ok its about resolution preview, now about the tessellation problem, you can choose one of these 3 options or play around with each settings :
讓我們談談鑲嵌的問題,你可以選擇這 3 個選項中的一個或三個都選來設置 :
1. before circular filleting an object, be sure your positional tolerance (in circular fillet option box) has been set to minimal value for better tessellation between two surfaces, you could set it to 0.010 (the default is 0.0100), and also you can change the tangent tolerance to about 0.0100, with this option and value, maya will create more tight connection between two surfaces.
1. 在 circular fillet 物體前,確認你的 positional tolerance( 在 circular fillet 選項里 ) 是否已經設置到最小的值,以便在兩個要 fillet 的曲面中得到最好的結果,你可以設為 0.010( 缺省就是 0.010), 同樣你也可以將 tangent tolerance 設為 0.0100, 在這種設置下, maya 可以在嚴謹的連接兩個曲面 .
2. maya has built-in automatic nurbs tessellation check located in the render menu. if you want to render your nurbs scene, all you have to do is select all of your nurbs objects, go to the render menu and select set nurbs tessellation, apply this function, then render the scene, it will reduce the gaps automatically. this feature evaluates a set frame (s) and automatically determines the optimum tessellation settings, which results in smoother surfaces without over-tessellation (of course this saves time and memory).
2.maya 會自動創建 nurbs 曲面的鑲嵌,你可以在 render menu 里查看它 . 如果你想渲染你的 nurbs 場景,你必需要做的是選擇你所有的 nurbs 物體,到你的 render menu 里設置 nurbs 鑲嵌,然后渲染場景,它可以減少縫隙 . 它會增加你的渲染時間和內存,但是可以使你的曲面平滑 .
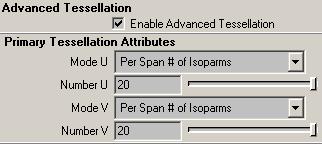
3. every time you're finished with fillet & trim, select your trimmed & filleted objects and set/turn on advanced tessellation and set number of uv to 20x20 (pic 14), and again, don't forget to set your render globals to production quality. it doesn't have to be 20x20, but i have found these to be good settings, but be carefull with this settings, the surfaces would very very smooth which increasing your rendering times.
3. 當你每次完成 fillet 和 trim 操作,選擇已被 fillet 和 trim 過的物體設置它們的 advanced tessllation 屬性,將 uv 設為 20x20(pic 14), 不要忘記在全局渲染里設置產品質量 . 雖然不一定要到 20x20, 但是我認為這是一個比較好的數值 , 請你注意使用這個方法,它會增加你的渲染時間 .

4. 如果遇上很糟糕的情況,你可以在兩個表面連接的地方之間增加你的 isoparm.
but i suggest you to use no.1 and no.2
但我認為你會使用 no.1 和 no.2 來改善這種情況 .
anyway...please...don't be to much worried about these gaps/space ..:) --- 不要太擔心這種情況 .
-----------------------------------------------
ha...still with me guys ?.....ok..let's continue our wheel lesson
circular fillet & trim (part 1)
important : you must turn on create curve on surface on circular fillet option box, otherwise you cannot trim the surface.
重要 : 在你 circular fillet 時,一定要在選項框中選擇在表面創建曲線,否則你將不能剪切曲面 .
to circular fillet, select lofted/extruded object first, then select main body object, then circular fillet it, this would help us to remember the last settings of circular fillet directions.
cirular fillet 前,先選擇 loft/extrude 的曲面,然后再選擇主要的面, circular fillet 它們,這樣會讓我們記得 circular fillet
[1] [2] 下一頁
新聞熱點
疑難解答