前言
最近在寫些小Demo復習基礎,在用到android/54108.html">EditText的時候突然發現之前幾乎沒有注意到它的光標和下劃線的顏色,于是花了不少時間,看了不少博客,現在就來總結和分享一下收獲,話不多說了,來一起看看詳細的介紹:
1、第一印象:原生的EditText
我們要在原生的EditText上修改,首先當然要認識一下它的本來面目。在Android Studio中新建一個工程,讓MainActivity繼承于AppCompatActivity(為什么要這樣做,后面再說),然后在MainActivity的布局中放置一個EditText:
<LinearLayout xmlns:android="http://schemas.android.com/apk/res/android" xmlns:app="http://schemas.android.com/apk/res-auto" android:orientation="vertical" xmlns:tools="http://schemas.android.com/tools" android:layout_width="match_parent" android:layout_height="match_parent" tools:context="com.lindroid.edittext.MainActivity"> <EditText android:hint="原生的EditText" android:layout_width="match_parent" android:layout_height="wrap_content" /> </LinearLayout>
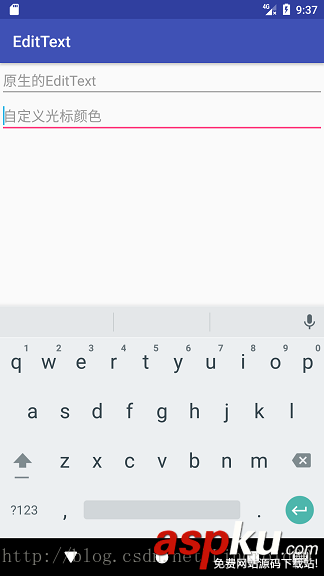
運行工程,仔細觀察可以看到光標和下劃線都是粉紅色的。現在就讓我們循序漸進,先修改它的光標顏色。

2、自定義光標顏色
EditText 有一個屬性:android:textCursorDrawable ,它就是用來設置光標樣式的。為了加深認識,大家先額外做個小實驗:將textCursorDrawable設置為@null,表示去除系統默認的樣式,但我們都記得隱藏光標的屬性是android:cursorVisible , 那么這時光標會是什么樣子的呢?你可以給文字(android:textColor)和提示文字(android:textColorHint屬性)設置不同的顏色,運行之后就會發現此時光標的顏色是跟文字的保持一致的。
了解了android:textCursorDrawable 的作用之后,我們可以在drawable資源文件夾下新建一個cursor_color.xml文件,內容如下
<?xml version="1.0" encoding="utf-8"?><shape xmlns:android="http://schemas.android.com/apk/res/android" android:shape="rectangle"> <size android:width="2dp" /> <solid android:color="@android:color/holo_blue_light" /></shape>
光標的顏色為系統自帶的淺藍色,寬度為2dp。在原生的EditText下面放置一個新的EditText:
<EditText android:textCursorDrawable="@drawable/cursor_color" android:hint="自定義光標顏色" android:layout_width="match_parent" android:layout_height="wrap_content" />
運行效果如下:

3、取消背景后的EditText
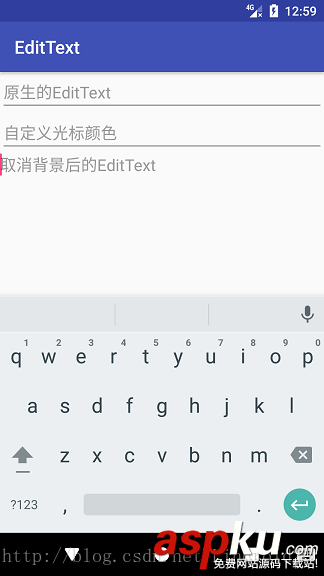
第2節中,我們將屬性android:textCursorDrawable 設置為“@null”之后發現光標的樣式會變得跟文字的顏色一樣,那么如果將整個EditText的背景設置為“@null”呢?我們可以添加一個EditText,然后為它增加屬性android:background="@null" :

可以看到,雖然光標的樣式沒有改變,但是下劃線消失了,不過除此之外,EditText的邊距也沒有了,如果不是光標在閃爍,一眼看上去就像個TextView了。
網上有些自定義EditText下劃線的教程就是這樣操作的,先把背景去除,再在下面加一個橫線。這樣的操作未嘗不可,但是為了美觀,還是得重新設置間距值。。
4、自定義主題修改下劃線
還記得剛才我們在創建MainActivity時要繼承AppCompatActivity嗎?到了這里就要揭曉答案了。這樣做是為了使用appcompat-v7包中的Material Design樣式,比如我們可以在Styles.xml文件中新建一個MyEditText樣式:
<style name="MyEditText" parent="Theme.AppCompat.Light"> <item name="colorControlNormal">@android:color/darker_gray</item> <item name="colorControlActivated">@android:color/holo_orange_dark</item> </style>
colorControlNormal 表示控件默認的顏色,colorControlActivated 表示控件被激活時的顏色,這樣,我們就可以分別設置EditText不被選中和選中時的顏色了。這里我將選中的顏色設為橙色。
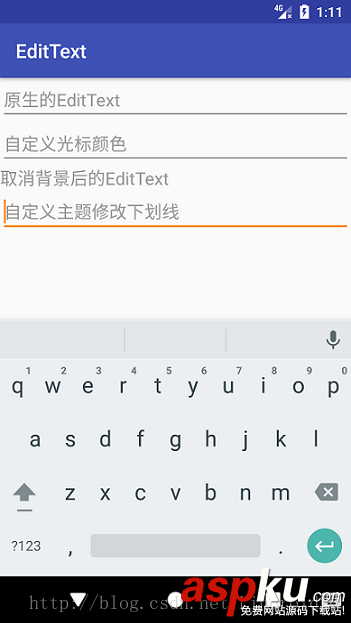
在activity_main.xml中再增加一個EditText,加上android:theme="@style/MyEditText" 屬性,效果如下:

可以看到,光標和下劃線的顏色都會修改掉,而間距還是會保留。
5、全局修改EditText顏色
前面的做法都是針對一個EditText來修改的,如果需要把項目中所有的EditText的顏色都改掉的話,那這樣做的話工作量就太大了。有沒有辦法可以一腳定江山的呢?
不知道你發現了沒有,為什么EditText默認是騷氣的粉紅色呢?事實上,你設置其他幾種控件(比如ProgressBar、Switch等等),它們的顏色基本上也是騷粉。你只要再看一眼剛才的styles.xml,里面的AppTheme的代碼是這樣的:
<style name="AppTheme" parent="Theme.AppCompat.Light.DarkActionBar"> <!-- Customize your theme here. --> <item name="colorPrimary">@color/colorPrimary</item> <item name="colorPrimaryDark">@color/colorPrimaryDark</item> <item name="colorAccent">@color/colorAccent</item> </style>
看到了嗎?里面的colorAccent就是那個騷粉色了。為了理解這三種顏色,我特地找了一張圖:

6、繼承Activity時自定義下劃線
前面我們做的自定義下劃線操作都是在繼承AppCompatActivity的前提下,如果你改成Activity,然后在Android5.0以下的手機運行的話,效果是這樣的:

Material Design風格消失了,光標的顏色雖然還能修改,但是下劃線的顏色卻改不了。所以我們還得另想方法。
EditText是一個輸入框,我們可以這樣理解:下劃線無非就是給輸入框的下邊框加一條線。這個用Android中的layer-list(圖層)就可以做到。新建兩個xml文件:et_underline_unselected.xml和et_underline_selected.xml,前者是EditText被選中時的背景,后者則是未被選中時的背景:
et_underline_unselected.xml
<?xml version="1.0" encoding="utf-8"?><layer-list xmlns:android="http://schemas.android.com/apk/res/android"> <item android:bottom="0dp" android:left="-2dp" android:right="-2dp" android:top="-2dp"> <shape> <solid android:color="@android:color/transparent" /> <stroke android:width="1dp" android:color="@android:color/darker_gray" /> <padding android:bottom="4dp" /> </shape> </item></layer-list>
et_underline_selected.xml
<?xml version="1.0" encoding="utf-8"?><layer-list xmlns:android="http://schemas.android.com/apk/res/android"> <item android:bottom="0dp" android:left="-2dp" android:right="-2dp" android:top="-2dp"> <shape> <solid android:color="@android:color/transparent" /> <stroke android:color="@android:color/holo_green_light" android:width="2dp" /> <padding android:bottom="4dp" /> </shape> </item></layer-list>
我將layer-list理解成一個圖層列表,shape就是列表中的一個item,由于我們只需要下邊框有橫線,所以除了shape在列表中的下邊距外都設為負值。光標和下劃線之間要有點距離,所以shape的下方內邊距設為4dp。當然,被選中時的下劃線寬度要大一點。
在項目中新建一個SecondActivity,繼承于Activity,然后在布局文件中放置兩個EditText,background都設為“@null”,光標就用我們之前的淺藍色。
<LinearLayout xmlns:android="http://schemas.android.com/apk/res/android" xmlns:app="http://schemas.android.com/apk/res-auto" xmlns:tools="http://schemas.android.com/tools" android:layout_width="match_parent" android:layout_height="match_parent" android:orientation="vertical" tools:context="com.lindroid.edittext.SecondActivity"> <EditText android:id="@+id/editText1" android:layout_width="match_parent" android:layout_height="wrap_content" android:layout_margin="3dp" android:background="@null" android:hint="自定義EditText下劃線1" android:textCursorDrawable="@drawable/cursor_color" /> <EditText android:id="@+id/editText2" android:layout_width="match_parent" android:layout_height="wrap_content" android:layout_margin="3dp" android:background="@null" android:hint="自定義EditText下劃線2" android:textCursorDrawable="@drawable/cursor_color" /></LinearLayout>
然后在代碼中設置EditText的監聽事件
/**初始化EditText,默認都為未選中狀態**/ editText1.setBackgroundResource(R.drawable.et_underline_unselected); editText2.setBackgroundResource(R.drawable.et_underline_unselected); /**第一個EditText的焦點監聽事件**/ editText1.setOnFocusChangeListener(new View.OnFocusChangeListener() { @Override public void onFocusChange(View v, boolean hasFocus) { if (hasFocus) { Log.e(TAG, "EditText1獲得焦點"); editText1.setBackgroundResource(R.drawable.et_underline_selected); } else { Log.e(TAG, "EditText1失去焦點"); editText1.setBackgroundResource(R.drawable.et_underline_unselected); } } }); /**第二個EditText的焦點監聽事件**/ editText2.setOnFocusChangeListener(new View.OnFocusChangeListener() { @Override public void onFocusChange(View v, boolean hasFocus) { if (hasFocus) { Log.e(TAG, "EditText2獲得焦點"); editText2.setBackgroundResource(R.drawable.et_underline_selected); } else { Log.e(TAG, "EditText2失去焦點"); editText2.setBackgroundResource(R.drawable.et_underline_unselected); } } });注意:要先將所有的EditText都設置為運行一下,效果如下:

效果我們是實現了,但是這樣一來Activity中的代碼顯得太冗長,因此我們可以將選中和未選中的狀態封裝到狀態選擇器中。在drawable文件夾下新建一個et_underline_selector.xml文件:
<?xml version="1.0" encoding="utf-8"?><selector xmlns:android="http://schemas.android.com/apk/res/android"> <item android:state_focused="false" android:drawable="@drawable/et_underline_unselected"/> <item android:state_focused="true" android:drawable="@drawable/et_underline_selected"/></selector>
android:state_focused表示控件是否獲得焦點。然后在布局文件中設置
android:background="@drawable/et_underline_selector" ,Activity的焦點監聽代碼刪去就可以了。運行,就可以看到一模一樣的效果了。
7、后記
文章至此就結束了,但是我要學的東西還有很多,文章里的某些知識出于我個人理解,可能會有不足或者錯誤,歡迎大家指正!
由于這里的代碼比較簡單,工程就不上傳了,大家動手敲一敲,相信沒有問題的。
以上就是這篇文章的全部內容了,希望本文的內容對大家的學習或者工作能帶來一定的幫助,如果有疑問大家可以留言交流,謝謝大家對VEVB武林網的支持。
新聞熱點
疑難解答