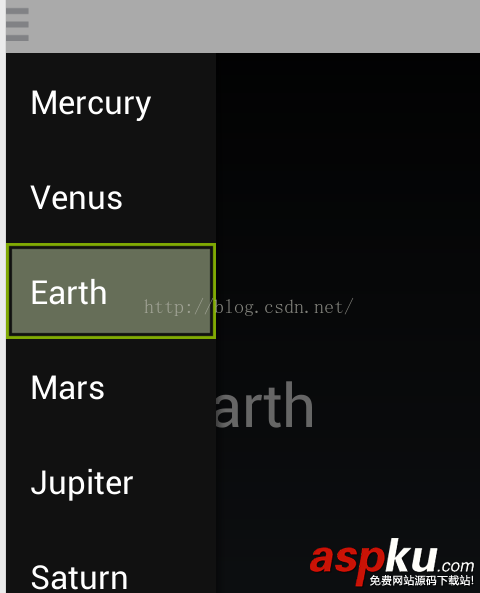
drawerLayout是Support Library包中實現了側滑菜單效果的控件,可以說drawerLayout是因為第三方控件如MenuDrawer等的出現之后,google借鑒而出現的產物。drawerLayout分為側邊菜單和主內容區兩部分,側邊菜單可以根據手勢展開與隱藏(drawerLayout自身特性),主內容區的內容可以隨著菜單的點擊而變化(這需要使用者自己實現)。
使用步驟:
創建一個DrawerLayout
為了添加導航抽屜,你需要在你的布局界面中聲明一個DrawerLayout對象作為布局的根節點。同時在DrawerLayout內部添加兩個view:
如下面例子所示:該布局使用了DrawerLayout它包含了兩個子節點:一個FrameLayout它包含了主要內容(在運行時將會被Fragment替換) 和 一個ListView作為導航抽屜,上面titlebar 上圖標,負責打開、關閉抽屜;
<?xml version="1.0" encoding="utf-8"?> <RelativeLayout xmlns:android="http://schemas.android.com/apk/res/android" xmlns:tools="http://schemas.android.com/tools" android:layout_width="match_parent" android:layout_height="match_parent" > <LinearLayout android:orientation="horizontal" android:layout_width="match_parent" android:id="@+id/titleBar" android:gravity="center_vertical" android:background="@android:color/darker_gray" android:layout_height="40dp"> <ImageView android:layout_width="wrap_content" android:layout_height="wrap_content" android:src="@drawable/ic_drawer" android:onClick="onClickDrawerOpened" android:clickable="true" android:id="@+id/imageView" /> </LinearLayout> <android.support.v4.widget.DrawerLayout android:id="@+id/drawer_layout" android:layout_below="@id/titleBar" android:layout_width="match_parent" android:layout_height="match_parent"> <!-- The main content view --> <FrameLayout android:id="@+id/content_frame" android:layout_width="match_parent" android:layout_height="match_parent"></FrameLayout> <!-- The navigation drawer --> <ListView android:id="@+id/left_drawer" android:layout_width="240dp" android:layout_height="match_parent" android:layout_gravity="start" android:background="#111" android:choiceMode="singleChoice" android:divider="@android:color/transparent" android:dividerHeight="0dp" /> </android.support.v4.widget.DrawerLayout> </RelativeLayout>
上面這個例子包含了一些重要的布局技巧:
初始化Drawer List
在你的Activity中,要做的第一件事是初始化導航抽屜的列表項。具體該怎么做根據你APP的內容來定,但是導航抽屜通常包含一個Listview,所以還需要一個相匹配的Adapter(比如 ArrayAdapter 或者 SimpleCursorAdapter)
下面的例子,告訴你該如何借助一個string array 來初始化一個導航list
public class MainActivity extends Activity { private DrawerLayout mDrawerLayout; private ListView mDrawerList; private String[] mPlanetTitles; @Override protected void onCreate(Bundle savedInstanceState) { super.onCreate(savedInstanceState); setContentView(R.layout.activity_main); mPlanetTitles = getResources().getStringArray(R.array.planets_array); mDrawerLayout = (DrawerLayout) findViewById(R.id.drawer_layout); mDrawerList = (ListView) findViewById(R.id.left_drawer); // set a custom shadow that overlays the main content when the drawer opens mDrawerLayout.setDrawerShadow(R.drawable.drawer_shadow, GravityCompat.START); // set up the drawer's list view with items and click listener mDrawerList.setAdapter(new ArrayAdapter<String>(this, R.layout.drawer_list_item, mPlanetTitles)); mDrawerList.setOnItemClickListener(new DrawerItemClickListener()); } //................................ } 處理導航點擊事件
當用戶選擇了抽屜列表里面的一個Item時, 系統調用onItemClickListener上的onItemClick(), 給setOnItemClickListener().
你在onItemClick()方法里面做什么, 取決于你的app實現的結構. 在下面的例子中, 選擇每一個Item都會在主要內容的布局中插入一個不同的Fragment.
private class DrawerItemClickListener implements ListView.OnItemClickListener { @Override public void onItemClick(AdapterView<?> parent, View view, int position, long id) { selectItem(position); } } private void selectItem(int position) { // update the main content by replacing fragments Fragment fragment = new PlanetFragment(); Bundle args = new Bundle(); args.putInt(PlanetFragment.ARG_PLANET_NUMBER, position); fragment.setArguments(args); FragmentManager fragmentManager = getFragmentManager(); fragmentManager.beginTransaction().replace(R.id.content_frame, fragment).commit(); // update selected item and title, then close the drawer mDrawerList.setItemChecked(position, true); mDrawerLayout.closeDrawer(mDrawerList); } 打開和關閉抽屜
使用onDrawerOpened()和onDrawerClosed () 打開和關閉抽屜:
public void onClickDrawerOpened(View drawerView) { if(!mDrawerLayout.isDrawerOpen(GravityCompat.START))//if not open ,open or close; { mDrawerLayout.openDrawer(mDrawerList); } else { mDrawerLayout.closeDrawer(mDrawerList); } } 效果圖:

Demo 下載
以上就是本文的全部內容,希望對大家的學習有所幫助,也希望大家多多支持VEVB武林網。
新聞熱點
疑難解答