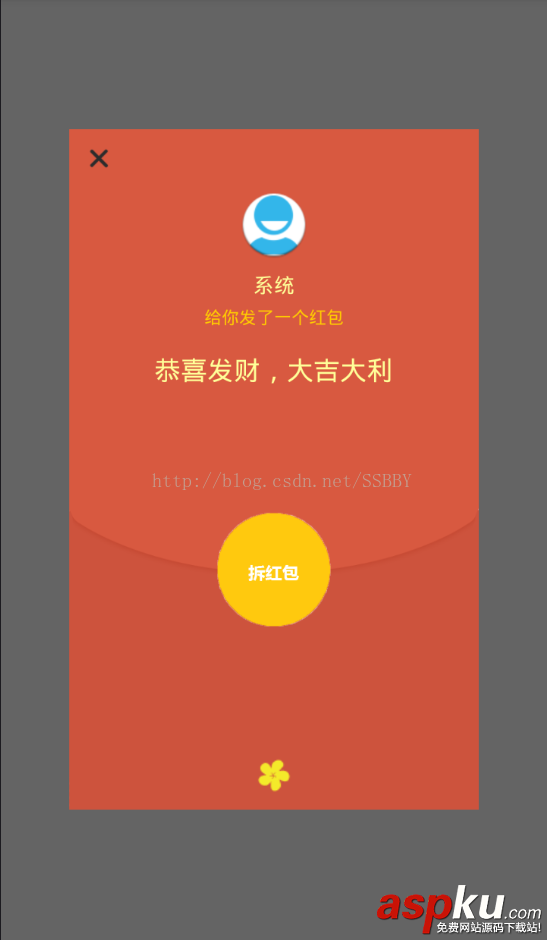
項目需要研究了一下微信紅包動畫,即硬幣轉動的效果,原理其實就是三張不同角度的圖片利用AnimationDrawable幀動畫進行播放,在參考了案例之后,給自己記錄一下完成的過程。
1,在XML文件中定義動畫:
步驟如下:
①新建 Android 項目
②在drawable目錄中新建一個anim.xml(注意文件名小寫)
<?xml version="1.0" encoding="utf-8"?> <animation-list xmlns:android="http://schemas.android.com/apk/res/android" android:oneshot="false"> <item android:drawable="@drawable/bag" android:duration="400"></item> <item android:drawable="@drawable/bag1" android:duration="400"></item> <item android:drawable="@drawable/bag2" android:duration="400"></item> </animation-list>
根標簽為animation-list,其中oneshot代表著是否只展示一遍,設置為false會不停的循環播放動畫根標簽下,通過item標簽對動畫中的每一個圖片進行聲明 ,android:duration 表示展示所用的該圖片的時間長度 ,可通過該參數來設置圖片旋轉的速度,其他屬性可以自行查找資料~
2,設置布局文件,效果以及代碼如下

<?xml version="1.0" encoding="utf-8"?> <LinearLayout xmlns:android="http://schemas.android.com/apk/res/android" android:orientation="vertical" android:layout_width="match_parent" android:layout_height="match_parent" android:gravity="center_vertical|center_horizontal" android:background="@drawable/background"> <!-- 關閉按鈕框 --> <LinearLayout android:id="@+id/top" android:layout_width="match_parent" android:layout_height="0dp" android:layout_weight="1"> <Button android:id="@+id/close" android:layout_width="32dp" android:layout_height="32dp" android:background="@drawable/close" android:layout_margin="10dp"/> </LinearLayout> <!-- 頭像以及相關文字 --> <LinearLayout android:layout_below="@+id/top" android:layout_width="match_parent" android:layout_height="0dp" android:layout_weight="10" android:orientation="vertical"> <RelativeLayout android:layout_width="match_parent" android:layout_height="0dp" android:layout_weight="3"> <ImageButton android:id="@+id/head_img" android:layout_width="60dp" android:layout_height="60dp" android:background="@drawable/ic_launcher" android:layout_alignParentTop="true" android:layout_centerHorizontal="true"/> <TextView android:id="@+id/name" android:layout_width="wrap_content" android:layout_height="wrap_content" android:text="系統用戶" android:layout_marginTop="10dp" android:layout_below="@+id/head_img" android:layout_centerHorizontal="true" android:textColor="@color/yellow" android:textSize="18sp"/> <TextView android:id="@+id/textView1" android:layout_width="wrap_content" android:layout_height="wrap_content" android:layout_below="@+id/name" android:layout_centerHorizontal="true" android:layout_marginTop="5dp" android:textSize="15sp" android:textColor="@color/yellow2" android:text="給你發了一個紅包"/> <TextView android:id="@+id/textView2" android:layout_below="@+id/textView1" android:layout_centerHorizontal="true" android:layout_width="wrap_content" android:layout_height="wrap_content" android:layout_marginTop="20dp" android:textColor="@color/yellow" android:textSize="23sp" android:text="恭喜發財,大吉大利"/> </RelativeLayout> <RelativeLayout android:layout_width="match_parent" android:layout_height="0dp" android:layout_weight="3"> <Button android:id="@+id/open_btn" android:layout_width="100dp" android:layout_height="100dp" android:background="@drawable/anim" android:layout_marginTop="50dp" android:layout_centerHorizontal="true" /> </RelativeLayout> <RelativeLayout android:layout_width="match_parent" android:layout_height="0dp" android:layout_weight="1"> <ImageView android:layout_width="wrap_content" android:layout_height="wrap_content" android:background="@drawable/blow" android:layout_alignParentBottom="true" android:layout_centerHorizontal="true" android:layout_marginBottom="14dp" android:id="@+id/imageView" /> </RelativeLayout> </LinearLayout> </LinearLayout>
3,實現紅包彈窗的效果,效果及代碼如下:
步驟如下:
①自定義紅包彈窗Diaog類:紅色代碼部分為啟動動畫部分

package com.example.xuboyu.luckeymoney; import android.app.Dialog; import android.content.Context; import android.content.DialogInterface; import android.graphics.drawable.AnimationDrawable; import android.view.Display; import android.view.Gravity; import android.view.LayoutInflater; import android.view.View; import android.view.ViewGroup; import android.view.WindowManager; import android.widget.Button; import android.widget.TextView; /** * 自定義紅包彈窗 * Created by xuboyu on 2017/2/20. */ public class LuckeyDialog extends Dialog { public LuckeyDialog(Context context) { super(context); } public LuckeyDialog(Context context, int theme) { super(context, theme); } public static class Builder { private Context context; private String name;//發紅包者的名稱 private Button red_page; //拆紅包按鈕 private String openButtonText; private OnClickListener openButtonClickListener; //關閉按鈕 private String closeButtonText; private OnClickListener closeButtonClickListener; public Builder(Context context, int dialog) { this.context = context; } /** * Set the Dialog title from resource * * @param name * @return */ public Builder setName(int name) { this.name = (String) context.getText(name); return this; } /** * Set the Dialog title from String * * @param name * @return */ public Builder setName(String name) { this.name = name; return this; } /** * Set the positive button resource and it's listener * * @param closeButtonText * @return */ public Builder setCloseButton(int closeButtonText, OnClickListener listener) { this.closeButtonText = (String) context .getText(closeButtonText); this.closeButtonClickListener = listener; return this; } public Builder setCloseButton(String closeButtonText, OnClickListener listener) { this.closeButtonText = closeButtonText; this.closeButtonClickListener = listener; return this; } /** * Set the positive button resource and it's listener * * @param openButtonText * @return */ public Builder setOpenButton(int openButtonText, OnClickListener listener) { this.openButtonText = (String) context .getText(openButtonText); this.openButtonClickListener = listener; return this; } public Builder setOpenButton(String openButtonText, OnClickListener listener) { this.openButtonText = openButtonText; this.openButtonClickListener = listener; return this; } public LuckeyDialog create() { LayoutInflater inflater = (LayoutInflater) context .getSystemService(Context.LAYOUT_INFLATER_SERVICE); //加載布局 final LuckeyDialog dialog = new LuckeyDialog(context,R.style.Dialog); View layout = inflater.inflate(R.layout.open, null); red_page = (Button) layout.findViewById(R.id.open_btn); <span style="color:#ff0000;">//red指的是需要播放動畫的ImageView控件 AnimationDrawable animationDrawable = (AnimationDrawable)red_page.getBackground(); animationDrawable.start();//啟動動畫</span> dialog.addContentView(layout, new ViewGroup.LayoutParams( ViewGroup.LayoutParams.FILL_PARENT, ViewGroup.LayoutParams.WRAP_CONTENT)); //設置發紅包者姓名 ((TextView) layout.findViewById(R.id.name)).setText(name); //設置拆紅包的按鈕 if (openButtonText != null) { ((Button) layout.findViewById(R.id.open_btn)) .setText(openButtonText); if (openButtonClickListener != null) { ((Button) layout.findViewById(R.id.open_btn)) .setOnClickListener(new View.OnClickListener() { public void onClick(View v) { openButtonClickListener.onClick(dialog, DialogInterface.BUTTON_POSITIVE); } }); } } else { // if no confirm button just set the visibility to GONE layout.findViewById(R.id.open_btn).setVisibility( View.GONE); } //設置關閉按鈕 if (closeButtonText != null) { ((Button) layout.findViewById(R.id.close)) .setText(closeButtonText); if (closeButtonClickListener != null) { ((Button) layout.findViewById(R.id.close)) .setOnClickListener(new View.OnClickListener() { public void onClick(View v) { closeButtonClickListener.onClick(dialog, DialogInterface.BUTTON_POSITIVE); } }); } } else { // if no confirm button just set the visibility to GONE layout.findViewById(R.id.close).setVisibility( View.GONE); } dialog.setContentView(layout); return dialog; } } } ②在系統style文件中新增一個Diaog
<style name="Dialog" parent="android:style/Theme.Dialog"> <!-- <item name="android:background">#00000000</item> --> <item name="android:windowBackground">@drawable/red_bg</item> <item name="android:windowFrame">@null</item> <item name="android:windowNoTitle">true</item> <item name="android:windowIsFloating">true</item><!-- 是否漂現在activity上 --> <item name="android:windowCloseOnTouchOutside">false</item </style>
③在MainActivity中調用自定義的Diaog類并實例化,并且設置彈出的紅包占屏幕的比例,不然彈出的紅包會占滿整個屏幕,紅色代碼為設置大小代碼。
red1.setOnClickListener(new View.OnClickListener() { @Override public void onClick(View view) { LuckeyDialog.Builder builder = new LuckeyDialog.Builder(mContext,R.style.Dialog);//調用style中的Diaog builder.setName("系統"); builder.setOpenButton("", new DialogInterface.OnClickListener() { public void onClick(DialogInterface dialog, int which) { Intent intent = new Intent(mContext,Open.class); startActivity(intent); dialog.dismiss(); } }); builder.setCloseButton("", new DialogInterface.OnClickListener() { @Override public void onClick(DialogInterface dialog, int i) { dialog.dismiss(); } }); <span style="color:#ff0000;">Dialog dialog = builder.create(); Window dialogWindow = dialog.getWindow(); WindowManager m = getWindowManager(); Display d = m.getDefaultDisplay(); // 獲取屏幕寬、高用 WindowManager.LayoutParams p = dialogWindow.getAttributes(); // 獲取對話框當前的參數值 p.height = (int) (d.getHeight() * 0.7); // 高度設置為屏幕的0.6 p.width = (int) (d.getWidth() * 0.75); // 寬度設置為屏幕的0.65 dialogWindow.setAttributes(p); </span> dialog.show(); } }); 4,完成點擊后的兩種結果,即搶到和未搶到的兩種結果,通過Intent跳轉領取成功類或者跳出失敗彈窗的簡單邏輯即可。
①搶到的效果圖,這里界面比較簡單就不貼代碼了。

②失敗彈窗的效果圖,這里的自定義彈窗代碼與紅包彈窗的代碼基本相似,區別就在于少了個拆紅包按鈕而已,布局也相對簡單,就不貼出來了,主要在這里面需要使用比例來規劃幾個部件的位置(參考上面的紅包代碼),否則無法適配多種屏幕,會出現壓縮拉伸變形的情況。

到這里粗略的紅包動畫效果就基本完成了!當然實際應用中需要用到網絡請求之類的,就再按照業務要求加入。
以上所述是小編給大家介紹的Android仿硬幣轉動微信紅包動畫效果,希望對大家有所幫助,如果大家有任何疑問請給我留言,小編會及時回復大家的。在此也非常感謝大家對VEVB武林網網站的支持!
新聞熱點
疑難解答