1、下載Nginx
官網地址:
http://nginx.org/
下載地址:
http://nginx.org/en/download.html

2、下載Windows Service Wrapper
官網地址:
https://github.com/kohsuke/winsw/
下載地址:
http://repo.jenkins-ci.org/releases/com/sun/winsw/winsw/


3、解壓Nginx壓縮包文件到C盤根目錄,并且重命名為nginx

4、將"winsw-1.19-bin.exe"重命名為"nginx-service.exe",并且復制到nginx根目錄

5、在nginx根目錄編寫nginx-service.xml文件

nginx-service.xml文件內容
<?xml version="1.0" encoding="UTF-8" ?><service> <id>Nginx</id> <name>Nginx</name> <description>本服務用于加載Nginx服務,請確保開機啟動。</description> <logpath>C:/nginx/logs</logpath> <executable>nginx.exe</executable> <stopexecutable>nginx.exe</stopexecutable> <stopargument>-s</stopargument> <stopargument>stop</stopargument> <logmode>rotate</logmode></service>
6、安裝Nginx系統服務或者卸載Nginx系統服務
6.1、安裝Nginx系統服務
按下Win+X+A鍵
打開命令提示符(管理員)
輸入:
C:/nginx/nginx-service.exe install

6.2、卸載Nginx系統服務
按下Win+X+A鍵
打開命令提示符(管理員)
輸入:
C:/nginx/nginx-service.exe uninstall

7、查看系統服務
7.1、進入服務


9、用命令方式啟動、關閉Nginx服務
9.1、啟動Nginx服務
按下Win+X+A鍵
打開命令提示符(管理員)
輸入:net start nginx

9.2、關閉Nginx服務
按下Win+X+A鍵
打開命令提示符(管理員)
輸入:net stop nginx

10、Windows查看進程和殺死進程
10.1、查看Nginx進程號
tasklist | findstr 服務名
按下Win+X+A鍵
打開命令提示符(管理員)
輸入:
tasklist | findstr nginx

10.2、使用tskill命令殺死進程(tskill PID)

11、配置Nginx文件
Nginx配置文件目錄:
C:/nginx/conf

11.1、編輯Nginx核心配置文件nginx.conf
# 根據你服務器的cpu核數來確定此值worker_processes 2;# events事件主要用來確定Nginx使用哪種算法events { worker_connections 1024;} http { #隱藏Nginx版本信息 server_tokens off; include mime.types; default_type application/octet-stream; sendfile on; keepalive_timeout 65; #代理的相關參數設置 fastcgi_connect_timeout 300; fastcgi_send_timeout 300; fastcgi_read_timeout 300; fastcgi_buffer_size 128k; fastcgi_buffers 4 128k; fastcgi_busy_buffers_size 256k; fastcgi_temp_file_write_size 256k; #啟用gzip壓縮,提高用戶訪問速度 gzip on; gzip_min_length 1k; gzip_buffers 4 32k; gzip_http_version 1.1; gzip_comp_level 2; gzip_types text/plain application/x-javascript text/css application/xml; gzip_vary on; gzip_disable "MSIE [1-6]."; server_names_hash_bucket_size 128; client_max_body_size 100m; client_header_buffer_size 256k; large_client_header_buffers 4 256k; #增加虛擬主機include vhosts.conf; }11.2、編輯Nginx虛擬主機配置文件vhosts.conf
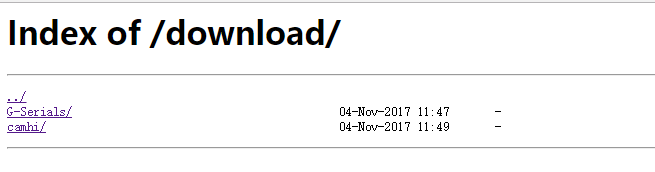
#NGINX安裝初始化server { listen 80; charset utf-8; server_name 127.0.0.1; location / { #打開瀏覽目錄 autoindex on; #顯示出文件的大概大小 autoindex_exact_size off; #顯示的文件時間為文件的服務器時間 autoindex_localtime on; root C:/wwwroot/html; index index.html index.htm; } } 12、創建網站根目錄
12.1、在C盤根目錄創建網站目錄,命名為"wwwroot"。

12.2、在網站根目錄放入站點目錄,命名為"html"。

12.3、瀏覽網頁

新聞熱點


疑難解答