注,操作系統(tǒng)為 CentOS 6.4 x86_64 , Nginx 是版本是最新版的1.4.2,所以實驗用到的軟件請點擊這里下載:
一、前言
在前面的幾篇博文中我們主要講解了Nginx作為Web服務(wù)器知識點,主要的知識點有nginx的理論詳解、nginx作為web服務(wù)器的操作講解、nginx作為LNMP架構(gòu)的講解,不清楚的博友可以回頭看看,在這一篇博客中我們主要講解, nginx的反向代理、負(fù)載均衡、緩存、URL重寫以及讀寫分離詳解。好了,下面我們來具體說一說。
二、環(huán)境準(zhǔn)備
1. 操作系統(tǒng)
CentOS 6.4 x86_64
2.軟件版本
Nginx 1.4.2
3.實驗拓?fù)?/p>
注,實驗拓?fù)湟娤挛摹?/p>
4.安裝yum源
[root@nginx ~]# rpm -ivh http://download.fedoraproject.org/pub/epel/6/x86_64/epel-release-6-8.noarch.rpm[root@web1 ~]# rpm -ivh http://download.fedoraproject.org/pub/epel/6/x86_64/epel-release-6-8.noarch.rpm[root@web2 ~]# rpm -ivh http://download.fedoraproject.org/pub/epel/6/x86_64/epel-release-6-8.noarch.rpm
5.各節(jié)點時間同步
[root@nginx ~]# ntpdate 202.120.2.101[root@web1 ~]# ntpdate 202.120.2.101[root@web2 ~]# ntpdate 202.120.2.101
6.關(guān)閉防火墻與SELinux
[root@nginx ~]# service iptables stop [root@nginx ~]# chkconfig iptables off [root@nginx ~]# getenforce Disabled[root@web1 ~]# service iptables stop [root@web1 ~]# chkconfig iptables off [root@web1 ~]# getenforce Disabled[root@web2 ~]# service iptables stop [root@web2 ~]# chkconfig iptables off [root@web2 ~]# getenforce Disabled
三、安裝Nginx
1.解壓
[root@nginx src]# tar xf nginx-1.4.2.tar.gz
2.新建nginx用戶與組
[root@nginx src]# groupadd -g 108 -r nginx [root@nginx src]# useradd -u 108 -r -g 108 nginx [root@nginx src]# id nginx uid=108(nginx) gid=108(nginx) 組=108(nginx)
3.準(zhǔn)備編譯配置文件
[root@nginx src]# yum install -y pcre-devel openssl-devel[root@nginx nginx-1.4.2]# ./configure --prefix=/usr --sbin-path=/usr/sbin/nginx --conf-path=/etc/nginx/nginx.conf --error-log-path=/var/log/nginx/error.log --http-log-path=/var/log/nginx/access.log --pid-path=/var/run/nginx/nginx.pid --lock-path=/var/lock/nginx.lock --user=nginx --group=nginx --with-http_ssl_module --with-http_flv_module --with-http_stub_status_module --with-http_gzip_static_module --http-client-body-temp-path=/var/tmp/nginx/client/ --http-proxy-temp-path=/var/tmp/nginx/proxy/ --http-fastcgi-temp-path=/var/tmp/nginx/fcgi/ --http-uwsgi-temp-path=/var/tmp/nginx/uwsgi --http-scgi-temp-path=/var/tmp/nginx/scgi --with-pcre
4.編譯并安裝
[root@nginx nginx-1.4.2]# make && make install
5.為nginx提供SysV init腳本
[root@nginx ~]# cat /etc/init.d/nginx #!/bin/sh # # nginx - this script starts and stops the nginx daemon # # chkconfig: - 85 15 # description: Nginx is an HTTP(S) server, HTTP(S) reverse / # proxy and IMAP/POP3 proxy server # processname: nginx # config: /etc/nginx/nginx.conf # config: /etc/sysconfig/nginx # pidfile: /var/run/nginx.pid # Source function library. . /etc/rc.d/init.d/functions # Source networking configuration. . /etc/sysconfig/network # Check that networking is up. [ "$NETWORKING" = "no" ] && exit 0 nginx="/usr/sbin/nginx" prog=$(basename $nginx) NGINX_CONF_FILE="/etc/nginx/nginx.conf" [ -f /etc/sysconfig/nginx ] && . /etc/sysconfig/nginx lockfile=/var/lock/subsys/nginx make_dirs() { # make required directories user=`nginx -V 2>&1 | grep "configure arguments:" | sed 's/[^*]*--user=/([^ ]*/).*//1/g' -` options=`$nginx -V 2>&1 | grep 'configure arguments:'` for opt in $options; do if [ `echo $opt | grep '.*-temp-path'` ]; then value=`echo $opt | cut -d "=" -f 2` if [ ! -d "$value" ]; then # echo "creating" $value mkdir -p $value && chown -R $user $value fi fi done } start() { [ -x $nginx ] || exit 5 [ -f $NGINX_CONF_FILE ] || exit 6 make_dirs echo -n $"Starting $prog: " daemon $nginx -c $NGINX_CONF_FILE retval=$? echo [ $retval -eq 0 ] && touch $lockfile return $retval } stop() { echo -n $"Stopping $prog: " killproc $prog -QUIT retval=$? echo [ $retval -eq 0 ] && rm -f $lockfile return $retval } restart() { configtest || return $? stop sleep 1 start } reload() { configtest || return $? echo -n $"Reloading $prog: " killproc $nginx -HUP RETVAL=$? echo } force_reload() { restart } configtest() { $nginx -t -c $NGINX_CONF_FILE } rh_status() { status $prog } rh_status_q() { rh_status >/dev/null 2>&1 } case "$1" in start) rh_status_q && exit 0 $1 ;; stop) rh_status_q || exit 0 $1 ;; restart|configtest) $1 ;; reload) rh_status_q || exit 7 $1 ;; force-reload) force_reload ;; status) rh_status ;; condrestart|try-restart) rh_status_q || exit 0 ;; *) echo $"Usage: $0 {start|stop|status|restart|condrestart|try-restart|reload|force-reload|configtest}" exit 2 esac6.為此腳本賦予執(zhí)行權(quán)限
[root@nginx ~]# chmod +x /etc/init.d/nginx
7.添加至服務(wù)管理列表,并讓其開機自動啟動
[root@nginx ~]# chkconfig --add nginx [root@nginx ~]# chkconfig nginx on [root@nginx ~]# chkconfig nginx --list nginx 0:關(guān)閉 1:關(guān)閉 2:啟用 3:啟用 4:啟用 5:啟用 6:關(guān)閉
8.啟動nginx
[root@nginx ~]# service nginx start 正在啟動 nginx: [確定]
9.查看一下端口
[root@nginx ~]# netstat -ntlp | grep :80 tcp 0 0 0.0.0.0:80 0.0.0.0:* LISTEN 3889/nginx
10.測試一下
載均衡、頁面緩存、URL重寫及讀寫分離詳解")
好了,Nginx安裝與配置就到這里,下面我們來說一說Nginx的反向代理。
四、Nginx之反向代理
在配置nginx反向代理之間我們得先準(zhǔn)備兩臺測試服務(wù)器,Web1與Web2。
1.安裝httpd
[root@web1 ~]# yum install -y httpd[root@web2 ~]# yum install -y httpd
2.提供測試頁面
[root@web1 ~]# echo "<h1>web1.test.com</h1>" > /var/www/html/index.html[root@web2 ~]# echo "<h1>web2.test.com</h1>" > /var/www/html/index.html
3.啟動httpd服務(wù)
[root@web1 ~]# service httpd start 正在啟動 httpd: [確定][root@web2 ~]# service httpd start 正在啟動 httpd: [確定]
4.測試一下
載均衡、頁面緩存、URL重寫及讀寫分離詳解")
載均衡、頁面緩存、URL重寫及讀寫分離詳解")
5.簡單說一下,正向代理與反向代理
(1).正向代理的概念
正向代理,也就是傳說中的代理,他的工作原理就像一個跳板,簡單的說,我是一個用戶,我訪問不了某網(wǎng)站,但是我能訪問一個代理服務(wù)器,這個代理服務(wù)器呢,他能訪問那個我不能訪問的網(wǎng)站,于是我先連上代理服務(wù)器,告訴他我需要那個無法訪問網(wǎng)站的內(nèi)容,代理服務(wù)器去取回來,然后返回給我。從網(wǎng)站的角度,只在代理服務(wù)器來取內(nèi)容的時候有一次記錄,有時候并不知道是用戶的請求,也隱藏了用戶的資料,這取決于代理告不告訴網(wǎng)站。
結(jié)論就是,正向代理 是一個位于客戶端和原始服務(wù)器(origin server)之間的服務(wù)器,為了從原始服務(wù)器取得內(nèi)容,客戶端向代理發(fā)送一個請求并指定目標(biāo)(原始服務(wù)器),然后代理向原始服務(wù)器轉(zhuǎn)交請求并將獲得的內(nèi)容返回給客戶端。客戶端必須要進行一些特別的設(shè)置才能使用正向代理。
(2).反向代理的概念
繼續(xù)舉例:
例用戶訪問 http://www.test.com/readme,但www.test.com上并不存在readme頁面,他是偷偷從另外一臺服務(wù)器上取回來,然后作為自己的內(nèi)容返回用戶,但用戶并不知情。這里所提到的 www.test.com 這個域名對應(yīng)的服務(wù)器就設(shè)置了反向代理功能。
結(jié)論就是,反向代理正好相反,對于客戶端而言它就像是原始服務(wù)器,并且客戶端不需要進行任何特別的設(shè)置。客戶端向反向代理的命名空間(name-space)中的內(nèi)容發(fā)送普通請求,接著反向代理將判斷向何處(原始服務(wù)器)轉(zhuǎn)交請求,并將獲得的內(nèi)容返回給客戶端,就像這些內(nèi)容原本就是它自己的一樣。
(3).兩者區(qū)別
從用途上來講:
正向代理的典型用途是為在防火墻內(nèi)的局域網(wǎng)客戶端提供訪問Internet的途徑。正向代理還可以使用緩沖特性減少網(wǎng)絡(luò)使用率。反向代理的典型用途是將防火墻后面的服務(wù)器提供給Internet用戶訪問。反向代理還可以為后端的多臺服務(wù)器提供負(fù)載平衡,或為后端較慢的服務(wù)器提供緩沖服務(wù)。另外,反向代理還可以啟用高級URL策略和管理技術(shù),從而使處于不同web服務(wù)器系統(tǒng)的web頁面同時存在于同一個URL空間下。
從安全性來講:
正向代理允許客戶端通過它訪問任意網(wǎng)站并且隱藏客戶端自身,因此你必須采取安全措施以確保僅為經(jīng)過授權(quán)的客戶端提供服務(wù)。反向代理對外都是透明的,訪問者并不知道自己訪問的是一個代理。
6.nginx 代理模塊
http 代理官方中文文檔:http://www.howtocn.org/nginx:nginx%E6%A8%A1%E5%9D%97%E5%8F%82%E8%80%83%E6%89%8B%E5%86%8C%E4%B8%AD%E6%96%87%E7%89%88:standardhttpmodules:httpproxy
說明:代理模塊的指令有很多我這里只講解重要的proxy_pass,想了解更多代理指令請參考官方中文文檔。
這個模塊可以轉(zhuǎn)發(fā)請求到其他的服務(wù)器。HTTP/1.0無法使用keepalive(后端服務(wù)器將為每個請求創(chuàng)建并且刪除連接)。nginx為瀏覽器發(fā)送HTTP/1.1并為后端服務(wù)器發(fā)送HTTP/1.0,這樣瀏覽器就可以為瀏覽器處理keepalive。
如下例:
location / { proxy_pass http://localhost:8000; proxy_set_header X-Real-IP $remote_addr;}注意,當(dāng)使用http proxy模塊(甚至FastCGI),所有的連接請求在發(fā)送到后端服務(wù)器之前nginx將緩存它們,因此,在測量從后端傳送的數(shù)據(jù)時,它的進度顯示可能不正確。
實驗拓?fù)洌?/p>
載均衡、頁面緩存、URL重寫及讀寫分離詳解")
7.配置http反向代理
[root@nginx ~]# cd /etc/nginx/[root@nginx nginx]# cp nginx.conf nginx.conf.bak #備份一個原配置文件[root@nginx nginx]# vim nginx.conflocation / { proxy_pass http://192.168.18.201; }指令說明:proxy_pass
語法:proxy_pass URL
默認(rèn)值:no
使用字段:location, location中的if字段
這個指令設(shè)置被代理服務(wù)器的地址和被映射的URI,地址可以使用主機名或IP加端口號的形式,例如:proxy_pass http://localhost:8000/uri/;
8.重新加載一下配置文件
[root@nginx ~]# service nginx reloadnginx: the configuration file /etc/nginx/nginx.conf syntax is oknginx: configuration file /etc/nginx/nginx.conf test is successful重新載入 nginx: [確定]
9.測試一下
載均衡、頁面緩存、URL重寫及讀寫分離詳解")
注,大家可以看到,當(dāng)我們訪問192.168.18.208時,被代理重新定向到Web1上。
10.查看一下Web服務(wù)器日志
[root@web1 ~]# tail /var/log/httpd/access_log192.168.18.208 - - [04/Sep/2013:00:14:20 +0800] "GET /favicon.ico HTTP/1.0" 404 289 "-" "Mozilla/5.0 (Windows NT 6.1; WOW64) AppleWebKit/537.36 (KHTML, like Gecko) Chrome/28.0.1500.95 Safari/537.36"192.168.18.208 - - [04/Sep/2013:00:14:20 +0800] "GET / HTTP/1.0" 200 23 "-" "Mozilla/5.0 (Windows NT 6.1; WOW64) AppleWebKit/537.36 (KHTML, like Gecko) Chrome/28.0.1500.95 Safari/537.36"192.168.18.208 - - [04/Sep/2013:00:14:20 +0800] "GET /favicon.ico HTTP/1.0" 404 289 "-" "Mozilla/5.0 (Windows NT 6.1; WOW64) AppleWebKit/537.36 (KHTML, like Gecko) Chrome/28.0.1500.95 Safari/537.36"192.168.18.138 - - [04/Sep/2013:00:14:45 +0800] "GET / HTTP/1.1" 200 23 "-" "Mozilla/5.0 (Windows NT 6.1; WOW64) AppleWebKit/537.36 (KHTML, like Gecko) Chrome/28.0.1500.95 Safari/537.36"192.168.18.138 - - [04/Sep/2013:00:14:48 +0800] "GET /favicon.ico HTTP/1.1" 404 289 "-" "Mozilla/5.0 (Windows NT 6.1; WOW64) AppleWebKit/537.36 (KHTML, like Gecko) Chrome/28.0.1500.95 Safari/537.36"192.168.18.208 - - [04/Sep/2013:00:14:55 +0800] "GET /favicon.ico HTTP/1.0" 404 289 "-" "Mozilla/5.0 (Windows NT 6.1; WOW64) AppleWebKit/537.36 (KHTML, like Gecko) Chrome/28.0.1500.95 Safari/537.36"192.168.18.208 - - [04/Sep/2013:00:15:05 +0800] "GET /favicon.ico HTTP/1.0" 404 289 "-" "Mozilla/5.0 (Windows NT 6.1; WOW64) AppleWebKit/537.36 (KHTML, like Gecko) Chrome/28.0.1500.95 Safari/537.36"192.168.18.208 - - [04/Sep/2013:00:15:13 +0800] "GET /favicon.ico HTTP/1.0" 404 289 "-" "Mozilla/5.0 (Windows NT 6.1; WOW64) AppleWebKit/537.36 (KHTML, like Gecko) Chrome/28.0.1500.95 Safari/537.36"192.168.18.208 - - [04/Sep/2013:00:15:16 +0800] "GET / HTTP/1.0" 200 23 "-" "Mozilla/5.0 (Windows NT 6.1; WOW64) AppleWebKit/537.36 (KHTML, like Gecko) Chrome/28.0.1500.95 Safari/537.36"192.168.18.208 - - [04/Sep/2013:00:15:16 +0800] "GET /favicon.ico HTTP/1.0" 404 289 "-" "Mozilla/5.0 (Windows NT 6.1; WOW64) AppleWebKit/537.36 (KHTML, like Gecko) Chrome/28.0.1500.95 Safari/537.36"
注,大家可以看到我們這里的客戶的IP全是,nginx代理服務(wù)器的IP,并不是真實客戶端的IP。下面我們修改一下,讓日志的IP顯示真實的客戶端的IP。
11.修改nginx配置文件
location / { proxy_pass http://192.168.18.201; proxy_set_header X-Real-IP $remote_addr; #加上這一行}指令說明:proxy_set_header
語法:proxy_set_header header value
默認(rèn)值: Host and Connection
使用字段:http, server, location
這個指令允許將發(fā)送到被代理服務(wù)器的請求頭重新定義或者增加一些字段。這個值可以是一個文本,變量或者它們的組合。proxy_set_header在指定的字段中沒有定義時會從它的上級字段繼承。
12.重新加載一下配置文件
[root@nginx ~]# service nginx reloadnginx: the configuration file /etc/nginx/nginx.conf syntax is oknginx: configuration file /etc/nginx/nginx.conf test is successful重新載入 nginx: [確定]
13.測試并查看日志
[root@web1 ~]# tail /var/log/httpd/access_log192.168.18.208 - - [03/Sep/2013:16:26:18 +0800] "GET / HTTP/1.0" 200 23 "-" "Mozilla/5.0 (compatible; MSIE 10.0; Windows NT 6.1; WOW64; Trident/6.0)"192.168.18.208 - - [03/Sep/2013:16:26:18 +0800] "GET / HTTP/1.0" 200 23 "-" "Mozilla/5.0 (compatible; MSIE 10.0; Windows NT 6.1; WOW64; Trident/6.0)"192.168.18.208 - - [03/Sep/2013:16:26:18 +0800] "GET / HTTP/1.0" 200 23 "-" "Mozilla/5.0 (compatible; MSIE 10.0; Windows NT 6.1; WOW64; Trident/6.0)"192.168.18.208 - - [03/Sep/2013:16:26:18 +0800] "GET / HTTP/1.0" 200 23 "-" "Mozilla/5.0 (compatible; MSIE 10.0; Windows NT 6.1; WOW64; Trident/6.0)"192.168.18.208 - - [03/Sep/2013:16:26:18 +0800] "GET / HTTP/1.0" 200 23 "-" "Mozilla/5.0 (compatible; MSIE 10.0; Windows NT 6.1; WOW64; Trident/6.0)"192.168.18.208 - - [03/Sep/2013:16:26:18 +0800] "GET / HTTP/1.0" 200 23 "-" "Mozilla/5.0 (compatible; MSIE 10.0; Windows NT 6.1; WOW64; Trident/6.0)"192.168.18.208 - - [03/Sep/2013:16:26:18 +0800] "GET / HTTP/1.0" 200 23 "-" "Mozilla/5.0 (compatible; MSIE 10.0; Windows NT 6.1; WOW64; Trident/6.0)"192.168.18.208 - - [03/Sep/2013:16:26:18 +0800] "GET / HTTP/1.0" 200 23 "-" "Mozilla/5.0 (compatible; MSIE 10.0; Windows NT 6.1; WOW64; Trident/6.0)"192.168.18.208 - - [03/Sep/2013:16:26:18 +0800] "GET / HTTP/1.0" 200 23 "-" "Mozilla/5.0 (compatible; MSIE 10.0; Windows NT 6.1; WOW64; Trident/6.0)"192.168.18.208 - - [03/Sep/2013:16:26:18 +0800] "GET / HTTP/1.0" 200 23 "-" "Mozilla/5.0 (compatible; MSIE 10.0; Windows NT 6.1; WOW64; Trident/6.0)"
注,大家可以看到日志記錄的還是代理的IP,沒有顯示真實客戶端的IP,為什么呢?我們來看一下httpd的配置文件。
14.查看并修改httpd配置文件
[root@web1 ~]# vim /etc/httpd/conf/httpd.conf
載均衡、頁面緩存、URL重寫及讀寫分離詳解")
注,大家可以這里記錄日志的參數(shù)還是%h,下面我們修改一下參數(shù)。
載均衡、頁面緩存、URL重寫及讀寫分離詳解")
注,這是修改后的參數(shù),將h%修改為%{X-Real-IP}i,好的下面我們再來測試一下。
15.重啟并測試
[root@web1 ~]# service httpd restart停止 httpd: [確定]正在啟動 httpd: [確定][root@web1 ~]# tail /var/log/httpd/access_log192.168.18.138 - - [03/Sep/2013:17:09:14 +0800] "GET / HTTP/1.0" 200 23 "-" "Mozilla/5.0 (compatible; MSIE 10.0; Windows NT 6.1; WOW64; Trident/6.0)"192.168.18.138 - - [03/Sep/2013:17:09:14 +0800] "GET / HTTP/1.0" 200 23 "-" "Mozilla/5.0 (compatible; MSIE 10.0; Windows NT 6.1; WOW64; Trident/6.0)"192.168.18.138 - - [03/Sep/2013:17:09:15 +0800] "GET / HTTP/1.0" 200 23 "-" "Mozilla/5.0 (compatible; MSIE 10.0; Windows NT 6.1; WOW64; Trident/6.0)"192.168.18.138 - - [03/Sep/2013:17:09:15 +0800] "GET / HTTP/1.0" 200 23 "-" "Mozilla/5.0 (compatible; MSIE 10.0; Windows NT 6.1; WOW64; Trident/6.0)"192.168.18.138 - - [03/Sep/2013:17:09:15 +0800] "GET / HTTP/1.0" 200 23 "-" "Mozilla/5.0 (compatible; MSIE 10.0; Windows NT 6.1; WOW64; Trident/6.0)"192.168.18.138 - - [03/Sep/2013:17:09:15 +0800] "GET / HTTP/1.0" 200 23 "-" "Mozilla/5.0 (compatible; MSIE 10.0; Windows NT 6.1; WOW64; Trident/6.0)"192.168.18.138 - - [03/Sep/2013:17:09:15 +0800] "GET / HTTP/1.0" 200 23 "-" "Mozilla/5.0 (compatible; MSIE 10.0; Windows NT 6.1; WOW64; Trident/6.0)"192.168.18.138 - - [03/Sep/2013:17:09:15 +0800] "GET / HTTP/1.0" 200 23 "-" "Mozilla/5.0 (compatible; MSIE 10.0; Windows NT 6.1; WOW64; Trident/6.0)"192.168.18.138 - - [03/Sep/2013:17:09:15 +0800] "GET / HTTP/1.0" 200 23 "-" "Mozilla/5.0 (compatible; MSIE 10.0; Windows NT 6.1; WOW64; Trident/6.0)"192.168.18.138 - - [03/Sep/2013:17:09:15 +0800] "GET / HTTP/1.0" 200 23 "-" "Mozilla/5.0 (compatible; MSIE 10.0; Windows NT 6.1; WOW64; Trident/6.0)"
注,大家可以看到現(xiàn)在的日志里記錄的IP地址就是真實的客戶端地址了。好了,到這里Nginx代理后端一臺服務(wù)器就演示到這里,下面我們繼續(xù)說。
五、Nginx之負(fù)載均衡
注,大家可以看到,由于我們網(wǎng)站是發(fā)展初期,nginx只代理了后端一臺服務(wù)器,但由于我們網(wǎng)站名氣大漲訪問的人越來越多一臺服務(wù)器實在是頂不住,于是我們加了多臺服務(wù)器,那么多臺服務(wù)器又怎么配置代理呢,我們這里以兩臺服務(wù)器為案例,為大家做演示。
1.upstream 負(fù)載均衡模塊說明
案例:
下面設(shè)定負(fù)載均衡的服務(wù)器列表。
upstream test.net{ip_hash;server 192.168.10.13:80;server 192.168.10.14:80 down;server 192.168.10.15:8009 max_fails=3 fail_timeout=20s;server 192.168.10.16:8080;}server { location / { proxy_pass http://test.net; }}upstream是Nginx的HTTP Upstream模塊,這個模塊通過一個簡單的調(diào)度算法來實現(xiàn)客戶端IP到后端服務(wù)器的負(fù)載均衡。在上面的設(shè)定中,通過upstream指令指定了一個負(fù)載均衡器的名稱test.NET。這個名稱可以任意指定,在后面需要用到的地方直接調(diào)用即可。
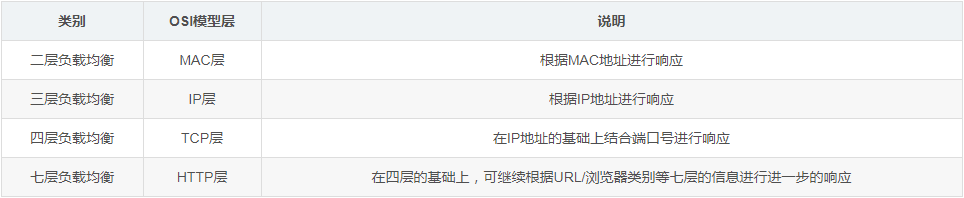
2.upstream 支持的負(fù)載均衡算法
Nginx的負(fù)載均衡模塊目前支持4種調(diào)度算法,下面進行分別介紹,其中后兩項屬于第三方調(diào)度算法。
3.upstream 支持的狀態(tài)參數(shù)
在HTTP Upstream模塊中,可以通過server指令指定后端服務(wù)器的IP地址和端口,同時還可以設(shè)定每個后端服務(wù)器在負(fù)載均衡調(diào)度中的狀態(tài)。常用的狀態(tài)有:
注,當(dāng)負(fù)載調(diào)度算法為ip_hash時,后端服務(wù)器在負(fù)載均衡調(diào)度中的狀態(tài)不能是weight和backup。
4.實驗拓?fù)?/p>
載均衡、頁面緩存、URL重寫及讀寫分離詳解")
5.配置nginx負(fù)載均衡
[root@nginx ~]# vim /etc/nginx/nginx.confupstream webservers { server 192.168.18.201 weight=1; server 192.168.18.202 weight=1; } server { listen 80; server_name localhost; #charset koi8-r; #access_log logs/host.access.log main; location / { proxy_pass http://webservers; proxy_set_header X-Real-IP $remote_addr; }}注,upstream是定義在server{ }之外的,不能定義在server{ }內(nèi)部。定義好upstream之后,用proxy_pass引用一下即可。
6.重新加載一下配置文件
[root@nginx ~]# service nginx reloadnginx: the configuration file /etc/nginx/nginx.conf syntax is oknginx: configuration file /etc/nginx/nginx.conf test is successful重新載入 nginx: [確定]
7.測試一下
載均衡、頁面緩存、URL重寫及讀寫分離詳解")
載均衡、頁面緩存、URL重寫及讀寫分離詳解")
注,大家可以不斷的刷新瀏覽的內(nèi)容,可以發(fā)現(xiàn)web1與web2是交替出現(xiàn)的,達到了負(fù)載均衡的效果。
8.查看一下Web訪問服務(wù)器日志
Web1:
[root@web1 ~]# tail /var/log/httpd/access_log192.168.18.138 - - [04/Sep/2013:09:41:58 +0800] "GET / HTTP/1.0" 200 23 "-" "Mozilla/5.0 (compatible; MSIE 10.0; Windows NT 6.1; WOW64; Trident/6.0)"192.168.18.138 - - [04/Sep/2013:09:41:58 +0800] "GET / HTTP/1.0" 200 23 "-" "Mozilla/5.0 (compatible; MSIE 10.0; Windows NT 6.1; WOW64; Trident/6.0)"192.168.18.138 - - [04/Sep/2013:09:41:59 +0800] "GET / HTTP/1.0" 200 23 "-" "Mozilla/5.0 (compatible; MSIE 10.0; Windows NT 6.1; WOW64; Trident/6.0)"192.168.18.138 - - [04/Sep/2013:09:41:59 +0800] "GET / HTTP/1.0" 200 23 "-" "Mozilla/5.0 (compatible; MSIE 10.0; Windows NT 6.1; WOW64; Trident/6.0)"192.168.18.138 - - [04/Sep/2013:09:42:00 +0800] "GET / HTTP/1.0" 200 23 "-" "Mozilla/5.0 (compatible; MSIE 10.0; Windows NT 6.1; WOW64; Trident/6.0)"192.168.18.138 - - [04/Sep/2013:09:42:00 +0800] "GET / HTTP/1.0" 200 23 "-" "Mozilla/5.0 (compatible; MSIE 10.0; Windows NT 6.1; WOW64; Trident/6.0)"192.168.18.138 - - [04/Sep/2013:09:42:00 +0800] "GET / HTTP/1.0" 200 23 "-" "Mozilla/5.0 (compatible; MSIE 10.0; Windows NT 6.1; WOW64; Trident/6.0)"192.168.18.138 - - [04/Sep/2013:09:44:21 +0800] "GET / HTTP/1.0" 200 23 "-" "Mozilla/5.0 (compatible; MSIE 10.0; Windows NT 6.1; WOW64; Trident/6.0)"192.168.18.138 - - [04/Sep/2013:09:44:22 +0800] "GET / HTTP/1.0" 200 23 "-" "Mozilla/5.0 (compatible; MSIE 10.0; Windows NT 6.1; WOW64; Trident/6.0)"192.168.18.138 - - [04/Sep/2013:09:44:22 +0800] "GET / HTTP/1.0" 200 23 "-" "Mozilla/5.0 (compatible; MSIE 10.0; Windows NT 6.1; WOW64; Trident/6.0)"
Web2:
先修改一下,Web服務(wù)器記錄日志的格式。
[root@web2 ~]# vim /etc/httpd/conf/httpd.confLogFormat "%{X-Real-IP}i %l %u %t /"%r/" %>s %b /"%{Referer}i/" /"%{User-Agent}i/"" combined[root@web2 ~]# service httpd restart停止 httpd: [確定]正在啟動 httpd: [確定]接著,再訪問多次,繼續(xù)查看日志。
[root@web2 ~]# tail /var/log/httpd/access_log192.168.18.138 - - [04/Sep/2013:09:50:28 +0800] "GET / HTTP/1.0" 200 23 "-" "Mozilla/5.0 (compatible; MSIE 10.0; Windows NT 6.1; WOW64; Trident/6.0)"192.168.18.138 - - [04/Sep/2013:09:50:28 +0800] "GET / HTTP/1.0" 200 23 "-" "Mozilla/5.0 (compatible; MSIE 10.0; Windows NT 6.1; WOW64; Trident/6.0)"192.168.18.138 - - [04/Sep/2013:09:50:28 +0800] "GET / HTTP/1.0" 200 23 "-" "Mozilla/5.0 (compatible; MSIE 10.0; Windows NT 6.1; WOW64; Trident/6.0)"192.168.18.138 - - [04/Sep/2013:09:50:28 +0800] "GET / HTTP/1.0" 200 23 "-" "Mozilla/5.0 (compatible; MSIE 10.0; Windows NT 6.1; WOW64; Trident/6.0)"192.168.18.138 - - [04/Sep/2013:09:50:28 +0800] "GET / HTTP/1.0" 200 23 "-" "Mozilla/5.0 (compatible; MSIE 10.0; Windows NT 6.1; WOW64; Trident/6.0)"192.168.18.138 - - [04/Sep/2013:09:50:28 +0800] "GET / HTTP/1.0" 200 23 "-" "Mozilla/5.0 (compatible; MSIE 10.0; Windows NT 6.1; WOW64; Trident/6.0)"192.168.18.138 - - [04/Sep/2013:09:50:28 +0800] "GET / HTTP/1.0" 200 23 "-" "Mozilla/5.0 (compatible; MSIE 10.0; Windows NT 6.1; WOW64; Trident/6.0)"192.168.18.138 - - [04/Sep/2013:09:50:28 +0800] "GET / HTTP/1.0" 200 23 "-" "Mozilla/5.0 (compatible; MSIE 10.0; Windows NT 6.1; WOW64; Trident/6.0)"192.168.18.138 - - [04/Sep/2013:09:50:29 +0800] "GET / HTTP/1.0" 200 23 "-" "Mozilla/5.0 (compatible; MSIE 10.0; Windows NT 6.1; WOW64; Trident/6.0)"192.168.18.138 - - [04/Sep/2013:09:50:29 +0800] "GET / HTTP/1.0" 200 23 "-" "Mozilla/5.0 (compatible; MSIE 10.0; Windows NT 6.1; WOW64; Trident/6.0)"
注,大家可以看到,兩臺服務(wù)器日志都記錄是192.168.18.138訪問的日志,也說明了負(fù)載均衡配置成功。
9.配置nginx進行健康狀態(tài)檢查
[root@nginx ~]# vim /etc/nginx/nginx.confupstream webservers { server 192.168.18.201 weight=1 max_fails=2 fail_timeout=2; server 192.168.18.202 weight=1 max_fails=2 fail_timeout=2; }10.重新加載一下配置文件
[root@nginx ~]# service nginx reloadnginx: the configuration file /etc/nginx/nginx.conf syntax is oknginx: configuration file /etc/nginx/nginx.conf test is successful重新載入 nginx: [確定]
11.停止服務(wù)器并測試
先停止Web1,進行測試。[root@web1 ~]# service httpd stop停止 httpd: [確定]
載均衡、頁面緩存、URL重寫及讀寫分離詳解")
注,大家可以看到,現(xiàn)在只能訪問Web2,再重新啟動Web1,再次訪問一下。
[root@web1 ~]# service httpd start正在啟動 httpd: [確定]
載均衡、頁面緩存、URL重寫及讀寫分離詳解")
載均衡、頁面緩存、URL重寫及讀寫分離詳解")
注,大家可以看到,現(xiàn)在又可以重新訪問,說明nginx的健康狀態(tài)查檢配置成功。但大家想一下,如果不幸的是所有服務(wù)器都不能提供服務(wù)了怎么辦,用戶打開頁面就會出現(xiàn)出錯頁面,那么會帶來用戶體驗的降低,所以我們能不能像配置LVS是配置sorry_server呢,答案是可以的,但這里不是配置sorry_server而是配置backup。
12.配置backup服務(wù)器
[root@nginx ~]# vim /etc/nginx/nginx.confserver { listen 8080; server_name localhost; root /data/www/errorpage; index index.html; }upstream webservers { server 192.168.18.201 weight=1 max_fails=2 fail_timeout=2; server 192.168.18.202 weight=1 max_fails=2 fail_timeout=2; server 127.0.0.1:8080 backup; }[root@nginx ~]# mkdir -pv /data/www/errorpage[root@nginx errorpage]# cat index.html<h1>Sorry......</h1>13.重新加載配置文件
[root@nginx errorpage]# service nginx reloadnginx: the configuration file /etc/nginx/nginx.conf syntax is oknginx: configuration file /etc/nginx/nginx.conf test is successful重新載入 nginx: [確定]
14.關(guān)閉Web服務(wù)器并進行測試
[root@web1 ~]# service httpd stop停止 httpd: [確定][root@web2 ~]# service httpd stop停止 httpd: [確定]
載均衡、頁面緩存、URL重寫及讀寫分離詳解")
注,大家可以看到,當(dāng)所有服務(wù)器都不能工作時,就會啟動備份服務(wù)器。好了,backup服務(wù)器就配置到這里,下面我們來配置ip_hash負(fù)載均衡。
15.配置ip_hash負(fù)載均衡
ip_hash,每個請求按訪問IP的hash結(jié)果分配,這樣來自同一個IP的訪客固定訪問一個后端服務(wù)器,有效解決了動態(tài)網(wǎng)頁存在的session共享問題。(一般電子商務(wù)網(wǎng)站用的比較多)
[root@nginx ~]# vim /etc/nginx/nginx.confupstream webservers { ip_hash; server 192.168.18.201 weight=1 max_fails=2 fail_timeout=2; server 192.168.18.202 weight=1 max_fails=2 fail_timeout=2; #server 127.0.0.1:8080 backup; }注,當(dāng)負(fù)載調(diào)度算法為ip_hash時,后端服務(wù)器在負(fù)載均衡調(diào)度中的狀態(tài)不能有backup。(有人可能會問,為什么呢?大家想啊,如果負(fù)載均衡把你分配到backup服務(wù)器上,你能訪問到頁面嗎?不能,所以了不能配置backup服務(wù)器)
16.重新加載一下服務(wù)器
[root@nginx ~]# service nginx reloadnginx: the configuration file /etc/nginx/nginx.conf syntax is oknginx: configuration file /etc/nginx/nginx.conf test is successful重新載入 nginx: [確定]
17.測試一下
載均衡、頁面緩存、URL重寫及讀寫分離詳解")
注,大家可以看到,你不斷的刷新頁面一直會顯示的民Web2,說明ip_hash負(fù)載均衡配置成功。下面我們來統(tǒng)計一下Web2的訪問連接數(shù)。
18.統(tǒng)計Web2的訪問連接數(shù)
[root@web2 ~]# netstat -an | grep :80 | wc -l304
注,你不斷的刷新,連接數(shù)會越來越多。好了,nginx的負(fù)載均衡就全部演示到這里下面我們來說一說,頁面緩存。
六、Nginx之頁面緩存
1.指令說明
proxy_cache_path
語法:proxy_cache_path path [levels=number] keys_zone=zone_name:zone_size [inactive=time] [max_size=size];
默認(rèn)值:None
使用字段:http
指令指定緩存的路徑和一些其他參數(shù),緩存的數(shù)據(jù)存儲在文件中,并且使用代理url的哈希值作為關(guān)鍵字與文件名。levels參數(shù)指定緩存的子目錄數(shù),例如:
proxy_cache_path /data/nginx/cache levels=1:2 keys_zone=one:10m;
文件名類似于:
/data/nginx/cache/c/29/b7f54b2df7773722d382f4809d65029c
levels指定目錄結(jié)構(gòu),可以使用任意的1位或2位數(shù)字作為目錄結(jié)構(gòu),如 X, X:X,或X:X:X 例如: “2”, “2:2”, “1:1:2“,但是最多只能是三級目錄。
所有活動的key和元數(shù)據(jù)存儲在共享的內(nèi)存池中,這個區(qū)域用keys_zone參數(shù)指定。one指的是共享池的名稱,10m指的是共享池的大小。
注意每一個定義的內(nèi)存池必須是不重復(fù)的路徑,例如:
proxy_cache_path /data/nginx/cache/one levels=1 keys_zone=one:10m;proxy_cache_path /data/nginx/cache/two levels=2:2 keys_zone=two:100m;proxy_cache_path /data/nginx/cache/three levels=1:1:2 keys_zone=three:1000m;
如果在inactive參數(shù)指定的時間內(nèi)緩存的數(shù)據(jù)沒有被請求則被刪除,默認(rèn)inactive為10分鐘。一個名為cache manager的進程控制磁盤的緩存大小,它被用來刪除不活動的緩存和控制緩存大小,這些都在max_size參數(shù)中定義,當(dāng)目前緩存的值超出max_size指定的值之后,超過其大小后最少使用數(shù)據(jù)(LRU替換算法)將被刪除。內(nèi)存池的大小按照緩存頁面數(shù)的比例進行設(shè)置,一個頁面(文件)的元數(shù)據(jù)大小按照操作系統(tǒng)來定,如FreeBSD/i386下為64字節(jié),F(xiàn)reeBSD/amd64下為128字節(jié)。
proxy_cache
語法:proxy_cache zone_name;
默認(rèn)值:None
使用字段:http, server, location
設(shè)置一個緩存區(qū)域的名稱,一個相同的區(qū)域可以在不同的地方使用。
在0.7.48后,緩存遵循后端的”Expires”, “Cache-Control: no-cache”, “Cache-Control: max-age=XXX”頭部字段,0.7.66版本以后,”Cache-Control:“private”和”no-store”頭同樣被遵循。nginx在緩存過程中不會處理”Vary”頭,為了確保一些私有數(shù)據(jù)不被所有的用戶看到,后端必須設(shè)置 “no-cache”或者”max-age=0”頭,或者proxy_cache_key包含用戶指定的數(shù)據(jù)如$cookie_xxx,使用cookie的值作為proxy_cache_key的一部分可以防止緩存私有數(shù)據(jù),所以可以在不同的location中分別指定proxy_cache_key的值以便分開私有數(shù)據(jù)和公有數(shù)據(jù)。
緩存指令依賴代理緩沖區(qū)(buffers),如果proxy_buffers設(shè)置為off,緩存不會生效。
proxy_cache_valid
語法:proxy_cache_valid reply_code [reply_code …] time;
默認(rèn)值:None
使用字段:http, server, location
為不同的應(yīng)答設(shè)置不同的緩存時間,例如:
proxy_cache_valid 200 302 10m;proxy_cache_valid 404 1m;
為應(yīng)答代碼為200和302的設(shè)置緩存時間為10分鐘,404代碼緩存1分鐘。
如果只定義時間:
proxy_cache_valid 5m;
那么只對代碼為200, 301和302的應(yīng)答進行緩存。
同樣可以使用any參數(shù)任何應(yīng)答。
proxy_cache_valid 200 302 10m;proxy_cache_valid 301 1h;proxy_cache_valid any 1m;
2.定義一個簡單nginx緩存服務(wù)器
[root@nginx ~]# vim /etc/nginx/nginx.confproxy_cache_path /data/nginx/cache/webserver levels=1:2 keys_zone=webserver:20m max_size=1g; server { listen 80; server_name localhost; #charset koi8-r; #access_log logs/host.access.log main; location / { proxy_pass http://webservers; proxy_set_header X-Real-IP $remote_addr; proxy_cache webserver; proxy_cache_valid 200 10m; }}3.新建緩存目錄
[root@nginx ~]# mkdir -pv /data/nginx/cache/webserver
4.重新加載一下配置文件
[root@nginx webserver]# service nginx reloadnginx: the configuration file /etc/nginx/nginx.conf syntax is oknginx: configuration file /etc/nginx/nginx.conf test is successful重新載入 nginx: [確定]
5.下面我們來測試一下(谷歌瀏覽器)
載均衡、頁面緩存、URL重寫及讀寫分離詳解")
注,大家用谷歌瀏覽器測試的時候,可以按F12調(diào)用開發(fā)工具,選擇Network選項,我們可以看到,Response Headers,在這里我們可以看到,我們請求的是否是緩存,但現(xiàn)在還看不到,下面我們來配置一下,再來測試。
6. 緩存變量說明
$server_addr
服務(wù)器地址,在完成一次系統(tǒng)調(diào)用后可以確定這個值,如果要繞開系統(tǒng)調(diào)用,則必須在listen中指定地址并且使用bind參數(shù)。
$upstream_cache_status
0.8.3版本中其值可能為:
[root@nginx ~]# vim /etc/nginx/nginx.confproxy_cache_path /data/nginx/cache/webserver levels=1:2 keys_zone=webserver:20m max_size=1g; server { listen 80; server_name localhost; #charset koi8-r; #access_log logs/host.access.log main; #增加兩頭部 add_header X-Via $server_addr; add_header X-Cache $upstream_cache_status; location / { proxy_pass http://webservers; proxy_set_header X-Real-IP $remote_addr; proxy_cache webserver; proxy_cache_valid 200 10m; }}7.重新加載一下配置文件
[root@nginx ~]# service nginx reloadnginx: the configuration file /etc/nginx/nginx.conf syntax is oknginx: configuration file /etc/nginx/nginx.conf test is successful重新載入 nginx: [確定]
8.測試一下
載均衡、頁面緩存、URL重寫及讀寫分離詳解")
注,從圖中我們可以看到,我們訪問的服務(wù)器是192.168.18.208,緩存命中。大家可以看到是不是很直觀啊。下面我們看一下緩存目錄。
9.查看一下緩存目錄
[root@nginx ~]# cd /data/nginx/cache/webserver/f/63/[root@nginx 63]# ls681ad4c77694b65d61c9985553a2763f
注,緩存目錄里確實有緩存文件。好了,nginx緩存配置就到這邊了,更多配置請根據(jù)需要看配置文檔。下面我們來說一下,URL重寫。
七、Nginx之URL重寫
1.URL重寫模塊(Rewrite)
摘要這個模塊允許使用正則表達式重寫URI(需PCRE庫),并且可以根據(jù)相關(guān)變量重定向和選擇不同的配置。如果這個指令在server字段中指定,那么將在被請求的location確定之前執(zhí)行,如果在指令執(zhí)行后所選擇的location中有其他的重寫規(guī)則,那么它們也被執(zhí)行。如果在location中執(zhí)行這個指令產(chǎn)生了新的URI,那么location又一次確定了新的URI。這樣的循環(huán)可以最多執(zhí)行10次,超過以后nginx將返回500錯誤。
break
語法:break
默認(rèn)值:none
使用字段:server, location, if
完成當(dāng)前設(shè)置的規(guī)則,停止執(zhí)行其他的重寫指令。
示例:
if ($slow) { limit_rate 10k; break;}if
語法:if (condition) { … }
默認(rèn)值:none
使用字段:server, location
注意:在使用if指令之前請查看if is evil page并且盡量考慮用try_files代替。
判斷一個條件,如果條件成立,則后面的大括號內(nèi)的語句將執(zhí)行,相關(guān)配置從上級繼承。
正則表達式的一部分可以用圓括號,方便之后按照順序用$1-$9來引用。
示例配置:
if ($http_user_agent ~ MSIE) { rewrite ^(.*)$ /msie/$1 break;} if ($http_cookie ~* "id=([^;] +)(?:;|$)" ) { set $id $1;} if ($request_method = POST ) { return 405;} if (!-f $request_filename) { break; proxy_pass http://127.0.0.1;} if ($slow) { limit_rate 10k;} if ($invalid_referer) { return 403;} if ($args ~ post=140){ rewrite ^ http://example.com/ permanent;}內(nèi)置變量$invalid_referer用指令valid_referers指定。
return
語法:return code
默認(rèn)值:none
使用字段:server, location, if
這個指令結(jié)束執(zhí)行配置語句并為客戶端返回狀態(tài)代碼,可以使用下列的值:204,400,402-406,408,410, 411, 413, 416與500-504。此外,非標(biāo)準(zhǔn)代碼444將關(guān)閉連接并且不發(fā)送任何的頭部。
rewrite
語法:rewrite regex replacement flag
默認(rèn)值:none
使用字段:server, location, if
按照相關(guān)的正則表達式與字符串修改URI,指令按照在配置文件中出現(xiàn)的順序執(zhí)行。
可以在重寫指令后面添加標(biāo)記。
如果替換的字符串以http://開頭,請求將被重定向,并且不再執(zhí)行多余的rewrite指令。
尾部的標(biāo)記(flag)可以是以下的值:
注意如果一個重定向是相對的(沒有主機名部分),nginx將在重定向的過程中使用匹配server_name指令的“Host”頭或者server_name指令指定的第一個名稱,如果頭不匹配或不存在,如果沒有設(shè)置server_name,將使用本地主機名,如果你總是想讓nginx使用“Host”頭,可以在server_name使用“*”通配符(查看http核心模塊中的server_name)。例如:
rewrite ^(/download/.*)/media/(.*)/..*$ $1/mp3/$2.mp3 last;rewrite ^(/download/.*)/audio/(.*)/..*$ $1/mp3/$2.ra last;return 403;
但是如果我們將其放入一個名為/download/的location中,則需要將last標(biāo)記改為break,否則nginx將執(zhí)行10次循環(huán)并返回500錯誤。
location /download/ { rewrite ^(/download/.*)/media/(.*)/..*$ $1/mp3/$2.mp3 break; rewrite ^(/download/.*)/audio/(.*)/..*$ $1/mp3/$2.ra break; return 403;}如果替換字段中包含參數(shù),那么其余的請求參數(shù)將附加到后面,為了防止附加,可以在最后一個字符后面跟一個問號:
rewrite ^/users/(.*)$ /show?user=$1? last;
注意:大括號({和}),可以同時用在正則表達式和配置塊中,為了防止沖突,正則表達式使用大括號需要用雙引號(或者單引號)。例如要重寫以下的URL:
/photos/123456
為:
/path/to/photos/12/1234/123456.png
則使用以下正則表達式(注意引號):
rewrite "/photos/([0-9] {2})([0-9] {2})([0-9] {2})" /path/to/photos/$1/$1$2/$1$2$3.png;如果指定一個“?”在重寫的結(jié)尾,Nginx將丟棄請求中的參數(shù),即變量$args,當(dāng)使用$request_uri或$uri&$args時可以在rewrite結(jié)尾使用“?”以避免nginx處理兩次參數(shù)串。
在rewrite中使用$request_uri將www.example.com重寫到example.com:
server { server_name www.example.com; rewrite ^ http://example.com$request_uri? permanent;}同樣,重寫只對路徑進行操作,而不是參數(shù),如果要重寫一個帶參數(shù)的URL,可以使用以下代替:
if ($args ^~ post=100){ rewrite ^ http://example.com/new-address.html? permanent;}注意$args變量不會被編譯,與location過程中的URI不同(參考http核心模塊中的location)。
rewrite_log
語法:rewrite_log on | off
默認(rèn)值:rewrite_log off
使用字段:server, location, if
變量:無
啟用時將在error log中記錄notice 標(biāo)記的重寫日志。
set
語法:set variable value
默認(rèn)值:none
使用字段:server, location, if
指令設(shè)置一個變量并為其賦值,其值可以是文本,變量和它們的組合。
你可以使用set定義一個新的變量,但是不能使用set設(shè)置$http_xxx頭部變量的值。
uninitialized_variable_warn
語法:uninitialized_variable_warn on|off
默認(rèn)值:uninitialized_variable_warn on
使用字段:http, server, location, if
開啟或關(guān)閉在未初始化變量中記錄警告日志。
事實上,rewrite指令在配置文件加載時已經(jīng)編譯到內(nèi)部代碼中,在解釋器產(chǎn)生請求時使用。
這個解釋器是一個簡單的堆棧虛擬機,如下列指令:
location /download/ { if ($forbidden) { return 403; } if ($slow) { limit_rate 10k; } rewrite ^/(download/.*)/media/(.*)/..*$ /$1/mp3/$2.mp3 break;將被編譯成以下順序:
variable $forbiddenchecking to zerorecovery 403completion of entire codevariable $slowchecking to zerocheckings of regular excodessioncopying "/"copying $1copying "/mp3/"copying $2copying ".mp3"completion of regular excodessioncompletion of entire sequence
注意并沒有關(guān)于limit_rate的代碼,因為它沒有提及ngx_http_rewrite_module模塊,“if”塊可以類似”location”指令在配置文件的相同部分同時存在。
如果$slow為真,對應(yīng)的if塊將生效,在這個配置中l(wèi)imit_rate的值為10k。
指令:
rewrite ^/(download/.*)/media/(.*)/..*$ /$1/mp3/$2.mp3 break;
如果我們將第一個斜杠括入圓括號,則可以減少執(zhí)行順序:
rewrite ^(/download/.*)/media/(.*)/..*$ $1/mp3/$2.mp3 break;
之后的順序類似如下:
checking regular excodessioncopying $1copying "/mp3/"copying $2copying ".mp3"completion of regular excodessioncompletion of entire code
2.簡單案例
注,由于配置文件內(nèi)容較多,為了讓大家看著方便,我們備份一下配置文件,打開一個新的配置文件。
[root@nginx ~]# cd /etc/nginx/[root@nginx nginx]# mv nginx.conf nginx.conf.proxy[root@nginx nginx]# cp nginx.conf.bak nginx.conf[root@nginx nginx]# vim /etc/nginx/nginx.confserver { listen 80; server_name localhost; #charset koi8-r; #access_log logs/host.access.log main; location / { root html; index index.html index.htm; rewrite ^/bbs/(.*)$ http://192.168.18.201/forum/$1; }}準(zhǔn)備forum目錄與測試文件
[root@web1 ~]# cd /var/www/html/[root@web1 html]# lsindex.html[root@web1 html]# mkdir forum[root@web1 html]# cd forum/[root@web1 forum]# vim index.html<h1>forum page!</h1>
測試一下
載均衡、頁面緩存、URL重寫及讀寫分離詳解")
好了,下面我們來測試一下rewrite重寫。
3.重新加載一下配置文件
[root@nginx 63]# service nginx reloadnginx: the configuration file /etc/nginx/nginx.conf syntax is oknginx: configuration file /etc/nginx/nginx.conf test is successful重新載入 nginx: [確定]
4.測試一下
載均衡、頁面緩存、URL重寫及讀寫分離詳解")
注,大家可以從圖中看出,status code 302指的是臨時重定向,那就說明我們rewrite重寫配置成功。大家知道302是臨時重定向而301是永久重定向,那么怎么實現(xiàn)永久重定向呢。一般服務(wù)器與服務(wù)器之間是臨時重定向,服務(wù)器內(nèi)部是永久重定向。下面我們來演示一下永久重定向。
5.配置永久重定向
[root@nginx nginx]# vim /etc/nginx/nginx.confserver { listen 80; server_name localhost; #charset koi8-r; #access_log logs/host.access.log main; location / { root html; index index.html index.htm; rewrite ^/bbs/(.*)$ /forum/$1; }}準(zhǔn)備forum目錄與測試文件
[root@nginx ~]# cd /usr/html/[root@nginx html]# ls50x.html index.html[root@nginx html]# mkdir forum[root@nginx html]# cd forum/[root@nginx forum]# vim index.html<h1>192.168.18.208 forum page</h1>
6.重新加載一下配置文件
[root@nginx ~]# service nginx reloadnginx: the configuration file /etc/nginx/nginx.conf syntax is oknginx: configuration file /etc/nginx/nginx.conf test is successful重新載入 nginx: [確定]
7.測試一下
載均衡、頁面緩存、URL重寫及讀寫分離詳解")
注,大家從圖中可以看到,我們訪問bbs/是直接幫我們跳轉(zhuǎn)到forum/下,這種本機的跳轉(zhuǎn)就是永久重定向也叫隱式重定向。好了,rewrite重定向我們就說到這里了,想要查詢更多關(guān)于重定向的指令請參考官方文檔。最后,我們來說一下讀寫分離。
八、Nginx之讀寫分離
1.實驗拓?fù)?/p>
載均衡、頁面緩存、URL重寫及讀寫分離詳解")
需求分析,前端一臺nginx做負(fù)載均衡反向代理,后面兩臺httpd服務(wù)器。整個架構(gòu)是提供BBS(論壇)服務(wù),有一需求得實現(xiàn)讀寫分離,就是上傳附件的功能,我們上傳的附件只能上傳到Web1,然后在Web1上利用rsync+inotify實現(xiàn)附件同步,大家都知道rsync+inotify只能是主向從同步,不能雙向同步。所以Web1可進行寫操作,而Web2只能進行讀操作,這就帶來讀寫分離的需求,下面我們就來說一下,讀寫分離怎么實現(xiàn)。
2.WebDAV功能說明
WebDAV (Web-based Distributed Authoring and Versioning) 一種基于 HTTP 1.1協(xié)議的通信協(xié)議。它擴展了HTTP 1.1,在GET、POST、HEAD等幾個HTTP標(biāo)準(zhǔn)方法以外添加了一些新的方法,使應(yīng)用程序可直接對Web Server直接讀寫,并支持寫文件鎖定(Locking)及解鎖(Unlock),還可以支持文件的版本控制。這樣我們就能配置讀寫分離功能了,下面我們來具體配置一下。
3.修改配置文件
[root@nginx nginx]# vim /etc/nginx/nginx.confserver { listen 80; server_name localhost; #charset koi8-r; #access_log logs/host.access.log main; location / { proxy_pass http://192.168.18.202; if ($request_method = "PUT"){ proxy_pass http://192.168.18.201; } }}4.重新加載一下配置文件
[root@nginx ~]# service nginx reloadnginx: the configuration file /etc/nginx/nginx.conf syntax is oknginx: configuration file /etc/nginx/nginx.conf test is successful重新載入 nginx: [確定]
5.配置httpd的WebDAV功能
[root@web1 ~]# vim /etc/httpd/conf/httpd.conf
載均衡、頁面緩存、URL重寫及讀寫分離詳解")
注,在<Directory "/var/www/html">下啟用就行。
6.重新啟動一下httpd
[root@web1 ~]# service httpd restart停止 httpd: [確定]正在啟動 httpd: [確定]
7.測試一下
[root@nginx ~]# curl http://192.168.18.201<h1>web1.test.com</h1>[root@nginx ~]# curl http://192.168.18.202<h1>web2.test.com</h1>
注,web1與web2訪問都沒問題。
[root@nginx ~]# curl -T /etc/issue http://192.168.18.202<!DOCTYPE HTML PUBLIC "-//IETF//DTD HTML 2.0//EN"><html><head><title>405 Method Not Allowed</title></head><body><h1>Method Not Allowed</h1>The requested method PUT is not allowed for the URL /issue.<hr><address>Apache/2.2.15 (CentOS) Server at 192.168.18.202 Port 80</address></body></html>
注,我們上傳文件到,web2上時,因為web2只人讀功能,所以沒有開戶WebDAV功能,所以顯示是405 Method Not Allowed。
[root@nginx ~]# curl -T /etc/issue http://192.168.18.201<!DOCTYPE HTML PUBLIC "-//IETF//DTD HTML 2.0//EN"><html><head><title>403 Forbidden</title></head><body><h1>Forbidden</h1>You don't have permission to access /issueon this server.<hr><address>Apache/2.2.15 (CentOS) Server at 192.168.18.201 Port 80</address></body></html>
注,我們在Web1開啟了WebDAV功能,但我們目錄是root目錄是不允許apache用戶上傳的,所以顯示的是403 Forbidden。下面我們給apache授權(quán),允許上傳。
[root@web1 ~]# setfacl -m u:apache:rwx /var/www/html/
下面我們再來測試一下,
[root@nginx ~]# curl -T /etc/issue http://192.168.18.201<!DOCTYPE HTML PUBLIC "-//IETF//DTD HTML 2.0//EN"><html><head><title>201 Created</title></head><body><h1>Created</h1>Resource /issue has been created.<hr /><address>Apache/2.2.15 (CentOS) Server at 192.168.18.201 Port 80</address></body></html>
注,大家可以看到我們成功的上傳了文件,說明nginx讀寫分離功能配置完成。最后,我們來查看一下上傳的文件。
[root@web1 ~]# cd /var/www/html/[root@web1 html]# ll
總用量 12
drwxr-xr-x 2 root root 4096 9月 4 13:16 forum-rw-r--r-- 1 root root 23 9月 3 23:37 index.html-rw-r--r-- 1 apache apache 47 9月 4 14:06 issue
好了,到這里nginx的反向代理、負(fù)載均衡、頁面緩存、URL重寫及讀寫分離就全部講解完成。希望大家有所收獲
新聞熱點


疑難解答
圖片精選