Nginx 也是當前流行的一款輕量級服務器在日常使用中呢,也會出現一些問題。在安裝配置Nginx的時候就出現了 403 Forbindden 的被禁止訪問的錯誤該怎么解決呢?這里給大家分享下
話不多說 先粘 上 原版nginx 配置文件代碼
worker_processes 1;
events {
worker_connections 1024;
}
http {
include mime.types;
default_type application/octet-stream;
sendfile on;
autoindex on;
keepalive_timeout 65;
fastcgi_connect_timeout 300;
fastcgi_send_timeout 300;
fastcgi_read_timeout 300;
fastcgi_buffer_size 128k;
fastcgi_buffers 4 128k;
fastcgi_busy_buffers_size 256k;
fastcgi_temp_file_write_size 256k;
#gzip on;
gzip on;
gzip_min_length 1k;
gzip_buffers 4 32k;
gzip_http_version 1.1;
gzip_comp_level 2;
gzip_types text/plain application/x-javascript text/css application/xml;
gzip_vary on;
gzip_disable "MSIE [1-6].";
server_names_hash_bucket_size 128;
client_max_body_size 100m;
client_header_buffer_size 256k;
large_client_header_buffers 4 256k;
server {
listen 80;
server_name localhost;
autoindex on; #是否允許訪問目錄
root "C:/WWW";
location / {
index index.html index.htm l.php;
#index.php
autoindex on;
}
error_page 500 502 503 504 /50x.html;
location = /50x.html {
root html;
}
location —— /.php(.*)$ {
fastcgi_pass 127.0.0.1:9000;
#fastcgi_index index.php;
fastcgi_split_path_info ^((?U).+/.php)(/?.+)$;
fastcgi_param SCRIPT_FILENAME $document_root$fastcgi_script_name;
fastcgi_param PATH_INFO $fastcgi_path_info;
fastcgi_param PATH_TRANSLATED $document_root$fastcgi_path_info;
include fastcgi_params;
}
}
include vh_*.conf;
}
這么多配置文件代碼(為了便于查看 已經把注釋的那些不懂的刪除) 學習君也是看不懂的
先說403 出現的原因
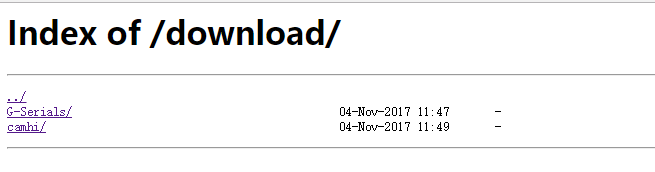
當訪問該地址的時候,nginx 會按照 index.html,index.htm ,index.PHP 的先后順序在根目錄中查找文件。如果這三個文件都不存在,那么nginx就會返回403 Forbidden。
學習君根目錄下也是沒有這三個文件的 所以直接
root "C:/WWW";
location / {
index index.html index.htm l.php;
#index.php
autoindex on;
}
注釋 項目列表就展示出來了
這里要注意
autoindex on; 這個默認是off的 意思是禁止訪問目錄 需要開啟
還有一點推薦大家別把配置項 都寫在這個文件當中 不便于管理
include vh_*.conf;
可以引入這樣一個域名一個配置文件方便管理