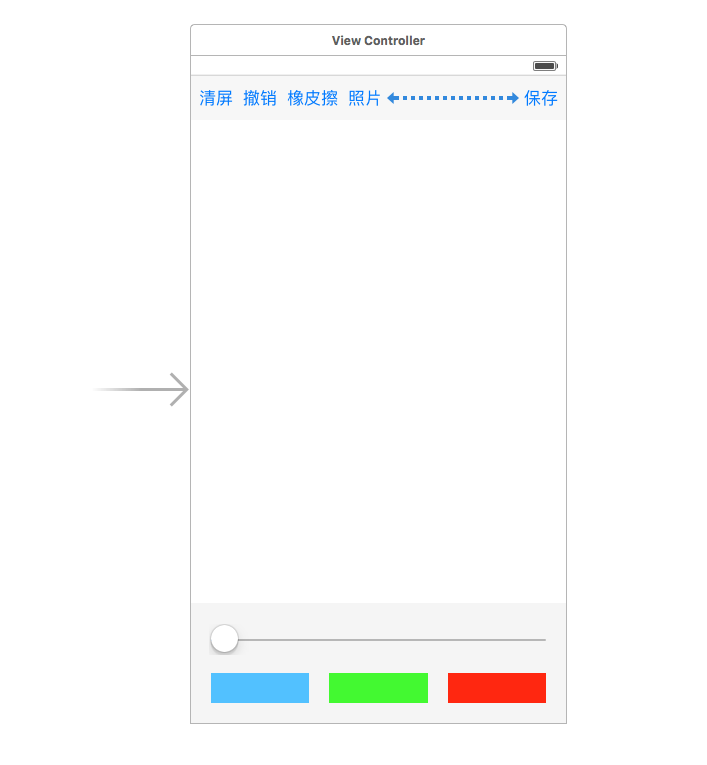
效果圖

設計要求
1、畫筆能設置大小、顏色
2、有清屏、撤銷、橡皮擦、導入照片功能
3、能將繪好的畫面保存到相冊
實現思路
1、畫筆的實現,我們可以通過監聽用戶的 平移手勢 中創建 UIBezierPath 來實現線條的繪制
2、撤銷功能,我們先來看下撤銷功能,我們會想到用一個數組隊列將用戶的每一次的筆畫都加入到數組中,然后撤銷的時候只需要將最后添加進去的筆畫pop掉,重新繪制就可以了
3、清屏功能就簡單了,只需要將上面說到的那個數組清空重新繪制下就可以了
4、導入照片功能,可以用系統的 UIImagePickerController 選取照片得到UIImage,然后再將 UIImage 繪制到屏幕中就可以了
5、保存到相冊功能,可以使用 UIGraphicsGetImageFromCurrentImageContext 獲取當前的圖片上下文,得到屏幕畫面的 UIImage ,然后通過 UIImageWriteToSavedPhotosAlbum 寫入到相冊
具體代碼實現
1、先畫個界面
2、因為我們繪制線條會用到 UIBezierPath ,并且要能可設置顏色,但是UIBezierPath是沒有設置顏色的屬性,所以我們這里需要簡單擴展一下,創建一個繼承于 UIBezierPath 的子類 DrawPath
//// DrawPath.h// 畫板//// Created by xgao on 16/4/13.// Copyright © 2016年 xgao. All rights reserved.//#import <UIKit/UIKit.h>@interface DrawPath : UIBezierPath// 畫筆顏色@property(nonatomic,retain)UIColor* pathColor;@end
這個子類只需要擴展一個屬性,就是 pathColor 用來保存畫筆的顏色
//// DrawPath.m// 畫板//// Created by xgao on 16/4/13.// Copyright © 2016年 xgao. All rights reserved.//#import "DrawPath.h"@implementation DrawPath@end
DrawPath.m 里面不需要做其它功能
3、接到來我們對畫板功能的實現封裝一下,創建一個繼承于UIView的 DrawView子類
//// DrawView.h// 畫板//// Created by xgao on 16/4/13.// Copyright © 2016年 xgao. All rights reserved.//#import <UIKit/UIKit.h>@interface DrawView : UIView// 畫線的寬度@property(nonatomic,assign)CGFloat lineWidth;// 線條顏色@property(nonatomic,retain)UIColor* pathColor;// 加載背景圖片@property(nonatomic,strong)UIImage* image;// 清屏- (void)clear;// 撤銷- (void)undo;// 橡皮擦- (void)eraser;// 保存- (void)save;@end
//// DrawView.m// 畫板//// Created by xgao on 16/4/13.// Copyright © 2016年 xgao. All rights reserved.//#import "DrawView.h"#import "DrawPath.h"@interface DrawView()@property(nonatomic,strong) DrawPath* path;// 線的數組@property(nonatomic,strong) NSMutableArray* paths;@end@implementation DrawView- (void)awakeFromNib{ [self setUp];}- (instancetype)initWithFrame:(CGRect)frame{ self = [super initWithFrame:frame]; if (self) { [self setUp]; } return self;}// 重繪UI- (void)drawRect:(CGRect)rect { for (DrawPath* path in self.paths) { if ([path isKindOfClass:[UIImage class]]) { // 畫圖片 UIImage* image = (UIImage*)path; [image drawInRect:rect]; }else{ // 畫線 // 設置畫筆顏色 [path.pathColor set]; // 繪制 [path stroke]; } }}// 懶加載屬性- (NSMutableArray*)paths{ if (_paths == nil) { _paths = [NSMutableArray array]; } return _paths;}// 重寫image屬性- (void)setImage:(UIImage *)image{ _image = image; // 將圖片加入到線條數組中 [self.paths addObject:image]; [self setNeedsDisplay];}#pragma mark - Init// 初始化- (void)setUp{ // 添加平移手勢 UIPanGestureRecognizer* panGes = [[UIPanGestureRecognizer alloc]initWithTarget:self action:@selector(panGes:)]; [self addGestureRecognizer:panGes]; // 默認值 self.lineWidth = 1; self.pathColor = [UIColor blackColor];}#pragma mark - Event// 平移事件- (void)panGes:(UIPanGestureRecognizer*)ges{ // 獲取當前點 CGPoint curPoint = [ges locationInView:self]; if (ges.state == UIGestureRecognizerStateBegan) { // 開始移動 // 創建貝塞爾曲線 _path = [[DrawPath alloc]init]; // 設置線條寬度 _path.lineWidth = _lineWidth; // 線條默認顏色 _path.pathColor = _pathColor; // 設置起始點 [_path moveToPoint:curPoint]; [self.paths addObject:_path]; } // 連線 [_path addLineToPoint:curPoint]; // 重繪 [self setNeedsDisplay];}#pragma mark - Method// 清屏- (void)clear{ [self.paths removeAllObjects]; [self setNeedsDisplay];}// 撤銷- (void)undo{ [self.paths removeLastObject]; [self setNeedsDisplay];}// 橡皮擦- (void)eraser{ self.pathColor = [UIColor whiteColor]; [self setNeedsDisplay];}// 保存- (void)save{ // ---- 截圖操作 // 開啟上下文 UIGraphicsBeginImageContextWithOptions(self.frame.size, NO, 0); // 獲取當前上下文 CGContextRef context = UIGraphicsGetCurrentContext(); // 渲染圖層到上下文 [self.layer renderInContext:context]; // 從上下文中獲取圖片 UIImage* image = UIGraphicsGetImageFromCurrentImageContext(); // 關閉上下文 UIGraphicsEndImageContext(); // ---- 保存圖片 UIImageWriteToSavedPhotosAlbum(image, self, @selector(image:didFinishSavingWithError:contextInfo:), nil);}// 圖片保存方法,必需寫這個方法體,不能會保存不了圖片- (void)image:(UIImage *)image didFinishSavingWithError:(NSError *)error contextInfo:(void *)contextInfo{ // 提示 UIAlertView* alert = [[UIAlertView alloc]initWithTitle:@"保存成功" message:nil delegate:nil cancelButtonTitle:@"ok" otherButtonTitles:nil, nil]; [alert show];}@end4、接下來就是如果使用這個畫板類了,直接上代碼吧
//// ViewController.m// 畫板//// Created by xgao on 16/4/13.// Copyright © 2016年 xgao. All rights reserved.//#import "ViewController.h"#import "DrawView.h"@interface ViewController ()<UIImagePickerControllerDelegate,UINavigationControllerDelegate>// 畫板@property (weak, nonatomic) IBOutlet DrawView *drawView;@end@implementation ViewController- (void)viewDidLoad { [super viewDidLoad];}#pragma mark - Event// 線條寬度變化- (IBAction)lineWidthChange:(UISlider*)sender { _drawView.lineWidth = sender.value;}// 線條顏色變化- (IBAction)pathColorChange:(UIButton*)sender { _drawView.pathColor = sender.backgroundColor;}// 清屏- (IBAction)clearAction:(id)sender { [_drawView clear];}// 撤銷- (IBAction)undoAction:(id)sender { [_drawView undo];}// 橡皮擦- (IBAction)eraserAction:(id)sender { [_drawView eraser];}// 照片- (IBAction)pickerPhotoAction:(id)sender { // 照片選擇控制器 UIImagePickerController* picVC = [[UIImagePickerController alloc]init]; // 照片源 picVC.sourceType = UIImagePickerControllerSourceTypePhotoLibrary; // 委托 picVC.delegate = self; [self presentViewController:picVC animated:YES completion:nil];}// 保存- (IBAction)saveAction:(id)sender { [_drawView save];}#pragma mark - UIImagePickerControllerDelegate- (void)imagePickerController:(UIImagePickerController *)picker didFinishPickingImage:(UIImage *)image editingInfo:(nullable NSDictionary<NSString *,id> *)editingInfo{ // 設置圖片 _drawView.image = image; // 關閉窗口 [self dismissViewControllerAnimated:YES completion:nil];}@end到這里就差不多了,這個小功能實現的基本思路與具體代碼我都已經放上來了,大家如果還有哪里不清楚的可以留言喔~~
以上就是本文的全部內容,希望本文的內容對大家的學習或者工作能帶來一定的幫助,同時也希望多多支持武林網!
新聞熱點


疑難解答