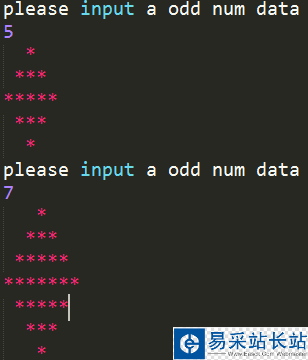
本文實例為大家分享了python使用tkinter實現簡單計算器的具體代碼,供大家參考,具體內容如下
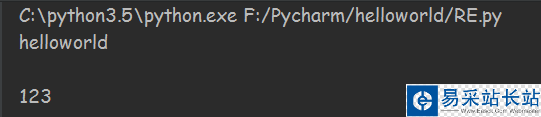
class Counter: #引入tkinter import tkinter as tk #引入消息彈窗模塊 import tkinter.messagebox as mbox #初始化Counter def __init__(self): #生成一個窗口對象 self.window = self.tk.Tk() #命名窗口對象的顯示title self.window.title('計算器') #設置窗口的大小 self.window.minsize(240, 325) self.window.maxsize(240, 325) #是否清空顯示框判定參數 self.is_init_lable = False #設置菜單 self.set_menu() #設置顯示框 self.lable_show = self.tk.Label(text='', anchor='se', font=('黑體', 30), fg='black') self.lable_show.place(x=0, y=0, width=240, height=80) #設置按鈕組件 self.set_buttons() #將窗口放入主消息隊列 self.window.mainloop() #設置菜單 def set_menu(self): #創建總菜單 menubar = self.tk.Menu(self.window) #創建一個下拉菜單,并且加入文件菜單 filemenu = self.tk.Menu(menubar, tearoff=0) #創建下來菜單的選項 filemenu.add_command(label="退出計算器", command=self.window.quit) #print author的函數 def show_author(): self.mbox.showinfo(message='Wiz333@XDL 2017') filemenu.add_command(label="作者", command=show_author) #將文件菜單作為下拉菜單添加到總菜單中,并且將命名為操作 menubar.add_cascade(label="操作", menu=filemenu) #顯示總菜單 self.window.config(menu=menubar) #設置按鈕組件 def set_buttons(self): #7 btn7 = self.tk.Button(text='7', bd=2, font='黑體') btn7.place(x=0, y=90, width=60, height=40) #8 btn8 = self.tk.Button(text='8', bd=2, font='黑體') btn8.place(x=60, y=90, width=60, height=40) #9 btn9 = self.tk.Button(text='9', bd=2, font='黑體') btn9.place(x=120, y=90, width=60, height=40) #+ btn_jia = self.tk.Button(text='+', bd=2, font='黑體') btn_jia.place(x=180, y=90, width=60, height=40) #4 btn4 = self.tk.Button(text='4', bd=2, font='黑體') btn4.place(x=0, y=130, width=60, height=40) #5 btn5 = self.tk.Button(text='5', bd=2, font='黑體') btn5.place(x=60, y=130, width=60, height=40) #6 btn6 = self.tk.Button(text='6', bd=2, font='黑體') btn6.place(x=120, y=130, width=60, height=40) #- btn_jian = self.tk.Button(text='-', bd=2, font='黑體') btn_jian.place(x=180, y=130, width=60, height=40) #1 btn1 = self.tk.Button(text='1', bd=2, font='黑體') btn1.place(x=0, y=170, width=60, height=40) #2 btn2 = self.tk.Button(text='2', bd=2, font='黑體') btn2.place(x=60, y=170, width=60, height=40) #3 btn3 = self.tk.Button(text='3', bd=2, font='黑體') btn3.place(x=120, y=170, width=60, height=40) #* btn_cheng = self.tk.Button(text='*', bd=2, font='黑體') btn_cheng.place(x=180, y=170, width=60, height=40) #0 btn0 = self.tk.Button(text='0', bd=2, font='黑體') btn0.place(x=0, y=210, width=120, height=40) #. btn_point = self.tk.Button(text='.', bd=2, font='黑體') btn_point.place(x=120, y=210, width=60, height=40) #/ btn_chu = self.tk.Button(text='/', bd=2, font='黑體') btn_chu.place(x=180, y=210, width=60, height=40) #取消 btn_cancel = self.tk.Button(text='C', bd=2, font='黑體') btn_cancel.place(x=0, y=250, width=60, height=40) #確定 btn_ok = self.tk.Button(text='=', bd=2, font='黑體') btn_ok.place(x=60, y=250, width=180, height=40) #綁定Button的點擊事件 btn7.bind_class('Button', '<Button-1>', self.click_button) #綁定Button的點擊事件 def click_button(self,e): #判斷是否是新的運算,如果是則清空顯示框 if self.is_init_lable: self.lable_show['text'] = '' self.is_init_lable = False #label_show顯示的累加 font = e.widget['text'] self.lable_show['text'] += font #異常捕獲 try: #判定運算符號重復的時候,使用最后輸入的符號 if self.lable_show['text'][-1] in ['+','-','*','/'] and self.lable_show['text'][-2] in ['+','-','*','/']: header = self.lable_show['text'][:-2] footer = self.lable_show['text'][-1] self.lable_show['text'] = header+footer except: pass #普通計算 if e.widget['text'] == '=': try: res = eval(self.lable_show['text'][:-1]) #print(res) #小數點取到9位 self.lable_show['text'] = str(round(float(res), 5)) self.isinit = True except ZeroDivisionError: #除法時,除數不能為0 self.mbox.showerror(message='除法計算時!除數不能為0!') except: self.mbox.showerror(message='算式有誤') #取消當前輸入的字符 if e.widget['text'] == 'C': cancel_res = self.lable_show['text'][:-2] self.lable_show['text'] = cancel_res #實例化計算器對象 wiz = Counter()
新聞熱點


疑難解答