所有演示均基于Django2.0
celery是一個基于python開發(fā)的簡單、靈活且可靠的分布式任務(wù)隊列框架,支持使用任務(wù)隊列的方式在分布式的機器/進(jìn)程/線程上執(zhí)行任務(wù)調(diào)度。采用典型的生產(chǎn)者-消費者模型,主要由三部分組成:
消息隊列broker:broker實際上就是一個MQ隊列服務(wù),可以使用redis、rabbitmq等作為broker 處理任務(wù)的消費者workers:broker通知worker隊列中有任務(wù),worker去隊列中取出任務(wù)執(zhí)行,每一個worker就是一個進(jìn)程 存儲結(jié)果的backend:執(zhí)行結(jié)果存儲在backend,默認(rèn)也會存儲在broker使用的MQ隊列服務(wù)中,也可以單獨配置用何種服務(wù)做backend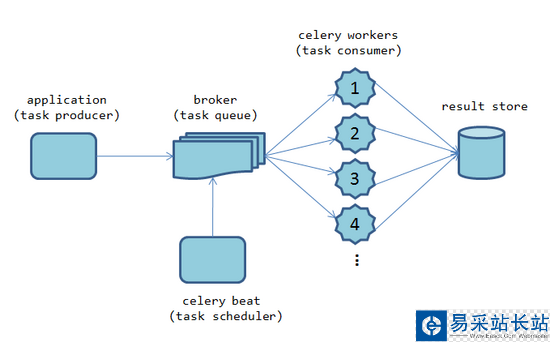
異步任務(wù)
我的異步使用場景為項目上線:前端web上有個上線按鈕,點擊按鈕后發(fā)請求給后端,后端執(zhí)行上線過程要5分鐘,后端在接收到請求后把任務(wù)放入隊列異步執(zhí)行,同時馬上返回給前端一個任務(wù)執(zhí)行中的結(jié)果。若果沒有異步執(zhí)行會怎么樣呢?同步的情況就是執(zhí)行過程中前端一直在等后端返回結(jié)果,頁面轉(zhuǎn)呀轉(zhuǎn)的就轉(zhuǎn)超時了。
異步任務(wù)配置
1.安裝rabbitmq,這里我們使用rabbitmq作為broker,安裝完成后默認(rèn)啟動了,也不需要其他任何配置
# apt-get install rabbitmq-server
2.安裝celery
# pip3 install celery
3.celery用在django項目中,django項目目錄結(jié)構(gòu)(簡化)如下
website/|-- deploy| |-- admin.py| |-- apps.py| |-- __init__.py| |-- models.py| |-- tasks.py| |-- tests.py| |-- urls.py| `-- views.py|-- manage.py|-- README`-- website |-- celery.py |-- __init__.py |-- settings.py |-- urls.py `-- wsgi.py
4.創(chuàng)建 website/celery.py 主文件
from __future__ import absolute_import, unicode_literalsimport osfrom celery import Celery, platforms# set the default Django settings module for the 'celery' program.os.environ.setdefault('DJANGO_SETTINGS_MODULE', 'website.settings')app = Celery('website')# Using a string here means the worker don't have to serialize# the configuration object to child processes.# - namespace='CELERY' means all celery-related configuration keys# should have a `CELERY_` prefix.app.config_from_object('django.conf:settings', namespace='CELERY')# Load task modules from all registered Django app configs.app.autodiscover_tasks()# 允許root 用戶運行celeryplatforms.C_FORCE_ROOT = True@app.task(bind=True)def debug_task(self): print('Request: {0!r}'.format(self.request))5.在 website/__init__.py 文件中增加如下內(nèi)容,確保django啟動的時候這個app能夠被加載到
from __future__ import absolute_import# This will make sure the app is always imported when# Django starts so that shared_task will use this app.from .celery import app as celery_app__all__ = ['celery_app']
新聞熱點


疑難解答