前言
相信大家應(yīng)該都有所體會,在以前我們要實現(xiàn)流動性布局,比較繁瑣,Google開源了一個項目叫FlexboxLayout,相信大家都不陌生。下面我們來學(xué)習(xí)一下FlexboxLayout基礎(chǔ)知識,并通過一個案例來加深理解。如果你對FlexboxLayout很熟悉,請忽略本文。
一、什么是 Flexbox
簡單來說 Flexbox 是屬于web前端領(lǐng)域CSS的一種布局方案,是2009年W3C提出了一種新的布局方案,可以響應(yīng)式地實現(xiàn)各種頁面布局,并且 React Native 也是使用的 Flex 布局。
我們可以簡單的理解為 Flexbox 是CSS領(lǐng)域類似 Linearlayout 的一種布局,但比 Linearlayout 要強大的多。
二、 什么是 FlexboxLayout?
我們在 Android 開發(fā)中使用 Linearlayout + RelativeLayout 基本可以實現(xiàn)大部分復(fù)雜的布局,但是Google就想了,有沒有類似 Flexbox 的一個布局呢?這使用起來一個布局就可以搞定各種復(fù)雜的情況了,于是 FlexboxLayout 就應(yīng)運而生了。
所以 FlexboxLayout 是針對 Android 平臺的,實現(xiàn)類似 Flexbox 布局方案的一個開源項目
我們先看看官方Demo的效果圖

開源地址:https://github.com/google/flexbox-layout
本地下載:點擊這里
三、使用方式
使用方式很簡單,只需要添加以下依賴:
compile 'com.google.android:flexbox:0.2.2'
在xml布局中我們可以這樣使用
<com.google.android.flexbox.FlexboxLayout android:id="@+id/flexbox_layout" android:layout_width="match_parent" android:layout_height="wrap_content" app:flexWrap="wrap"> <TextView android:id="@+id/tv1" android:layout_width="120dp" android:layout_height="80dp" app:layout_flexBasisPercent="50%" /> <TextView android:id="@+id/tv2" android:layout_width="80dp" android:layout_height="80dp" app:layout_alignSelf="center"/> <TextView android:id="@+id/tv3" android:layout_width="160dp" android:layout_height="80dp" app:layout_alignSelf="flex_end"/> </com.google.android.flexbox.FlexboxLayout>
代碼中可以這樣使用
FlexboxLayout flexboxLayout = (FlexboxLayout) findViewById(R.id.flexbox_layout);flexboxLayout.setFlexDirection(FlexboxLayout.FLEX_DIRECTION_COLUMN);View view = flexboxLayout.getChildAt(0);FlexboxLayout.LayoutParams lp = (FlexboxLayout.LayoutParams) view.getLayoutParams();lp.order = -1;lp.flexGrow = 2;view.setLayoutParams(lp);
我們來看看要模仿的布局

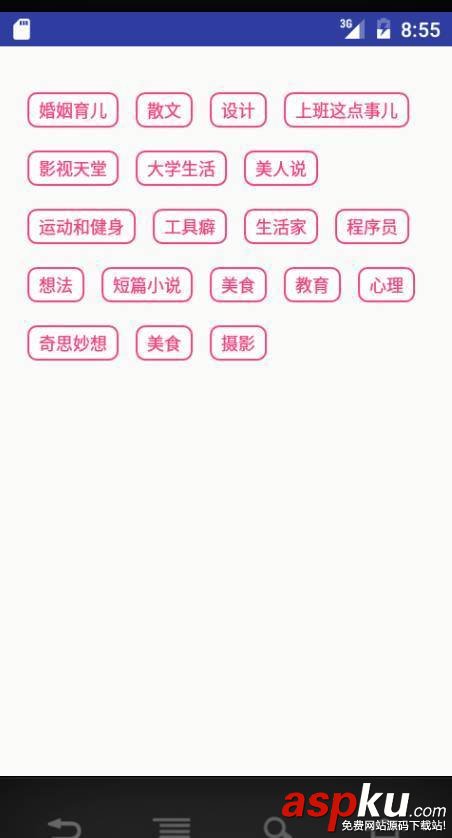
下面我們來實現(xiàn)它,先來看最終實現(xiàn)的效果:

實現(xiàn)方法如下:
1. 新建activity_flow.xml布局
<?xml version="1.0" encoding="utf-8"?><RelativeLayout xmlns:android="http://schemas.android.com/apk/res/android" xmlns:app="http://schemas.android.com/apk/res-auto" android:layout_width="match_parent" android:layout_height="match_parent"> <com.google.android.flexbox.FlexboxLayout android:id="@+id/flexbox_layout" android:layout_width="match_parent" android:layout_height="wrap_content" app:flexWrap="wrap" /></RelativeLayout>
布局很簡單,只有一個FlexboxLayout 因為我們需要動態(tài)創(chuàng)建它的item,所以就在這里固定寫TextView了
2. 新建ActivityFlow Activity,填充數(shù)據(jù)源
String[] tags = {"婚姻育兒", "散文", "設(shè)計", "上班這點事兒", "影視天堂", "大學(xué)生活", "美人說", "運動和健身", "工具癖", "生活家", "程序員", "想法", "短篇小說", "美食", "教育", "心理", "奇思妙想", "美食", "攝影"}; flexboxLayout = (FlexboxLayout) findViewById(R.id.flexbox_layout); for (int i = 0; i < tags.length; i++) { Book model = new Book(); model.setId(i); model.setName(tags[i]); flexboxLayout.addView(createNewFlexItemTextView(model)); }其中Book為一個實體,這個不是關(guān)鍵,關(guān)鍵的是createNewFlexItemTextView方法
我們要動態(tài)加載FlexboxLayout其FlexItem 并且讓FlexboxLayout中的item支持點擊事件,因為我們需要知道用戶點擊了哪個專題跳轉(zhuǎn)。
我們來看一下createNewFlexItemTextView方法
/** * 動態(tài)創(chuàng)建TextView * @param book * @return */ private TextView createNewFlexItemTextView(final Book book) { TextView textView = new TextView(this); textView.setGravity(Gravity.CENTER); textView.setText(book.getName()); textView.setTextSize(12); textView.setTextColor(getResources().getColor(R.color.colorAccent)); textView.setBackgroundResource(R.drawable.tag_states); textView.setTag(book.getId()); textView.setOnClickListener(new View.OnClickListener() { @Override public void onClick(View view) { Log.e(TAG, book.getName()); } }); int padding = Util.dpToPixel(this, 4); int paddingLeftAndRight = Util.dpToPixel(this, 8); ViewCompat.setPaddingRelative(textView, paddingLeftAndRight, padding, paddingLeftAndRight, padding); FlexboxLayout.LayoutParams layoutParams = new FlexboxLayout.LayoutParams( ViewGroup.LayoutParams.WRAP_CONTENT, ViewGroup.LayoutParams.WRAP_CONTENT); int margin = Util.dpToPixel(this, 6); int marginTop = Util.dpToPixel(this, 16); layoutParams.setMargins(margin, marginTop, margin, 0); textView.setLayoutParams(layoutParams); return textView; }其他有關(guān)Book實體和Util類,也貼出來一下
Book實體
public class Book { private int id; private String name; public String getName() { return name; } public void setName(String name) { this.name = name; } public int getId() { return id; } public void setId(int id) { this.id = id; } public Book() { }}Util工具類
public class Util { public static int pixelToDp(Context context, int pixel) { DisplayMetrics displayMetrics = context.getResources().getDisplayMetrics(); return pixel < 0 ? pixel : Math.round(pixel / displayMetrics.density); } public static int dpToPixel(Context context, int dp) { DisplayMetrics displayMetrics = context.getResources().getDisplayMetrics(); return dp < 0 ? dp : Math.round(dp * displayMetrics.density); }}這樣關(guān)于流動布局[FlexboxLayout],我們就實現(xiàn)完成了,是不是很簡單。
總結(jié)
以上就是關(guān)于Android輕松搞定流動布局(FlexboxLayout)的全部內(nèi)容了,希望本文的內(nèi)容對各位Android開發(fā)者們能帶來一定的幫助,如果有疑問大家可以留言交流,謝謝大家對VEVB武林網(wǎng)的支持。
新聞熱點
疑難解答
圖片精選