Android5.0推出的MaterialDesign庫包含了處理頭部工具欄的多個控件,不但允許自定義頂部導航欄,而且導航欄高度是可以伸縮的。如此一來,一方面導航欄能夠放得下更多控件,另一方面在用戶想看具體內容時也能騰出更多的屏幕空間。
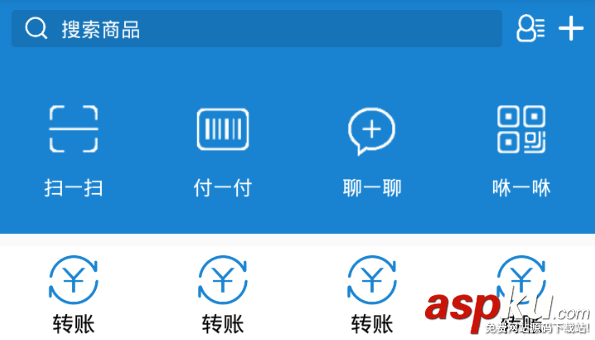
這么說可能比較抽象,那就先來看看兩張導航欄的效果圖,第一張是導航欄完全展開時的界面,此時頁面頭部的導航欄占據了較大部分的高度;

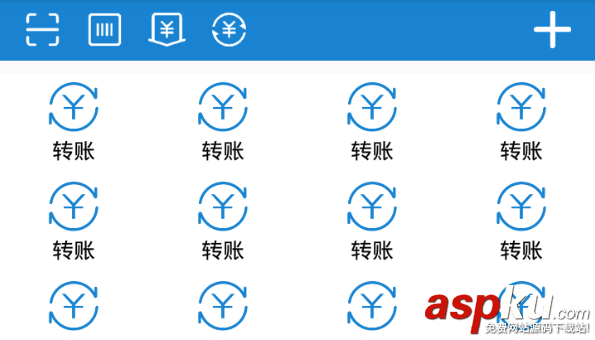
第二張是導航欄完全收縮時的界面,此時頭部導航欄只剩矮矮的一個長條。

看起來很眼熟是不是,上面的截圖正是仿支付寶首頁的頭部效果。如果你熟悉AppBarLayout和CollapsingToolbarLayout的話,也許可以很快做出類似以上的簡單界面,具體地說,就是定義一個CoordinatorLayout嵌套AppBarLayout再嵌套CollapsingToolbarLayout再嵌套Toolbar的布局。之所以要嵌套這么多層,是因為要完成以下功能:
1、CoordinatorLayout嵌套AppBarLayout,這是為了讓頭部導航欄能夠跟隨內容視圖下拉而展開,跟隨內容視圖上拉而收縮。這個內容視圖可以是RecyclerView,也可以是NestedScrollView;
2、AppBarLayout嵌套CollapsingToolbarLayout,這是為了定義導航欄下面需要展開和收縮的部分視圖;
3、CollapsingToolbarLayout嵌套Toolbar,這是為了定義導航欄上方無論何時都要顯示的長條區域,其中Toolbar還要定義兩個不同的樣式布局,用于分別顯示展開與收縮狀態時的工具欄界面。
下面是基于以上思路實現的布局文件代碼:
<android/166769.html">android.support.design.widget.CoordinatorLayout xmlns:android="http://schemas.android.com/apk/res/android" xmlns:app="http://schemas.android.com/apk/res-auto" android:layout_width="match_parent" android:layout_height="match_parent" android:fitsSystemWindows="true" > <android.support.design.widget.AppBarLayout android:id="@+id/abl_bar" android:layout_width="match_parent" android:layout_height="wrap_content" android:fitsSystemWindows="true" > <android.support.design.widget.CollapsingToolbarLayout android:layout_width="match_parent" android:layout_height="match_parent" android:fitsSystemWindows="true" app:layout_scrollFlags="scroll|exitUntilCollapsed|snap" app:contentScrim="@color/blue_dark" > <include android:layout_width="match_parent" android:layout_height="wrap_content" android:layout_marginTop="@dimen/toolbar_height" app:layout_collapseMode="parallax" app:layout_collapseParallaxMultiplier="0.7" layout="@layout/life_pay" /> <android.support.v7.widget.Toolbar android:layout_width="match_parent" android:layout_height="@dimen/toolbar_height" app:layout_collapseMode="pin" app:contentInsetLeft="0dp" app:contentInsetStart="0dp" > <include android:id="@+id/tl_expand" android:layout_width="match_parent" android:layout_height="match_parent" layout="@layout/toolbar_expand" /> <include android:id="@+id/tl_collapse" android:layout_width="match_parent" android:layout_height="match_parent" layout="@layout/toolbar_collapse" android:visibility="gone" /> </android.support.v7.widget.Toolbar> </android.support.design.widget.CollapsingToolbarLayout> </android.support.design.widget.AppBarLayout> <android.support.v7.widget.RecyclerView android:id="@+id/rv_content" android:layout_width="match_parent" android:layout_height="match_parent" android:layout_marginTop="10dp" app:layout_behavior="@string/appbar_scrolling_view_behavior" /> </android.support.design.widget.CoordinatorLayout>
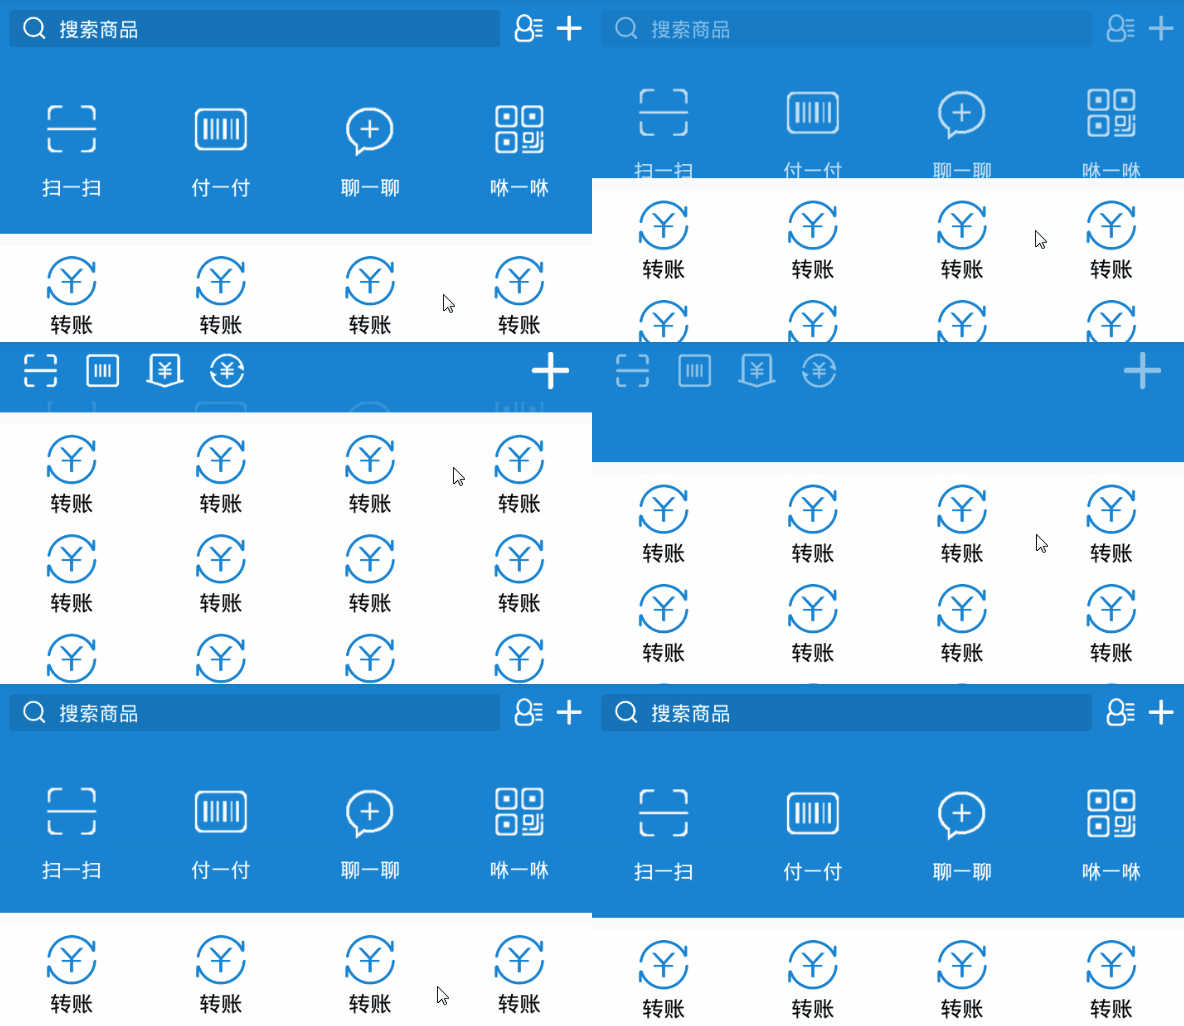
然而僅僅實現上述布局并非萬事大吉,支付寶首頁的頭部在伸縮時可是有動畫效果的,就像下面這個動圖那樣有淡入淡出的漸變動畫:

這個漸變動畫其實可分為兩段:
1、導航欄從展開狀態向上收縮時,頭部的各控件要慢慢向背景色過渡,也就是淡入效果;
2、導航欄向上收縮到一半,頂部的工具欄要換成收縮狀態下的工具欄布局,并且隨著導航欄繼續向上收縮,新工具欄上的各控件也要慢慢變得清晰起來,也就是淡出效果。
如果導航欄是從收縮狀態向下展開,則此時相應的做上述漸變動畫的取反效果,即:
1、導航欄從收縮狀態向下展開時,頭部的各控件要慢慢向背景色過渡,也就是淡入效果;同時展開導航欄的下部分布局,并且該布局上的各控件漸漸變得清晰;
2、導航欄向下展開到一半,頂部的工具欄要換成展開狀態下的工具欄布局,并且隨著導航欄繼續向下展開,新工具欄上的各控件也要慢慢變得清晰起來,也就是淡出效果。
看起來還比較復雜,如果只對某個控件做漸變動畫還好,可是導航欄上的控件有好幾個,而且并不固定常常會增加和修改。倘若要對導航欄上的各控件逐一動畫過去,不但費力氣,而且后期也不好維護。為了解決這個問題,我們可以采取類似遮罩的做法,即一開始先給導航欄罩上一層透明的視圖,此時導航欄的畫面就完全顯示;然后隨著導航欄的移動距離,計算當前位置下的遮罩透明度,比如該遮罩變得越來越不透明,看起來導航欄就像蒙上了一層面紗,蒙到最后就看不見了。反過來,也可以一開始給導航欄罩上一層不透明的視圖,此時導航欄的控件是看不見的,然后隨著距離的變化,遮罩變得越來越不透明,導航欄也會跟著變得越來越清晰了。
漸變動畫的思路有了,可謂萬事俱備,只欠東風,再來一個導航欄的移動偏移監聽器便行,正好有個現成的AppBarLayout.OnOffsetChangedListener,只需給AppBarLayout對象調用addOnOffsetChangedListener方法,即可實現給導航欄注冊偏移監聽器的功能。接下來的事還是直接看看具體的實現代碼吧:
public class AlipayActivity extends AppCompatActivity implements OnOffsetChangedListener { private final static String TAG = "AlipayActivity"; private AppBarLayout abl_bar; private View tl_expand, tl_collapse; private View v_expand_mask, v_collapse_mask, v_pay_mask; private int mMaskColor; private RecyclerView rv_content; @Override protected void onCreate(Bundle savedInstanceState) { super.onCreate(savedInstanceState); setContentView(R.layout.activity_alipay); mMaskColor = getResources().getColor(R.color.blue_dark); rv_content = (RecyclerView) findViewById(R.id.rv_content); rv_content.setLayoutManager(new GridLayoutManager(this, 4)); rv_content.setAdapter(new LifeAdapter(this, LifeItem.getDefault())); abl_bar = (AppBarLayout) findViewById(R.id.abl_bar); tl_expand = (View) findViewById(R.id.tl_expand); tl_collapse = (View) findViewById(R.id.tl_collapse); v_expand_mask = (View) findViewById(R.id.v_expand_mask); v_collapse_mask = (View) findViewById(R.id.v_collapse_mask); v_pay_mask = (View) findViewById(R.id.v_pay_mask); abl_bar.addOnOffsetChangedListener(this); } @Override public void onOffsetChanged(AppBarLayout appBarLayout, int verticalOffset) { Log.d(TAG, "verticalOffset="+verticalOffset); int offset = Math.abs(verticalOffset); int total = appBarLayout.getTotalScrollRange(); int alphaIn = offset; int alphaOut = (200-offset)<0?0:200-offset; int maskColorIn = Color.argb(alphaIn, Color.red(mMaskColor), Color.green(mMaskColor), Color.blue(mMaskColor)); int maskColorInDouble = Color.argb(alphaIn*2, Color.red(mMaskColor), Color.green(mMaskColor), Color.blue(mMaskColor)); int maskColorOut = Color.argb(alphaOut*2, Color.red(mMaskColor), Color.green(mMaskColor), Color.blue(mMaskColor)); if (offset <= total / 2) { tl_expand.setVisibility(View.VISIBLE); tl_collapse.setVisibility(View.GONE); v_expand_mask.setBackgroundColor(maskColorInDouble); } else { tl_expand.setVisibility(View.GONE); tl_collapse.setVisibility(View.VISIBLE); v_collapse_mask.setBackgroundColor(maskColorOut); } v_pay_mask.setBackgroundColor(maskColorIn); } } 以上所述是小編給大家介紹的Android仿支付寶的頭部伸縮動畫效果,希望對大家有所幫助,如果大家有任何疑問請給我留言,小編會及時回復大家的。在此也非常感謝大家對VEVB武林網網站的支持!
新聞熱點
疑難解答