閱讀公眾號或其他文章,經(jīng)常需要暫時退出文章.
在新版微信中,可以把瀏覽的文章縮小為浮窗.點擊浮窗繼續(xù)閱讀.對于經(jīng)常在微信里閱讀的人來說,這簡直就是人類之光.
微信效果如下
微信效果
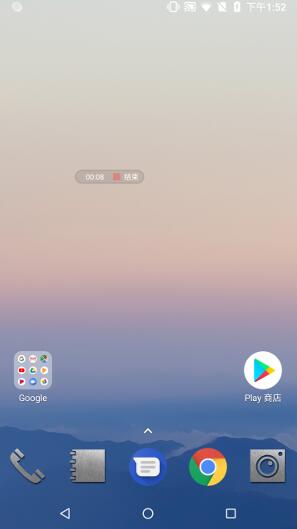
對于這功能我進行了仿寫.
效果如下
仿寫效果
微信的大佬一定用了了不起的技術(shù),我這里只是實現(xiàn)效果.
簡單寫了一個庫,一句代碼即可實現(xiàn)效果
//在AppDelegate中將類名傳入即可[HKFloatManager addFloatVcs:@[@"HKSecondViewController"]];
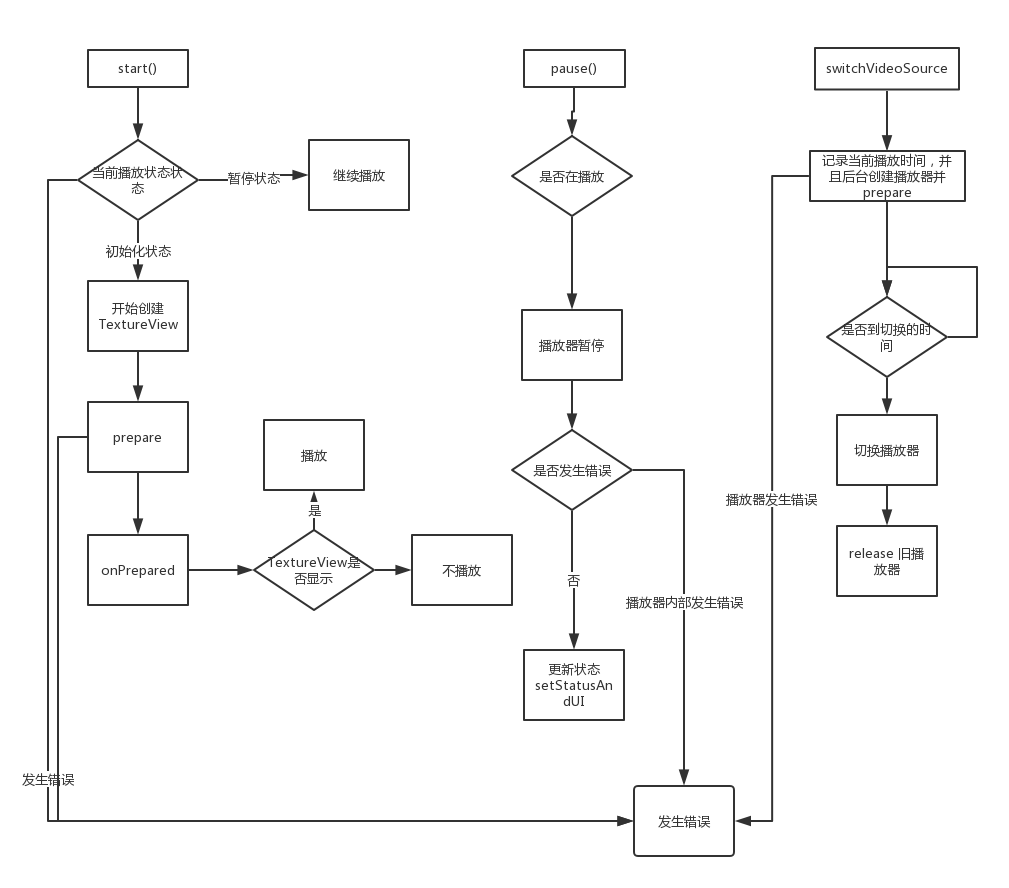
使用到的技術(shù)點
監(jiān)聽側(cè)滑返回
//設(shè)置邊緣側(cè)滑代理self.navigationController.interactivePopGestureRecognizer.delegate = self; //當開始側(cè)滑pop時調(diào)用此方法- (BOOL)gestureRecognizerShouldBegin:(UIGestureRecognizer *)gestureRecognizer{ /* 判斷是否開啟邊緣側(cè)滑返回 **/ if (self.navigationController.viewControllers.count > 1) { [self beginScreenEdgePanBack:gestureRecognizer]; return YES; } return NO;}/* UIScreenEdgePanGestureRecognizer@property(nullable, nonatomic, readonly) UIGestureRecognizer *interactivePopGestureRecognizer NS_AVAILABLE_IOS(7_0) __TVOS_PROHIBITED;/*! This subclass of UIPanGestureRecognizer only recognizes if the user slides their finger in from the bezel on the specified edge. *///NS_CLASS_AVAILABLE_IOS(7_0) __TVOS_PROHIBITED @interface UIScreenEdgePanGestureRecognizer : UIPanGestureRecognizer**///利用CADisplayLink 來實現(xiàn)監(jiān)聽返回手勢- (void)beginScreenEdgePanBack:(UIGestureRecognizer *)gestureRecognizer{ /* * 引用 gestureRecognizer * 開啟 CADisplayLink * 顯示右下視圖 **/ self.edgePan = (UIScreenEdgePanGestureRecognizer *)gestureRecognizer; _link = [CADisplayLink displayLinkWithTarget:self selector:@selector(panBack:)]; [self.link addToRunLoop:[NSRunLoop mainRunLoop] forMode:NSRunLoopCommonModes]; [[UIApplication sharedApplication].keyWindow addSubview:self.floatArea];}//此方法中進行操作- (void)panBack:(CADisplayLink *)link { //判斷手勢狀態(tài) if (self.edgePan.state == UIGestureRecognizerStateChanged) {//移動過程 /* * 改變右下視圖 frame * 判斷手指是否進入右下視圖中 **/ //手指在屏幕上的位置 CGPoint tPoint = [self.edgePan translationInView:kWindow]; ...根據(jù)tPoint設(shè)置右下視圖 frame... //手指在右下視圖上的位置(若 x>0 && y>0 說明此時手指在右下視圖上) CGPoint touchPoint = [kWindow convertPoint:[self.edgePan locationInView:kWindow] toView:self.floatArea]; if (touchPoint.x > 0 && touchPoint.y > 0) { ... //由于右下視圖是1/4圓 所以需要這步判斷 if (pow((kFloatAreaR - touchPoint.x), 2) + pow((kFloatAreaR - touchPoint.y), 2) <= pow((kFloatAreaR), 2)) { self.showFloatBall = YES; } ... }else if (self.edgePan.state == UIGestureRecognizerStatePossible) { /* * 停止CADisplayLink * 隱藏右下視圖 * 顯示/隱藏浮窗 **/ [self.link invalidate]; if (self.showFloatBall) { self.floatBall.iconImageView.image= [self.floatViewController valueForKey:@"hk_iconImage"]; [kWindow addSubview:self.floatBall]; } } }監(jiān)聽浮窗移動/點擊
#import "HKFloatBall.h" 類為浮窗視圖類//點擊浮窗后讓代理push之前保留起來的控制器- (void)tap:(UIGestureRecognizer *)tap{ if ([self.delegate respondsToSelector:@selector(floatBallDidClick:)]) { [self.delegate floatBallDidClick:self]; }}- (void)touchesCancelled:(NSSet *)touches withEvent:(UIEvent *)event{ ...結(jié)束監(jiān)聽...}- (void)touchesEnded:(NSSet *)touches withEvent:(UIEvent *)event{ ...結(jié)束監(jiān)聽...}- (void)touchesMoved:(NSSet *)touches withEvent:(UIEvent *)event{ /* * 改變浮窗 frame * 改變右下視圖 frame * 判斷浮窗center 是否在右下視圖之上 **/ CGPoint center_ball = [kWindow convertPoint:self.floatBall.center toView:self.cancelFloatArea]; if (pow((kFloatAreaR - center_ball.x), 2) + pow((kFloatAreaR - center_ball.y), 2) <= pow((kFloatAreaR), 2)) { if (!self.cancelFloatArea.highlight) { self.cancelFloatArea.highlight = YES; } }}}自定義push/pop動畫
//設(shè)置navigationController代理 self.navigationController.delegate = self;#pragma UINavigationControllerDelegate//push/pop 時會調(diào)用此代理方法- (nullable id )navigationController:(UINavigationController *)navigationController animationControllerForOperation:(UINavigationControllerOperation)operation fromViewController:(UIViewController *)fromVC toViewController:(UIViewController *)toVC{ ... 判斷是否執(zhí)行動畫 若 return nil 則執(zhí)行原始 push/pop 動畫... //HKTransitionPush HKTransitionPop 是自己寫的兩個動畫類,需要實現(xiàn) if(operation==UINavigationControllerOperationPush) { return [[HKTransitionPush alloc]init]; } else if(operation==UINavigationControllerOperationPop){ return [[HKTransitionPop alloc]init]; }}HKTransitionPush HKTransitionPop 代碼類似已HKTransitionPush為例#import "HKTransitionPush.h"-(NSTimeInterval)transitionDuration:(id)transitionContext{ return kAuration;//動畫時間}- (void)animateTransition:(id)transitionContext { //獲取上下文 self.transitionContext = transitionContext; UIViewController * fromVC = [transitionContext viewControllerForKey:UITransitionContextFromViewControllerKey]; UIViewController *toVC = [transitionContext viewControllerForKey:UITransitionContextToViewControllerKey]; UIView *contView = [transitionContext containerView]; [contView addSubview:fromVC.view]; [contView addSubview:toVC.view]; //添加遮罩視圖 [fromVC.view addSubview:self.coverView]; //浮窗的 frame push時這個是起始 frame ,pop時是結(jié)束時的 frame CGRect floatBallRect = [HKFloatManager shared].floatBall.frame; //開始/結(jié)束時的曲線 UIBezierPath *maskStartBP = [UIBezierPath bezierPathWithRoundedRect:CGRectMake(floatBallRect.origin.x, floatBallRect.origin.y,floatBallRect.size.width , floatBallRect.size.height) cornerRadius:floatBallRect.size.height/2]; UIBezierPath *maskFinalBP = [UIBezierPath bezierPathWithRoundedRect:CGRectMake(0, 0,SCREEN_WIDTH, SCREEN_HEIGHT) cornerRadius:floatBallRect.size.width/2]; //.layer.mask 是部分顯示的原因 CAShapeLayer *maskLayer = [CAShapeLayer layer]; maskLayer.path = maskFinalBP.CGPath; toVC.view.layer.mask = maskLayer; //動畫類 CABasicAnimation *maskLayerAnimation = [CABasicAnimation animationWithKeyPath:@"path"]; maskLayerAnimation.fromValue = (__bridge id)(maskStartBP.CGPath); maskLayerAnimation.toValue = (__bridge id)((maskFinalBP.CGPath)); maskLayerAnimation.duration = kAuration; maskLayerAnimation.timingFunction = [CAMediaTimingFunction functionWithName:kCAMediaTimingFunctionEaseInEaseOut]; maskLayerAnimation.delegate = self; [maskLayer addAnimation:maskLayerAnimation forKey:@"path"]; //隱藏浮窗 [UIView animateWithDuration:kAuration animations:^{ [HKFloatManager shared].floatBall.alpha = 0; }];}#pragma mark - CABasicAnimation的Delegate//動畫完成后代理- (void)animationDidStop:(CAAnimation *)anim finished:(BOOL)flag{ [self.transitionContext completeTransition:YES]; [self.transitionContext viewControllerForKey:UITransitionContextFromViewControllerKey].view.layer.mask = nil; [self.transitionContext viewControllerForKey:UITransitionContextToViewControllerKey].view.layer.mask = nil; [self.coverView removeFromSuperview]; }-(UIView *)coverView{ if (!_coverView) { _coverView = [[UIView alloc]initWithFrame:[UIScreen mainScreen].bounds]; _coverView.backgroundColor = [UIColor blackColor]; _coverView.alpha = 0.5; }; return _coverView;}解耦
將所有代碼集中在 #import "HKFloatManager.h" 中
//在AppDelegate中將類名傳入即可,在該類控制器側(cè)滑返回時啟動浮窗功能(需要在實例化導(dǎo)航控制器之后)[HKFloatManager addFloatVcs:@[@"HKSecondViewController"]];
若需要設(shè)置浮窗頭像,設(shè)置該控制器的"hk_iconImage"
@property (nonatomic, strong) UIImage *hk_iconImage;Tips
震動反饋
UIImpactFeedbackGenerator*impactLight = [[UIImpactFeedbackGenerator alloc]initWithStyle:UIImpactFeedbackStyleMedium]; [impactLight impactOccurred]; // UIImpactFeedbackStyleLight, // UIImpactFeedbackStyleMedium, // UIImpactFeedbackStyleHeavy
分類獲取當前控制器
#import "NSObject+hkvc.h"@implementation NSObject (hkvc)- (UIViewController *)hk_currentViewController{ UIWindow *keyWindow = [UIApplication sharedApplication].keyWindow; UIViewController *vc = keyWindow.rootViewController; if ([vc isKindOfClass:[UINavigationController class]]) { vc = [(UINavigationController *)vc visibleViewController]; } else if ([vc isKindOfClass:[UITabBarController class]]) { vc = [(UITabBarController *)vc selectedViewController]; } return vc;}- (UINavigationController *)hk_currentNavigationController{ return [self hk_currentViewController].navigationController;}- (UITabBarController *)hk_currentTabBarController{ return [self hk_currentViewController].tabBarController;}@end判斷控制器是否有"hk_iconImage"屬性
- (BOOL)haveIconImage{ BOOL have = NO; unsigned int outCount = 0; Ivar *ivars = class_copyIvarList([self.floatViewController class], &outCount); for (unsigned int i = 0; i < outCount; i ++) { Ivar ivar = ivars[i]; const char * nameChar = ivar_getName(ivar); NSString *nameStr =[NSString stringWithFormat:@"%s",nameChar]; if([nameStr isEqualToString:@"_hk_iconImage"]) { have = YES; } } free(ivars); return have;}以上便是實現(xiàn)該效果的全部實現(xiàn).上方含有部分偽代碼.全部代碼已上傳至---Github--- 歡迎(跪求) Star.
以上所述是小編給大家介紹的Android仿新版微信浮窗效果,希望對大家有所幫助,如果大家有任何疑問請給我留言,小編會及時回復(fù)大家的。在此也非常感謝大家對VEVB武林網(wǎng)網(wǎng)站的支持!
新聞熱點


疑難解答