自定義 cell 并使用 Auto Layout
創建文件
我們可以一次性創建 xib 文件和類的代碼文件。
新建 Cocoa Touch Class:

設置和下圖相同即可:

檢查成果

分別選中上圖中的 1、2 兩處,檢查 3 處是否已經自動綁定為 firstTableViewCell,如果沒有綁定,請先檢查選中的元素確實是 2,然后手動綁定即可。
完成綁定工作
切換一頁,如下圖進行 Identifier 設置:

新建 Table View Controller 頁面
新建一個 Table View Controller 頁面,并把我們之前創建的 Swift on iOS 那個按鈕的點擊事件綁定過去,我們得到:

然后創建一個名為 firstTableViewController 的 UITableViewController 類,創建流程跟前面基本一致。不要創建 xib。然后選中 StoryBoard 中的 Table View Controller(選中之后有藍色邊框包裹),在右側對它和 firstTableViewController 類進行綁定:

調用自定義 cell
修改 firstTableViewController 類中的有效代碼如下:
import UIKit
class firstTableViewController: UITableViewController {
override func viewDidLoad() {
super.viewDidLoad()
var nib = UINib(nibName: "firstTableViewCell", bundle: nil)
self.tableView.registerNib(nib, forCellReuseIdentifier: "firstTableViewCell")
}
override func didReceiveMemoryWarning() {
super.didReceiveMemoryWarning()
}
// MARK: - Table view data source
override func numberOfSectionsInTableView(tableView: UITableView) -> Int {
return 1
}
override func tableView(tableView: UITableView, numberOfRowsInSection section: Int) -> Int {
return 10
}
override func tableView(tableView: UITableView, cellForRowAtIndexPath indexPath: NSIndexPath) -> UITableViewCell {
let cell = tableView.dequeueReusableCellWithIdentifier("firstTableViewCell", forIndexPath: indexPath) as firstTableViewCell
cell.textLabel?.text = indexPath.row.description
return cell
}
}
viewDidLoad() 中添加的兩行代碼是載入 xib 的操作。最下面的三個 func 分別是定義:
self.tableView 中有多少個 section
每個 section 中分別有多少個條目
實例化每個條目,提供內容
如果你得到以下頁面,說明你調用自定義 cell 成功了!

給自定義 cell 添加元素并使用 Auto Layout 約束
首先向 Images.xcassets 中隨意加入一張圖片。
然后在左側文件樹中選中 firstTableViewCell.xib,從右側組件庫中拖進去一個 Image View,并且在右側將其尺寸設置如下圖右側:

給 ImageView 添加約束:

選中該 ImageView(左箭頭所示),點擊自動 Auto Layout(右箭頭所示),即可。
給 ImageView 設置圖片:

再從右側組件庫中拖入一個 UILabel,吸附到最右側,垂直居中,為其添加自動約束,這一步不再贅述。
在 firstTableViewCell 類中綁定 xib 中拖進去的元素
選中 firstTableViewCell.xib,切換到雙視圖,直接進行拖動綁定:

綁定完成!
約束 cell 的高度
在 firstTableViewController 中添加以下方法:
override func tableView(tableView: UITableView, heightForRowAtIndexPath indexPath: NSIndexPath) -> CGFloat {
return 50
}
給自定義的 UILabel 添加內容
修改 firstTableViewController 中以下函數為:
override func tableView(tableView: UITableView, cellForRowAtIndexPath indexPath: NSIndexPath) -> UITableViewCell {
let cell = tableView.dequeueReusableCellWithIdentifier("firstTableViewCell", forIndexPath: indexPath) as firstTableViewCell
cell.firstLabel.text = indexPath.row.description
return cell
}
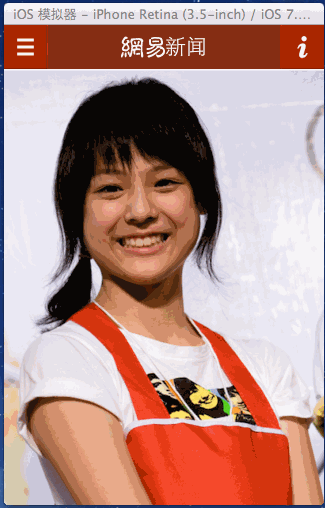
查看結果
4.0 寸:

4.7 寸:

如果你得到以上結果,那么恭喜你自定義 cell 并使用 Auto Layout 成功!
22 行代碼實現拖動回彈
搭建界面
刪除首頁中間的按鈕,添加一個 View ,設置一種背景色便于辨認,然后對其進行絕對約束:

拖動一個 UIPanGestureRecognizer 到該 View 上:

界面搭建完成。
屬性綁定
切換到雙向視圖,分別右鍵拖動 UIPanGestureRecognizer 和該 View 的 Top Space 的 Auto Layout 屬性到 ViewController 中綁定:

然后將 UIPanGestureRecognizer 右鍵拖動綁定:

編寫代碼
class ViewController: UIViewController {
var middleViewTopSpaceLayoutConstant: CGFloat!
var middleViewOriginY: CGFloat!
@IBOutlet weak var middleView: UIView!
@IBOutlet weak var middleViewTopSpaceLayout: NSLayoutConstraint!
@IBOutlet var panGesture: UIPanGestureRecognizer!
override func viewDidLoad() {
super.viewDidLoad()
panGesture.addTarget(self, action: Selector("pan"))
middleViewTopSpaceLayoutConstant = middleViewTopSpaceLayout.constant
middleViewOriginY = middleView.frame.origin.y
}
override func didReceiveMemoryWarning() {
super.didReceiveMemoryWarning()
// Dispose of any resources that can be recreated.
}
func pan() {
if panGesture.state == UIGestureRecognizerState.Ended {
UIView.animateWithDuration(0.4, delay: 0, options: UIViewAnimationOptions.CurveEaseInOut, animations: { () -> Void in
self.middleView.frame.origin.y = self.middleViewOriginY
}, completion: { (success) -> Void in
if success {
self.middleViewTopSpaceLayout.constant = self.middleViewTopSpaceLayoutConstant
}
})
return
}
let y = panGesture.translationInView(self.view).y
middleViewTopSpaceLayout.constant = middleViewTopSpaceLayoutConstant + y
}
}
查看效果

22 行代碼,拖動回彈效果完成!