HTML5中定義了WebSocket規范,該規范使得能夠實現在瀏覽器端和服務器端通過WebSocket協議進行雙向通信。
在Web應用中一個常見的場景是Server端向Client端推送某些消息,要實現這項功能,按照傳統的思路可以有以下可選方案:
隨著Html5技術的普及,主流瀏覽器對HTML5標準的支持越來越好,利用瀏覽器原生支持WebSocket就可以輕松的實現上面的功能。只需要在瀏覽器端和服務器端建立一條WebSocket連接,就可以進行雙向同時傳遞數據。相比于傳統的方式,使用WebSocket的優點顯而易見了:
那么在實際中如何建立WebSocket連接?在瀏覽器端和服務器端如何針對WebSocket編程?
就此問題,下文描述了建立WebSocket連接的過程,瀏覽器端WebSocket接口,并以Tomcat 7 為例在服務器端編寫WebSocket服務。
1. 建立WebSocket連接過程
關于WebSocket規范和協議參考 http://www.websocket.org/aboutwebsocket.html
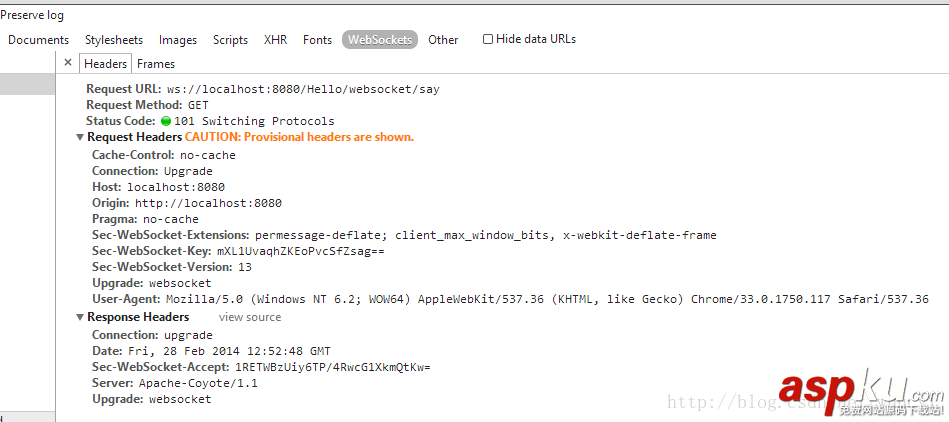
設計WebSocket協議的一個重要原則就是能和現有的Web方式和諧共處,建立WebSocket連接是以HTTP請求響應為基礎的,這個過程為 WebSocket握手 .
圖下所示為一個WebSocket建立連接的請求和響應過程:

此處稍作解釋一下:
WebSocket連接建立在原來HTTP所使用的TCP/IP通道和端口之上 ,也就是說原來使用的是8080端口,現在還是使用8080端口,而不是使用新的TCP/IP連接。
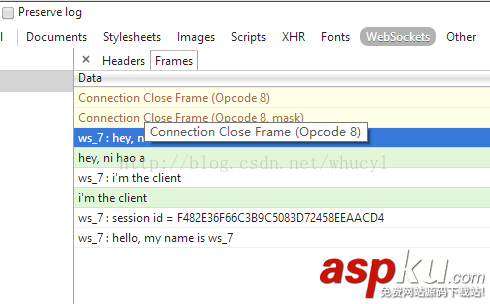
數據幀傳輸支持Text和Binary兩種方式:在使用Text方式時,以0x00為起始點,以0xFF結束,數據以UTF-8編碼置于中間;對于Binary方式則沒有結束標識,而是將數據幀長度置于數據前面。
2. 瀏覽器端 WebSocket編程接口
在瀏覽器端使用WebSocket之前,需要檢測瀏覽器是否支持WebSocket,代碼如下:
var socket=null; window.WebSocket = window.WebSocket || window.MozWebSocket; if (!window.WebSocket) { alert('Error: WebSocket is not supported .'); } else{ socket = new WebSocket('ws://...');} Websocket接口定義如下:
interface WebSocket : EventTarget { readonly attribute DOMString url; // ready state const unsigned short CONNECTING = 0; const unsigned short OPEN = 1; const unsigned short CLOSING = 2; const unsigned short CLOSED = 3; readonly attribute unsigned short readyState; readonly attribute unsigned long bufferedAmount; // networking attribute EventHandler onopen; attribute EventHandler onerror; attribute EventHandler onclose; readonly attribute DOMString extensions; readonly attribute DOMString protocol; void close([Clamp] optional unsigned short code, optional DOMString reason); // messaging attribute EventHandler onmessage; attribute DOMString binaryType; void send(DOMString data); void send(Blob data); void send(ArrayBuffer data); void send(ArrayBufferView data); }; 從上面定義中可以很清晰的看出:
在index.jsp中編寫編寫代碼如下:
<!DOCTYPE HTML> <html> <head> <title>WebSocket demo</title> <style> body {padding: 40px;} #outputPanel {margin: 10px;padding:10px;background: #eee;border: 1px solid #000;min-height: 300px;} </style> </head> <body> <input type="text" id="messagebox" size="60" /> <input type="button" id="buttonSend" value="Send Message" /> <input type="button" id="buttonConnect" value="Connect to server" /> <input type="button" id="buttonClose" value="Disconnect" /> <br> <% out.println("Session ID = " + session.getId()); %> <div id="outputPanel"></div> </body> <script type="text/javascript"> var infoPanel = document.getElementById('outputPanel'); // 輸出結果面板 var textBox = document.getElementById('messagebox'); // 消息輸入框 var sendButton = document.getElementById('buttonSend'); // 發送消息按鈕 var connButton = document.getElementById('buttonConnect');// 建立連接按鈕 var discButton = document.getElementById('buttonClose');// 斷開連接按鈕 // 控制臺輸出對象 var console = {log : function(text) {infoPanel.innerHTML += text + "<br>";}}; // WebSocket演示對象 var demo = { socket : null, // WebSocket連接對象 host : '', // WebSocket連接 url connect : function() { // 連接服務器 window.WebSocket = window.WebSocket || window.MozWebSocket; if (!window.WebSocket) { // 檢測瀏覽器支持 console.log('Error: WebSocket is not supported .'); return; } this.socket = new WebSocket(this.host); // 創建連接并注冊響應函數 this.socket.onopen = function(){console.log("websocket is opened .");}; this.socket.onmessage = function(message) {console.log(message.data);}; this.socket.onclose = function(){ console.log("websocket is closed ."); demo.socket = null; // 清理 }; }, send : function(message) { // 發送消息方法 if (this.socket) { this.socket.send(message); return true; } console.log('please connect to the server first !!!'); return false; } }; // 初始化WebSocket連接 url demo.host=(window.location.protocol == 'http:') ? 'ws://' : 'wss://' ; demo.host += window.location.host + '/Hello/websocket/say'; // 初始化按鈕點擊事件函數 sendButton.onclick = function() { var message = textBox.value; if (!message) return; if (!demo.send(message)) return; textBox.value = ''; }; connButton.onclick = function() { if (!demo.socket) demo.connect(); else console.log('websocket already exists .'); }; discButton.onclick = function() { if (demo.socket) demo.socket.close(); else console.log('websocket is not found .'); }; </script> </html> 3. 服務器端WebSocket編程
Tomcat 7提供了WebSocket支持,這里就以Tomcat 7 為例,探索一下如何在服務器端進行WebSocket編程。需要加載的依賴包為 /lib/catalina.jar、/lib/tomcat-coyote.jar
這里有兩個重要的類 :WebSocketServlet 和 StreamInbound, 前者是一個容器,用來初始化WebSocket環境;后者是用來具體處理WebSocket請求和響應的。
編寫一個Servlet類,繼承自WebSocket,實現其抽象方法即可,代碼如下:
package websocket; import java.util.concurrent.atomic.AtomicInteger; import javax.servlet.http.HttpServletRequest; import org.apache.catalina.websocket.StreamInbound; import org.apache.catalina.websocket.WebSocketServlet; public class HelloWebSocketServlet extends WebSocketServlet { private static final long serialVersionUID = 1L; private final AtomicInteger connectionIds = new AtomicInteger(0); @Override protected StreamInbound createWebSocketInbound(String arg0, HttpServletRequest request) { return new HelloMessageInbound(connectionIds.getAndIncrement(), request .getSession().getId()); } } package websocket; import java.io.IOException; import java.io.InputStream; import java.io.Reader; import java.nio.CharBuffer; import org.apache.catalina.websocket.StreamInbound; import org.apache.catalina.websocket.WsOutbound; public class HelloMessageInbound extends StreamInbound { private String WS_NAME; private final String FORMAT = "%s : %s"; private final String PREFIX = "ws_"; private String sessionId = ""; public HelloMessageInbound(int id, String _sessionId) { this.WS_NAME = PREFIX + id; this.sessionId = _sessionId; } @Override protected void onTextData(Reader reader) throws IOException { char[] chArr = new char[1024]; int len = reader.read(chArr); send(String.copyValueOf(chArr, 0, len)); } @Override protected void onClose(int status) { System.out.println(String.format(FORMAT, WS_NAME, "closing ......")); super.onClose(status); } @Override protected void onOpen(WsOutbound outbound) { super.onOpen(outbound); try { send("hello, my name is " + WS_NAME); send("session id = " + this.sessionId); } catch (IOException e) { e.printStackTrace(); } } private void send(String message) throws IOException { message = String.format(FORMAT, WS_NAME, message); System.out.println(message); getWsOutbound().writeTextMessage(CharBuffer.wrap(message)); } @Override protected void onBinaryData(InputStream arg0) throws IOException { } } 在Web.xml中進行Servlet配置:
<?xml version="1.0" encoding="UTF-8"?> <web-app version="3.0" xmlns="http://java.sun.com/xml/ns/javaee" xmlns:xsi="http://www.w3.org/2001/XMLSchema-instance" xsi:schemaLocation="http://java.sun.com/xml/ns/javaee http://java.sun.com/xml/ns/javaee/web-app_3_0.xsd"> <display-name>websocket demo</display-name> <servlet> <servlet-name>wsHello</servlet-name> <servlet-class>websocket.HelloWebSocketServlet</servlet-class> </servlet> <servlet-mapping> <servlet-name>wsHello</servlet-name> <url-pattern>/websocket/say</url-pattern> </servlet-mapping> <welcome-file-list> <welcome-file>index.jsp</welcome-file> </welcome-file-list> </web-app>
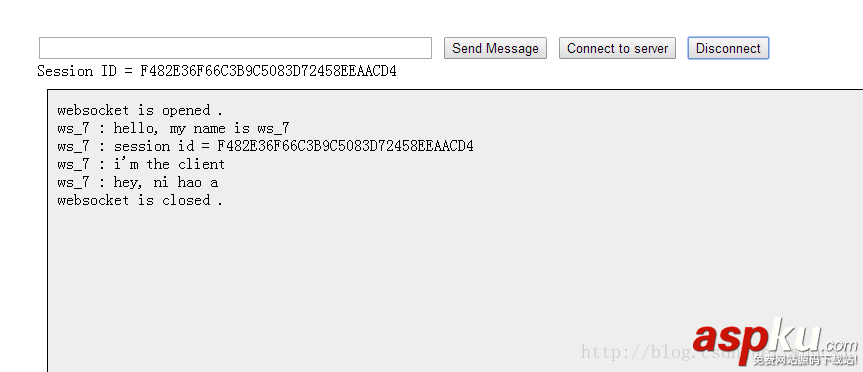
4. 結果


這里看到 WebSocket建立的連接所訪問的Session和HTTP訪問的Session是一致的。
以上就是本文的全部內容,希望對大家的學習有所幫助,也希望大家多多支持VEVB武林網。
新聞熱點
疑難解答
圖片精選