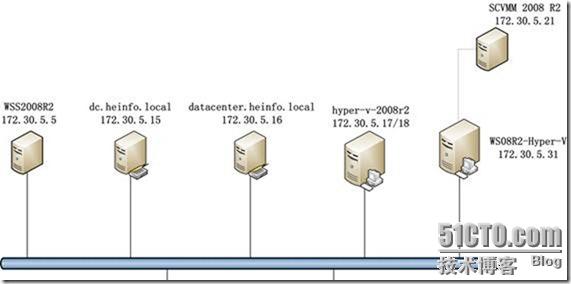
前面主服務畫面 (< 畫面 4-9 >) 下第五個選項 ADDSWAP, 我們
用方向鍵往下移動到此, 之後按 鍵。 這畫面中的 /dev/hdb2
是系統自己抓到的, 無須額外手工指定, 不過, 前提是之前進行硬碟
分割時, 已經把 /dev/hdb2 的分割區型態 (Partition Type) 正確
設定為 〃linux swap〃。
以下自動化程序所作的有三個動作, 第一就是對現有的 Swap
Partition 執行規劃動作 (mkswap), 第二個動作, 是讓該新規劃好的
Swap partition 即刻生效 (swapon)。 最後一步, 則是安裝到將來系
統的 /etc/fstab, 這樣系統安裝完成後, 每次系統開機時就會自動啟
動虛擬記憶體。
<< 畫面 4-10 >>
______________________ SWAP SPACE DETECTED ________________________
? ?
? Slackware Setup has detected a swap partition: ?
? ?
? Device Boot Begin Start End Blocks Id System ?
? /dev/hdb2 101 101 160 30240 82 Linux swap ?
? ?
? Do you wish to install this as your swap partition? ?
? ?
?___________________________________________________________________?
? < Yes > < No > ?
____________________________________________________________________?
上面這畫面下, 按 就可以繼續到下面畫面, 假若要中斷
的話, 按 鍵可以移動反白到 < No > 區域。
<< 畫面 4-11 >>
________________________ MKSWAP WARNING ________________________
? IMPORTANT NOTE: If you have already made any of your swap ?
? partitions active (using the swapon command), then you ?
? should not allow Setup to use mkswap on your swap partitions, ?
? because it may corrupt memory pages that are currently ?
? swapped out. Instead, you will have to make sure that your ?
? swap partitions have been PRepared (with mkswap) before they ?
? will work. You might want to do this to any inactive swap ?
? partitions before you reboot. ?
________________________________________________________________ ?
? < OK > ?
________________________________________________________________ ?
<< 畫面 4-12 >>
________________________ USE MKSWAP? ________________________
? Do you want Setup to use mkswap on your swap partitions? ?
______________________________________________________________?
? < Yes > < No > ?
______________________________________________________________?
以上三個連續畫面所執行的, 也可以用下面這個指令手工完成, 這
提供讀者叁考。
$ /sbin/mkswap /dev/hdb2 30240
還有一點要注重, 假如以前已經做過這指令, 此處就不要重復。
至於操作方法, 上面畫面中, 可以移動 鍵, 選擇 No 不安裝,
這樣會直接跳到下面畫面。 假若以前沒有操作過, 可以直接按
,這樣會自動執行 mkswap動作。
下面畫面則無論如何一定要執行, 這樣就馬上才可以使 Swap
Partition 生效。 以此例來說, 會馬上增加約 30MB 的虛擬記憶體。
<< 畫面 4-13 >>
__________________ ACTIVATE SWAP SPACE? __________________
? If you have not already activated your swap partitions ?
? with 'swapon', you should do so at this time. Activate ?
? swap partitions with 'swapon'? ?
__________________________________________________________?
? < Yes > < No > ?
__________________________________________________________?
上面畫面所執行的, 就等同於以下這指令:
$ /sbin/swapon /dev/hdb2
下面這畫面, 安裝程式詢問說要不要更改 /etc/fstab, 這效果是
以後系統 (指安裝完成後的系統) 每次開機後, 會自行啟動該 Swap
Partition, 此處我們按 鍵, 選擇安裝。
<< 畫面 4-14 >>
______________________ SWAP SPACE CONFIGURED ________________________
? Your swapspace has been configured. This information will ?
? be added to your /etc/fstab: ?
? ?
? /dev/hdb2 swap swap defaults ?
? ?
? ?
? ?
? ?
? ?
______________________________________________________________________?
? < OK > ?
______________________________________________________________________?
下面是最後一個畫面, 安裝程式詢問我們是否接下來繼續執行我
前面介紹的 『2. 指定安裝目的分割區 (Target)』, 若按
回答 Yes, 則會馬上接續下去, 若按 選擇 No, 則回到最外層
主服務畫面。
<< 畫面 4-15 >>
______________ CONTINUE WITH INSTALLATION? ______________
? Now that you've set up your swap space, you may ?
? continue on with the installation. Otherwise, you'll ?
? be returned to the main menu. Would you like to ?
? continue the installation and set up your TARGET ?
? drive(s)? ?
__________________________________________________________?
? < Yes > < No > ?
__________________________________________________________?