国产探花免费观看_亚洲丰满少妇自慰呻吟_97日韩有码在线_资源在线日韩欧美_一区二区精品毛片,辰东完美世界有声小说,欢乐颂第一季,yy玄幻小说排行榜完本

首頁 > 開發 > 綜合 > 正文

Struts+Spring+Hibernate實現上傳下載

2024-07-21 02:15:00
字體:
來源:轉載
供稿:網友
  引言

  文件的上傳和下載在j2ee編程已經是一個非常古老的話題了,也許您馬上就能掰著指頭數出好幾個著名的大件:如smartupload、apache的fileupload。但如果您的項目是構建在struts+spring+hibernate(以下稱ssh)框架上的,這些大件就顯得笨重而滄桑了,ssh提供了一個簡捷方便的文件上傳下載的方案,我們只需要通過一些配置并輔以少量的代碼就可以完好解決這個問題了。

  本文將圍繞ssh文件上傳下載的主題,向您詳細講述如何開發基于ssh的web程序。ssh各框架的均為當前最新版本:

  ·struts 1.2

  ·spring 1.2.5

  ·hibernate 3.0

  本文選用的數據庫為oracle 9i,當然你可以在不改動代碼的情況下,通過配置文件的調整將其移植到任何具有blob字段類型的數據庫上,如mysql,sqlserver等。

  總體實現

  上傳文件保存到t_file表中,t_file表結構如下:


圖 1 t_file表結構

  其中:

  ·file_id:文件id,32個字符,用hibernate的uuid.hex算法生成。

  ·file_name:文件名。

  ·file_content:文件內容,對應oracle的blob類型。

  ·remark:文件備注。

  文件數據存儲在blob類型的file_content表字段上,在spring中采用oraclelobhandler來處理lob字段(包括clob和blob),由于在程序中不需要引用到oracle數據驅動程序的具體類且屏蔽了不同數據庫處理lob字段方法上的差別,從而撤除程序在多數據庫移植上的樊籬。

  1.首先數據表中的blob字段在java領域對象中聲明為byte[]類型,而非java.sql.blob類型。

  2.數據表blob字段在hibernate持久化映射文件中的type為org.springframework.orm.hibernate3.support.blobbytearraytype,即spring所提供的用戶自定義的類型,而非java.sql.blob。

  3.在spring中使用org.springframework.jdbc.support.lob.oraclelobhandler處理oracle數據庫的blob類型字段。

  通過這樣的設置和配置,我們就可以象持久化表的一般字段類型一樣處理blob字段了。

  以上是spring+hibernate將文件二進制數據持久化到數據庫的解決方案,而struts通過將表單中file類型的組件映射為actionform中類型為org.apache.struts.upload. formfile的屬性來獲取表單提交的文件數據。

  綜上所述,我們可以通過圖 2,描繪出ssh處理文件上傳的方案:


圖 2 ssh處理文件上傳技術方案

  文件上傳的頁面如圖 3所示:


圖 3 文件上傳頁面

  文件下載的頁面如圖 4所示:


圖 4 文件下載頁面

  該工程的資源結構如圖 5所示:


圖 5 工程資源結構


  工程的類按ssh的層次結構劃分為數據持久層、業務層和web層;web-inf下的applicationcontext.xml為spring的配置文件,struts-config.xml為struts的配置文件,file-upload.jsp為文件上傳頁面,file-list.jsp為文件列表頁面。

  本文后面的章節將從數據持久層->業務層->web層的開發順序,逐層講解文件上傳下載的開發過程。

  數據持久層

  1、領域對象及映射文件

  您可以使用hibernate middlegen、hibernate tools、hibernate syhchronizer等工具或手工的方式,編寫hibernate的領域對象和映射文件。其中對應t_file表的領域對象tfile.java為:

  代碼 1 領域對象tfile

1. package sshfile.model;
2. public class tfile
3.{
4. private string fileid;
5. private string filename;
6. private byte[] filecontent;
7. private string remark;
8. …//getter and setter
9. }


  特別需要注意的是:數據庫表為blob類型的字段在tfile中的filecontent類型為byte[]。tfile的hibernate映射文件tfile.hbm.xml放在tfile .java類文件的相同目錄下:

  代碼 2 領域對象映射文件

1. <?xml version="1.0"?>
2. <!doctype hibernate-mapping public
3. "-//hibernate/hibernate mapping dtd 3.0//en"
4. "http://hibernate.sourceforge.net/hibernate-mapping-3.0.dtd" >
5. <hibernate-mapping>
6. <class name="sshfile.model.tfile" table="t_file">
7. <id name="fileid" type="java.lang.string" column="file_id">
8. <generator class="uuid.hex"/>
9. </id>
10. <property name="filecontent"
11. type="org.springframework.orm.hibernate3.support.blobbytearraytype"
12. column="file_content" lazy="true"/>
13. …//其它一般字段的映射
14. </class>
15. </hibernate-mapping>


  filecontent字段映射為spring所提供的blobbytearraytype類型,blobbytearraytype是用戶自定義的數據類型,它實現了hibernate 的org.hibernate.usertype.usertype接口。blobbytearraytype使用從sessionfactory獲取的lob操作句柄lobhandler將byte[]的數據保存到blob數據庫字段中。這樣,我們就再沒有必要通過硬編碼的方式,先insert然后再update來完成blob類型數據的持久化,這個原來難伺候的老爺終于被平民化了。關于lobhandler的配置請見本文后面的內容。

  此外lazy="true"說明地返回整個tfile對象時,并不返回filecontent這個字段的數據,只有在顯式調用tfile.getfilecontent()方法時才真正從數據庫中獲取filecontent的數據。這是hibernate3引入的新特性,對于包含重量級大數據的表字段,這種抽取方式提高了對大字段操作的靈活性,否則加載tfile對象的結果集時如果總是返回filecontent,這種批量的數據抽取將可以引起數據庫的"洪泛效應"。

  2、dao編寫和配置

  spring強調面向接口編程,所以我們將所有對tfile的數據操作的方法定義在tfiledao接口中,這些接口方法分別是:

  ·findbyfildid(string fileid)

  ·save(tfile tfile)

  ·list findall()

  tfiledaohibernate提供了對tfiledao接口基于hibernate的實現,如代碼 3所示:

  代碼 3 基于hibernate 的filedao實現類

1. package sshfile.dao;
2.
3. import sshfile.model.*;
4. import org.springframework.orm.hibernate3.support.hibernatedaosupport;
5. import java.util.list;
6.
7. public class tfiledaohibernate
8. extends hibernatedaosupport implements tfiledao
9. {
10. public tfile findbyfildid(string fileid)
11. {
12. return (tfile) gethibernatetemplate().get(tfile.class, fileid);
13. }
14. public void save(tfile tfile)
15. {
16. gethibernatetemplate().save(tfile);
17. gethibernatetemplate().flush();
18. }
19. public list findall()
20. {
21. return gethibernatetemplate().loadall(tfile.class);
22. }
23. }


  tfiledaohibernate通過擴展spring提供的hibernate支持類hibernatedaosupport而建立,hibernatedaosupport封裝了hibernatetemplate,而hibernatetemplate封裝了hibernate所提供幾乎所有的的數據操作方法,如execute(hibernatecallback action),load(class entityclass, serializable id),save(final object entity)等等。

  所以我們的dao只需要簡單地調用父類的hibernatetemplate就可以完成幾乎所有的數據庫操作了。

  由于spring通過代理hibernate完成數據層的操作,所以原hibernate的配置文件hibernate.cfg.xml的信息也轉移到spring的配置文件中:

  代碼 4 spring中有關hibernate的配置信息

1. <beans>
2. <!-- 數據源的配置 //-->
3. <bean id="datasource" class="org.apache.commons.dbcp.basicdatasource"
4. destroy-method="close">
5. <property name="driverclassname" value="oracle.jdbc.driver.oracledriver"/>
6. <property name="url" value="jdbc:oracle:thin:@localhost:1521:ora9i"/>
7. <property name="username" value="test"/>
8. <property name="password" value="test"/>
9. </bean>
10. <!-- hibernate會話工廠配置 //-->
11. <bean id="sessionfactory"
12. class="org.springframework.orm.hibernate3.localsessionfactorybean">
13. <property name="datasource" ref="datasource"/>
14. <property name="mappingdirectorylocations">
15. <list>
16. <value>classpath:/sshfile/model</value>
17. </list>
18. </property>
19. <property name="hibernateproperties">
20. <props>
21. <prop key="hibernate.dialect">org.hibernate.dialect.oracledialect</prop>
22. <prop key="hibernate.cglib.use_reflection_optimizer">true</prop>
23. </props>
24. </property>
25. </bean>
26. <!-- hibernate 模板//-->
27. <bean id="hibernatetemplate"
28. class="org.springframework.orm.hibernate3.hibernatetemplate">
29. <property name="sessionfactory" ref="sessionfactory"/>
30. </bean>
31. <!--dao配置 //-->
32. <bean id="tfiledao" class="sshfile.dao.tfiledaohibernate">
33. <property name="hibernatetemplate" ref="hibernatetemplate" />
34. </bean>
35. …
36. </beans>


  第3~9行定義了一個數據源,其實現類是apache的basicdatasource,第11~25行定義了hibernate的會話工廠,會話工廠類用spring提供的localsessionfactorybean維護,它注入了數據源和資源映射文件,此外還通過一些鍵值對設置了hibernate所需的屬性。

  其中第16行通過類路徑的映射方式,將sshfile.model類包目錄下的所有領域對象的映射文件裝載進來,在本文的例子里,它將裝載進tfile.hbm.xml映射文件。如果有多個映射文件需要聲明,使用類路徑映射方式顯然比直接單獨指定映射文件名的方式要簡便。

  第27~30行定義了spring代理hibernate數據操作的hibernatetemplate模板,而第32~34行將該模板注入到tfiledao中。

  需要指定的是spring 1.2.5提供了兩套hibernate的支持包,其中hibernate 2相關的封裝類位于org.springframework.orm.hibernate2.*包中,而hibernate 3.0的封裝類位于org.springframework.orm.hibernate3.*包中,需要根據您所選用hibernate版本進行正確選擇。

  3、lob字段處理的配置

  我們前面已經指出oracle的lob字段和一般類型的字段在操作上有一個明顯的區別--那就是你必須首先通過oracle的empty_blob()/empty_clob()初始化lob字段,然后獲取該字段的引用,通過這個引用更改其值。所以要完成對lob字段的操作,hibernate必須執行兩步數據庫訪問操作,先insert再update。

  使用blobbytearraytype字段類型后,為什么我們就可以象一般的字段類型一樣操作blob字段呢?可以確定的一點是:blobbytearraytype不可能逾越blob天生的操作方式,原來是blobbytearraytype數據類型本身具體數據訪問的功能,它通過lobhandler將兩次數據訪問的動作隱藏起來,使blob字段的操作在表現上和其他一般字段業類型無異,所以lobhandler即是那個"苦了我一個,幸福十億人"的那位幕后英雄。

  lobhandler必須注入到hibernate會話工廠sessionfactory中,因為sessionfactory負責產生與數據庫交互的session。lobhandler的配置如代碼 5所示:

  代碼 5 lob字段的處理句柄配置

1. <beans>
2. …
3. <bean id="nativejdbcextractor"
4. class="org.springframework.jdbc.support.nativejdbc.commonsdbcpnativejdbcextractor"
5. lazy-init="true"/>
6. <bean id="lobhandler"
7. class="org.springframework.jdbc.support.lob.oraclelobhandler" lazy-init="true">
8. <property name="nativejdbcextractor">
9. <ref local="nativejdbcextractor"/>
10. </property>
11. </bean>
12. …
13. </beans>


  首先,必須定義一個能夠從連接池中抽取出本地數據庫jdbc對象(如oracleconnection,oracleresultset等)的抽取器:nativejdbcextractor,這樣才可以執行一些特定數據庫的操作。對于那些僅封裝了connection而未包括statement的簡單數據連接池,simplenativejdbcextractor是效率最高的抽取器實現類,但具體到apache的basicdatasource連接池,它封裝了所有jdbc的對象,這時就需要使用commonsdbcpnativejdbcextractor了。spring針對幾個著名的web服務器的數據源提供了相應的jdbc抽取器:

  ·weblogic:weblogicnativejdbcextractor

  ·websphere:webspherenativejdbcextractor

  ·jboss:jbossnativejdbcextractor

  在定義了jdbc抽取器后,再定義lobhandler。spring 1.2.5提供了兩個lobhandler:

  ·defaultlobhandler:適用于大部分的數據庫,如sqlserver,mysql,對oracle 10g也適用,但不適用于oracle 9i(看來oracle 9i確實是個怪胎,誰叫oracle 公司自己都說oracle 9i是一個過渡性的產品呢)。

  ·oraclelobhandler:適用于oracle 9i和oracle 10g。

  由于我們的數據庫是oracle9i,所以使用oraclelobhandler。

  在配置完lobhandler后, 還需要將其注入到sessionfactory的bean中,下面是調用后的sessionfactory bean的配置:

  代碼 6 將lobhandler注入到sessionfactory中的配置

1. <beans>
2. …
3. <bean id="sessionfactory"
4. class="org.springframework.orm.hibernate3.localsessionfactorybean">
5. <property name="datasource" ref="datasource"/>
6. <!-- 為處理blob類型字段的句柄聲明 //-->
7. <property name="lobhandler" ref="lobhandler"/>
8. …
9. </bean>
10. …
11. </beans>


  如第7所示,通過sessionfactory的lobhandler屬性進行注入。

  業務層

  1、業務層接口

  "面向接口而非面向類編程"是spring不遺余力所推薦的編程原則,這條原則也已經為大部開發者所接受;此外,jdk的動態代理只對接口有效,否則必須使用cglib生成目標類的子類。我們依從于spring的倡導為業務類定義一個接口:

  代碼 7 業務層操作接口

1. public interface fileservice
2. {
3. void save(fileactionform fileform);//將提交的上傳文件保存到數據表中
4. list getallfile();//得到t_file所示記錄
5. void write(outputstream os,string fileid);//將某個文件的文件數據寫出到輸出流中
6. string getfilename(string fileid);//獲取文件名
7. }


  其中save(fileactionform fileform)方法,將封裝在fileform中的上傳文件保存到數據庫中,這里我們使用fileactionform作為方法入參,fileactionform是web層的表單數據對象,它封裝了提交表單的數據。將fileactionform直接作為業務層的接口入參,相當于將web層傳播到業務層中去,即將業務層綁定在特定的web層實現技術中,按照分層模型學院派的觀點,這是一種反模塊化的設計,但在"一般"的業務系統并無需提供多種ui界面,系統web層將來切換到另一種實現技術的可能性也微乎其微,所以筆者覺得沒有必要為了這個業務層完全獨立于調用層的過高目標而去搞一個額外的隔離層,浪費了原材料不說,還將系統搞得過于復雜,相比于其它原則,"簡單"始終是最大的一條原則。

  getallfile()負責獲取t_file表所有記錄,以便在網頁上顯示出來。

  而getfilename(string fileid)和write(outputstream os,string fileid)則用于下載某個特定的文件。具體的調用是將web層將response.getoutputstream()傳給write(outputstream os,string fileid)接口,業務層直接將文件數據輸出到這個響應流中。具體實現請參見錯誤!未找到引用源。節下載文件部分。

  2、業務層接口實現類

  fileservice的實現類為fileserviceimpl,其中save(fileactionform fileform)的實現如下所示:

  代碼 8 業務接口實現類之save()

1. …
2. public class fileserviceimpl
3. implements fileservice
4. {
5. private tfiledao tfiledao;
6. public void save(fileactionform fileform)
7. {
8. tfile tfile = new tfile();
9. try
10. {
11. tfile.setfilecontent(fileform.getfilecontent().getfiledata());
12. }
13. catch (filenotfoundexception ex)
14. {
15. throw new runtimeexception(ex);
16. }
17. catch (ioexception ex)
18. {
19. throw new runtimeexception(ex);
20. }
21. tfile.setfilename(fileform.getfilecontent().getfilename());
22. tfile.setremark(fileform.getremark());
23. tfiledao.save(tfile);
24. }
25. …
26. }


  在save(fileactionform fileform)方法里,完成兩個步驟:

  其一,象在水桶間倒水一樣,將fileactionform對象中的數據倒入到tfile對象中;

  其二,調用tfiledao保存數據。

  需要特別注意的是代碼的第11行,fileactionform的filecontent屬性為org.apache.struts.upload.formfile類型,formfile提供了一個方便的方法getfiledata(),即可獲取文件的二進制數據。通過解讀formfile接口實現類diskfile的原碼,我們可能知道formfile本身并不緩存文件的數據,只有實際調用getfiledata()時,才從磁盤文件輸入流中獲取數據。由于formfile使用流讀取方式獲取數據,本身沒有緩存文件的所有數據,所以對于上傳超大體積的文件,也是沒有問題的;但是,由于數據持久層的tfile使用byte[]來緩存文件的數據,所以并不適合處理超大體積的文件(如100m),對于超大體積的文件,依然需要使用java.sql.blob類型以常規流操作的方式來處理。

  此外,通過fileform的getfilename()方法就可以獲得上傳文件的文件名,如第21行代碼所示。

  write(outputstream os,string fileid)方法的實現,如代碼 9所示:

  代碼 9 業務接口實現類之write()

1. …
2. public class fileserviceimpl
3. implements fileservice
4. {
5.
6. public void write(outputstream os, string fileid)
7. {
8. tfile tfile = tfiledao.findbyfildid(fileid);
9. try
10. {
11. os.write(tfile.getfilecontent());
12. os.flush();
13. }
14. catch (ioexception ex)
15. {
16. throw new runtimeexception(ex);
17. }
18. }
19. …
20. }


  write(outputstream os,string fileid)也簡單地分為兩個操作步驟,首先,根據fileid加載表記錄,然后將filecontent寫入到輸出流中。

  3、spring事務配置

  下面,我們來看如何在spring配置文件中為fileservice配置聲明性的事務

1. <beans>
2. …
3. <bean id="transactionmanager"
4. class="org.springframework.orm.hibernate3.hibernatetransactionmanager">
5. <property name="sessionfactory" ref="sessionfactory"/>
6. </bean>
7. <!-- 事務處理的aop配置 //-->
8. <bean id="txproxytemplate" abstract="true"
9. class="org.springframework.transaction.interceptor.transactionproxyfactorybean">
10. <property name="transactionmanager" ref="transactionmanager"/>
11. <property name="transactionattributes">
12. <props>
13. <prop key="get*">propagation_required,readonly</prop>
14. <prop key="find*">propagation_required,readonly</prop>
15. <prop key="save">propagation_required</prop>
16. <prop key="write">propagation_required,readonly</prop>
17. </props>
18. </property>
19. </bean>
20. <bean id="fileservice" parent="txproxytemplate">
21. <property name="target">
22. <bean class="sshfile.service.fileserviceimpl">
23. <property name="tfiledao" ref="tfiledao"/>
24. </bean>
25. </property>
26. </bean>
27. </beans>


  spring的事務配置包括兩個部分:

  其一,定義事務管理器transactionmanager,使用hibernatetransactionmanager實現事務管理;

  其二,對各個業務接口進行定義,其實txproxytemplate和fileservice是父子節點的關系,本來可以將txproxytemplate定義的內容合并到fileservice中一起定義,由于我們的系統僅有一個業務接口需要定義,所以將其定義的一部分抽象到父節點txproxytemplate中意義確實不大,但是對于真實的系統,往往擁有為數眾多的業務接口需要定義,將這些業務接口定義內容的共同部分抽取到一個父節點中,然后在子節點中通過parent進行關聯,就可以大大簡化業務接口的配置了。

  父節點txproxytemplate注入了事務管理器,此外還定義了業務接口事務管理的方法(允許通過通配符的方式進行匹配聲明,如前兩個接口方法),有些接口方法僅對數據進行讀操作,而另一些接口方法需要涉及到數據的更改。對于前者,可以通過readonly標識出來,這樣有利于操作性能的提高,需要注意的是由于父類節點定義的bean僅是子節點配置信息的抽象,并不能具體實現化一個bean對象,所以需要特別標注為abstract="true",如第8行所示。

  fileservice作為一個目標類被注入到事務代理器中,而fileservice實現類所需要的tfiledao實例,通過引用3.2節中定義的tfiledao bean注入。

  web層實現

  1、web層的構件和交互流程

  web層包括主要3個功能:

  ·上傳文件。

  ·列出所有已經上傳的文件列表,以供點擊下載。

  ·下載文件。

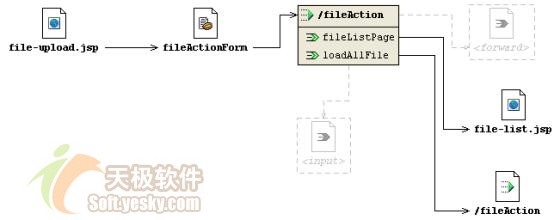
  web層實現構件包括與2個jsp頁面,1個actionform及一個action:

  ·file-upload.jsp:上傳文件的頁面。

  ·file-list.jsp:已經上傳文件的列表頁面。

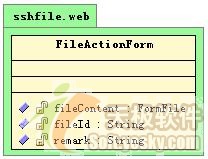
  ·fileactionform:file-upload.jsp頁面表單對應的actionform。

  ·fileaction:繼承org.apache.struts.actions.dispatchaction的action,這樣這個action就可以通過一個url參數區分中響應不同的請求。

  web層的這些構件的交互流程如圖 6所示:


圖 6 web層struts流程圖

  其中,在執行文件上傳的請求時,fileaction在執行文件上傳后,forward到loadallfile出口中,loadallfile加載數據庫中所有已經上傳的記錄,然后forward到名為filelistpage的出口中,調用file-list.jsp頁面顯示已經上傳的記錄。

  2、fileaction功能

  struts 1.0的action有一個弱項:一個action只能處理一種請求,struts 1.1中引入了一個dispatchaction,允許通過url參數指定調用action中的某個方法,如http://yourwebsite/fileaction.do?method=upload即調用fileaction中的upload方法。通過這種方式,我們就可以將一些相關的請求集中到一個action當中編寫,而沒有必要為某個請求操作編寫一個action類。但是參數名是要在struts-config.xml中配置的:

1. <struts-config>
2. <form-beans>
3. <form-bean name="fileactionform" type="sshfile.web.fileactionform" />
4. </form-beans>
5. <action-mappings>
6. <action name="fileactionform" parameter="method" path="/fileaction"
7. type="sshfile.web.fileaction">
8. <forward name="filelistpage" path="/file-list.jsp" />
9. <forward name="loadallfile" path="/fileaction.do?method=listallfile" />
10. </action>
11. </action-mappings>
12. </struts-config>


  第6行的parameter="method"指定了承載方法名的參數,第9行中,我們還配置了一個調用fileaction不同方法的action出口。

  fileaction共有3個請求響應的方法,它們分別是:

  ·upload(…):處理上傳文件的請求。

  ·listallfile(…):處理加載數據庫表中所有記錄的請求。

  ·download(…):處理下載文件的請求。

  下面我們分別對這3個請求處理方法進行講解。

  2.1 上傳文件

  上傳文件的請求處理方法非常簡單,簡之言之,就是從spring容器中獲取業務層處理類fileservice,調用其save(fileactionform form)方法上傳文件,如下所示:

1. public class fileaction
2. extends dispatchaction
3. {
4. //將上傳文件保存到數據庫中
5. public actionforward upload(actionmapping mapping, actionform form,
6. httpservletrequest request,
7. httpservletresponse response)
8. {
9. fileactionform fileform = (fileactionform) form;
10. fileservice fileservice = getfileservice();
11. fileservice.save(fileform);
12. return mapping.findforward("loadallfile");
13. }
14. //從spring容器中獲取fileservice對象
15. private fileservice getfileservice()
16. {
17. applicationcontext appcontext = webapplicationcontextutils.
18. getwebapplicationcontext(this.getservlet().getservletcontext());
19. return (fileservice) appcontext.getbean("fileservice");
20. }
21. …
22. }


  由于fileaction其它兩個請求處理方法也需要從spring容器中獲取fileservice實例,所以我們特別提供了一個getfileservice()方法(第15~21行)。重構的一條原則就是:"發現代碼中有重復的表達式,將其提取為一個變量;發現類中有重復的代碼段,將其提取為一個方法;發現不同類中有相同的方法,將其提取為一個類"。在真實的系統中,往往擁有多個action和多個service類,這時一個比較好的設置思路是,提供一個獲取所有service實現對象的工具類,這樣就可以將spring 的service配置信息屏蔽在一個類中,否則service的配置名字散落在程序各處,維護性是很差的。

  2.2 列出所有已經上傳的文件

  listallfile方法調用servie層方法加載t_file表中所有記錄,并將其保存在request域中,然后forward到列表頁面中:

1. public class fileaction
2. extends dispatchaction
3. {
4. …
5. public actionforward listallfile(actionmapping mapping, actionform form,
6. httpservletrequest request,
7. httpservletresponse response)
8. throws moduleexception
9. {
10. fileservice fileservice = getfileservice();
11. list filelist = fileservice.getallfile();
12. request.setattribute("filelist",filelist);
13. return mapping.findforward("filelistpage");
14. }
15. }


  file-list.jsp頁面使用struts標簽展示出保存在request域中的記錄:

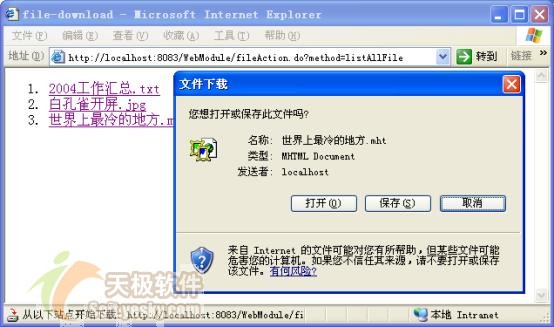
1. <%@page contenttype="text/html; charset=gbk"%>
2. <%@taglib uri="/web-inf/struts-logic.tld" prefix="logic"%>
3. <%@taglib uri="/web-inf/struts-bean.tld" prefix="bean"%>
4. <html>
5. <head>
6. <title>file-download</title>
7. </head>
8. <body bgcolor="#ffffff">
9. <ol>
10. <logic:iterate id="item" name="filelist" scope="request">
11. <li>
12. <a href='fileaction.do?method=download&fileid=
13. <bean:write name="item"property="fileid"/>'>
14. <bean:write name="item" property="filename"/>
15. </a>
16. </li>
17. </logic:iterate>
18. </ol>
19. </body>
20. </html>


  展現頁面的每條記錄掛接著一個鏈接地址,形如:fileaction.do?method=download&fileid=xxx,method參數指定了這個請求由fileaction的download方法來響應,fileid指定了記錄的主鍵。

  由于在fileactionform中,我們定義了fileid的屬性,所以在download響應方法中,我們將可以從fileactionform中取得fileid的值。這里涉及到一個處理多個請求action所對應的actionform的設計問題,由于原來的action只能對應一個請求,那么原來的actionform非常簡單,它僅需要將這個請求的參數項作為其屬性就可以了,但現在一個action對應多個請求,每個請求所對應的參數項是不一樣的,此時的actionform的屬性就必須是多請求參數項的并集了。所以,除了文件上傳請求所對應的filecontent和remark屬性外還包括文件下載的fileid屬性:


圖 7 fileactionform

  當然這樣會造成屬性的冗余,比如在文件上傳的請求中,只會用到filecontent和remark屬性,而在文件下載的請求時,只會使用到fileid屬性。但這種冗余是會帶來好處的--它使得一個action可以處理多個請求。

  2.3 下載文件

  在列表頁面中點擊一個文件下載,其請求由fileaction的download方法來響應,download方法調用業務層的fileservice方法,獲取文件數據并寫出到response的響應流中。通過合理設置http響應頭參數,將響應流在客戶端表現為一個下載文件對話框,其代碼如下所示:

  代碼 10 業務接口實現類之download

1. public class fileaction
2. extends dispatchaction
3. {
4. …
5. public actionforward download(actionmapping mapping, actionform form,
6. httpservletrequest request,
7. httpservletresponse response)
8. throws moduleexception
9. {
10. fileactionform fileform = (fileactionform) form;
11. fileservice fileservice = getfileservice();
12. string filename = fileservice.getfilename(fileform.getfileid());
13. try
14. {
15. response.setcontenttype("application/x-msdownload");
16. response.setheader("content-disposition",
17. "attachment;" + " filename="+
18. new string(filename.getbytes(), "iso-8859-1"));
19. fileservice.write(response.getoutputstream(), fileform.getfileid());
20. }
21. catch (exception e)
22. {
23. throw new moduleexception(e.getmessage());
24. }
25. return null;
26. }
27. }


  第15~18行,設置http響應頭,將響應類型設置為application/x-msdownload mime類型,則響應流在ie中將彈出一個文件下載的對話框,如圖 4所示。ie所支持的mime類型多達26種,您可以通過這個網址查看其他的mime類型:

http://msdn.microsoft.com/workshop/networking/moniker/overview/appendix_a.asp。

  如果下載文件的文件名含有中文字符,如果不對其進行硬編碼,如第18行所示,客戶文件下載對話框中出現的文件名將會發生亂碼。
第19行代碼獲得response的輸出流,作為fileservie write(outputstream os,string fileid)的入參,這樣文件的內容將寫到response的輸出流中。

  3、web.xml文件的配置

  spring容器在何時啟動呢?我可以在web容器初始化來執行啟動spring容器的操作,spring提供了兩種方式啟動的方法:

  ·通過org.springframework.web.context .contextloaderlistener容器監聽器,在web容器初始化時觸發初始化spring容器,在web.xml中通過<listener></listener>對其進行配置。

  ·通過servlet org.springframework.web.context.contextloaderservlet,將其配置為自動啟動的servlet,在web容器初始化時,通過這個servlet啟動spring容器。

  在初始化spring容器之前,必須先初始化log4j的引擎,spring也提供了容器監聽器和自動啟動servlet兩種方式對log4j引擎進行初始化:

  ·org.springframework.web.util .log4jconfiglistener

  ·org.springframework.web.util.log4jconfigservlet

  下面我們來說明如何配置web.xml啟動spring容器:

  代碼 11 web.xml中對應spring的配置內容

1. <web-app>
2. <context-param>
3. <param-name>contextconfiglocation</param-name>
4. <param-value>/web-inf/applicationcontext.xml</param-value>
5. </context-param>
6. <context-param>
7. <param-name>log4jconfiglocation</param-name>
8. <param-value>/web-inf/log4j.properties</param-value>
9. </context-param>
10. <servlet>
11. <servlet-name>log4jinitservlet</servlet-name>
12. <servlet-class>org.springframework.web.util.log4jconfigservlet</servlet-class>
13. <load-on-startup>1</load-on-startup>
14. </servlet>
15. <servlet>
16. <servlet-name>springinitservlet</servlet-name>
17. <servlet-class>org.springframework.web.context.contextloaderservlet</servlet-class>
18. <load-on-startup>2</load-on-startup>
19. </servlet>
20. …
21. </web-app>


  啟動spring容器時,需要得到兩個信息:spring配置文件的地址和log4j屬性文件,這兩上信息分別通過contextconfiglocationweb和log4jconfiglocation容器參數指定,如果有多個spring配置文件,則用逗號隔開,如:

/web-inf/applicationcontext_1.xml, /web-inf/applicationcontext_1.xm2

  由于在啟動contextloaderservlet之前,必須事先初始化log4j的引擎,所以log4jconfigservlet必須在contextloaderservlet之前啟動,這通過<load-on-startup>來指定它們啟動的先后順序。

  亂碼是開發web應用程序一個比較老套又常見問題,由于不同web應用服務器的默認編碼是不一樣的,為了方便web應用在不同的web應用服務器上移植,最好的做法是web程序自身來處理編碼轉換的工作。經典的作法是在web.xml中配置一個編碼轉換過濾器,spring就提供了一個編碼過濾器類characterencodingfilter,下面,我們為應用配置上這個過濾器:

1. <web-app>
2. …
3. <filter>
4. <filter-name>encodingfilter</filter-name>
5. <filter-class>org.springframework.web.filter.characterencodingfilter</filter-class>
6. <init-param>
7. <param-name>encoding</param-name>
8. <param-value>gbk</param-value>
9. </init-param>
10. </filter>
11. <filter-mapping>
12. <filter-name>encodingfilter</filter-name>
13. <url-pattern>/*</url-pattern>
14. </filter-mapping>
15. …
16. </web-app>


  spring的過濾器類是org.springframework.web.filter.characterencodingfilter,通過encoding參數指定編碼轉換類型為gbk,<filter-mapping>的配置使該過濾器截獲所有的請示。

  struts的框架也需要在web.xml中配置,想必讀者朋友對struts的配置都很熟悉,故在此不再提及,請參見本文所提供的源碼。

  總結

  本文通過一個文件上傳下載的web應用,講解了如何構建基于ssh的web應用,通過struts和formfile,spring的lobhandler以及spring為hibernateblob處理所提供的用戶類blobbytearraytype ,實現上傳和下載文件的功能僅需要廖廖數行的代碼即告完成。讀者只需對程序作稍許的調整,即可處理clob字段:

  ·領域對象對應clob字段的屬性聲明為string類型;

  ·映射文件對應clob字段的屬性聲明為org.springframework.orm.hibernate3.support.clobstringtype類型。

  本文通過ssh對文件上傳下載簡捷完美的實現得以管中窺豹了解ssh強強聯合構建web應用的強大優勢。在行文中,還穿插了一些分層的設計經驗,配置技巧和spring所提供的方便類,相信這些知識對您的開發都有所裨益。

發表評論 共有條評論
用戶名: 密碼:
驗證碼: 匿名發表
主站蜘蛛池模板: 神木县| 平利县| 梅州市| 奇台县| 温宿县| 南开区| 通城县| 大名县| 宝坻区| 西盟| 浙江省| 晋宁县| 泗水县| 婺源县| 会东县| 南宁市| 云龙县| 岳阳市| 龙泉市| 建阳市| 白玉县| 社会| 鹤壁市| 仁布县| 林西县| 万盛区| 陕西省| 三门峡市| 通道| 雷波县| 江都市| 醴陵市| 沙洋县| 兰坪| 和静县| 通榆县| 镇平县| 邛崃市| 汕尾市| 泰安市| 木兰县|