iOS 控件設(shè)置圓角,避免離屏渲染。
離屏渲染:指GPU(圖形處理器)在當(dāng)前屏幕緩沖區(qū)外新開辟一個(gè)渲染緩沖區(qū)進(jìn)行工作。這會(huì)給我們帶來(lái)額外的性能損耗,如果這樣的操作達(dá)到一定數(shù)量,會(huì)觸發(fā)緩沖區(qū)的頻繁合并和上下文的的頻繁切換,會(huì)出現(xiàn)卡頓、掉幀現(xiàn)象。造成離屏渲染的原因有很多,如:shouldRasterize(光柵化)、mask(遮罩層)、shadows(陰影)、EdgeAnntialiasing(抗鋸齒)、cornerRadius(圓角)等等。
下面說(shuō)一下什么情況下設(shè)置圓角會(huì)造成離屏渲染:
//設(shè)置cornerRadius>0且masksToBounds為YESview.layer.cornerRadius = 10.f;view.layer.masksToBounds = YES; //設(shè)置cornerRadius>0且masksToBounds為YESview.layer.cornerRadius = 10.f;view.clipToBounds = YES; //像下面設(shè)置view.layer.maskUIBezierPath *path = [UIBezierPath bezierPathWithRoundedRect:imgView.bounds byRoundingCorners:UIRectCornerAllCorners cornerRadii:CGSizeMake(10.f, 10.f)];CAShapeLayer *maskLayer = [[CAShapeLayer alloc] init];maskLayer.frame = view.bounds;maskLayer.path = path.CGPath;view.layer.mask = maskLayer;
上面第一種應(yīng)該是最常用的,是在設(shè)置了圓角及masksToBounds為YES時(shí),才會(huì)觸發(fā)離屏渲染,而masksToBounds默認(rèn)是NO,也就是說(shuō)只要不設(shè)置這個(gè)屬性就能避免很多情況了,下面說(shuō)一下如何切一個(gè)不觸發(fā)離屏渲染的圓角:
UIView、UITextField、UITextView等大部分控件都可以像下面這樣設(shè)置:
view.layer.cornerRadius = 10.f;view.layer.masksToBounds = NO;
有一些特殊情況,UILabel設(shè)置時(shí),不要設(shè)置label.backgroundColor,應(yīng)設(shè)置:
label.layer.cornerRadius = 10.f;label.layer.backgroundColor = [UIColor whiteColor].CGColor;
有圖片的UIButton、UIIMageView,用drawInRect繪制UIImage圓角:
UIBezierPath *bezierPath = [UIBezierPath bezierPathWithRoundedRect:rect cornerRadius:cornerRadius];UIGraphicsBeginImageContextWithOptions(rect.size, false, [UIScreen mainScreen].scale);CGContextAddPath(UIGraphicsGetCurrentContext(), bezierPath.CGPath);CGContextClip(UIGraphicsGetCurrentContext());[self drawInRect:rect]; CGContextDrawPath(UIGraphicsGetCurrentContext(), kCGPathFillStroke);UIImage *image = UIGraphicsGetImageFromCurrentImageContext();UIGraphicsEndImageContext();
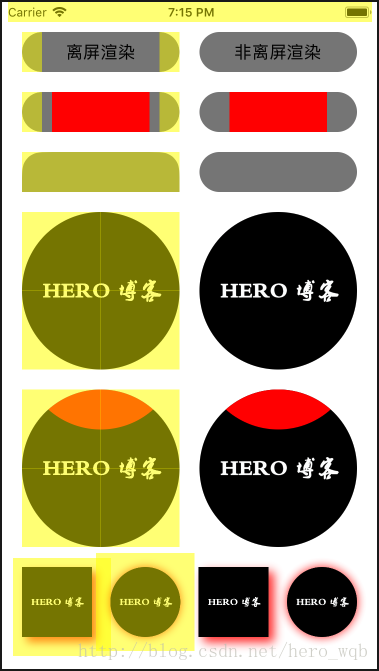
查看離屏渲染,模擬器可以選中“Debug - Color Off-screen Rendered”開啟調(diào)試,真機(jī)可以用Instruments檢測(cè),“Instruments - Core Animation - Debug Options - Color Offscreen-Rendered Yellow”開啟調(diào)試,開啟后,有離屏渲染的圖層會(huì)變成高亮的黃色。
寫了個(gè)離屏渲染的樣例:
下面貼上代碼:
控制器ViewController:
#import "ViewController.h"#import "UIImage+HWCorner.h" #define KMainW [UIScreen mainScreen].bounds.size.width @interface ViewController () @end @implementation ViewController - (void)viewDidLoad { [super viewDidLoad]; self.view.backgroundColor = [UIColor whiteColor]; //創(chuàng)建控件 [self creatControl];} - (void)creatControl{ CGFloat margin = 20.f; CGFloat controlW = (KMainW - margin * 3) * 0.5; NSArray *titleArray = @[@"離屏渲染", @"非離屏渲染"]; for (int i = 0; i < titleArray.count; i++) { CGFloat controlX = margin + (controlW + margin) * i; //UILabel UILabel *label = [[UILabel alloc] initWithFrame:CGRectMake(controlX, 30, controlW, 40)]; label.layer.backgroundColor = [[UIColor grayColor] CGColor]; label.text = titleArray[i]; label.textAlignment = NSTextAlignmentCenter; label.layer.cornerRadius = label.bounds.size.height * 0.5; label.layer.masksToBounds = i == 0 ? YES : NO; [self.view addSubview:label]; //UIView UIView *view = [[UIView alloc] initWithFrame:CGRectMake(controlX, CGRectGetMaxY(label.frame) + margin, controlW, 40)]; view.backgroundColor = [UIColor grayColor]; view.layer.cornerRadius = view.bounds.size.height * 0.5; view.layer.masksToBounds = i == 0 ? YES : NO; [self.view addSubview:view]; //UIView若未添加子控件,設(shè)置view.layer.masksToBounds = YES;也不會(huì)造成離屏渲染 UIView *subView = [[UIView alloc] initWithFrame:CGRectMake(30, 0, controlW - 60, 40)]; subView.backgroundColor = [UIColor redColor]; [view addSubview:subView]; //UITextView UITextView *textView = [[UITextView alloc] initWithFrame:CGRectMake(controlX, CGRectGetMaxY(view.frame) + margin, controlW, 40)]; textView.userInteractionEnabled = NO; textView.backgroundColor = [UIColor grayColor]; if (i == 0) { /* 這里換了一種實(shí)現(xiàn)方法,用UIBezierPath賦值layer.mask,兩種方式都會(huì)造成離屏渲染 textView.layer.cornerRadius = textView.bounds.size.height * 0.5; textView.layer.masksToBounds = YES; */ UIBezierPath *path = [UIBezierPath bezierPathWithRoundedRect:textView.bounds byRoundingCorners:UIRectCornerTopLeft | UIRectCornerTopRight cornerRadii:CGSizeMake(textView.bounds.size.height * 0.5, textView.bounds.size.height * 0.5)]; CAShapeLayer *maskLayer = [[CAShapeLayer alloc] init]; maskLayer.frame = textView.bounds; maskLayer.path = path.CGPath; textView.layer.mask = maskLayer; }else { textView.layer.cornerRadius = textView.bounds.size.height * 0.5; textView.layer.masksToBounds = NO; } [self.view addSubview:textView]; //UIButton UIButton *button = [[UIButton alloc] initWithFrame:CGRectMake(controlX, CGRectGetMaxY(textView.frame) + margin, controlW, controlW)]; if (i == 0) { [button setImage:[UIImage imageNamed:@"hero_1"] forState:UIControlStateNormal]; button.layer.cornerRadius = button.bounds.size.width * 0.5; button.layer.masksToBounds = YES; }else { [button setImage:[[UIImage imageNamed:@"hero_1"] drawCornerInRect:button.bounds cornerRadius:button.bounds.size.width * 0.5] forState:UIControlStateNormal]; } [self.view addSubview:button]; //UIImageView設(shè)置圓角 UIImageView *imageView = [[UIImageView alloc] initWithFrame:CGRectMake(controlX, CGRectGetMaxY(button.frame) + margin, controlW, controlW)]; if (i == 0) { [imageView setImage:[UIImage imageNamed:@"hero_1"]]; imageView.layer.cornerRadius = imageView.bounds.size.width * 0.5; imageView.layer.masksToBounds = YES; }else { [imageView setImage:[[UIImage imageNamed:@"hero_1"] drawCornerInRect:imageView.bounds cornerRadius:imageView.bounds.size.width * 0.5]]; } [self.view addSubview:imageView]; //UIImageView若未添加子控件,設(shè)置imageView.layer.masksToBounds = YES;也不會(huì)造成離屏渲染 UIView *subImageView = [[UIView alloc] initWithFrame:CGRectMake(0, 0, controlW, 40)]; subImageView.backgroundColor = [UIColor redColor]; subImageView.layer.cornerRadius = imageView.bounds.size.width * 0.5; [imageView addSubview:subImageView]; //UIImageView設(shè)置陰影 CGFloat imgW = 70.f; CGFloat imgPadding = (KMainW - imgW * 4 - margin * 2) / 3; UIImageView *shadowImgView = [[UIImageView alloc] initWithFrame:CGRectMake(margin + (imgW + imgPadding) * 2 * i, CGRectGetMaxY(imageView.frame) + margin, imgW, imgW)]; [shadowImgView setImage:[UIImage imageNamed:@"hero_1"]]; shadowImgView.layer.shadowColor = [UIColor redColor].CGColor; shadowImgView.layer.shadowOpacity = 0.8f; shadowImgView.layer.shadowOffset = CGSizeMake(5, 5); shadowImgView.layer.shadowRadius = 5.f; if (i == 1) { UIBezierPath *path = [UIBezierPath bezierPathWithRect:shadowImgView.bounds]; shadowImgView.layer.shadowPath = path.CGPath; } [self.view addSubview:shadowImgView]; //UIImageView設(shè)置陰影+圓角 UIImageView *shadowCorImgView = [[UIImageView alloc] initWithFrame:CGRectMake(margin + imgW + imgPadding + (imgW + imgPadding) * 2 * i, CGRectGetMinY(shadowImgView.frame), imgW, imgW)]; [shadowCorImgView setImage:[[UIImage imageNamed:@"hero_1"] drawCornerInRect:imageView.bounds cornerRadius:imageView.bounds.size.width * 0.5]]; shadowCorImgView.layer.shadowColor = [UIColor redColor].CGColor; shadowCorImgView.layer.shadowOpacity = 0.8f; shadowCorImgView.layer.shadowOffset = CGSizeMake(0, 0); shadowCorImgView.layer.shadowRadius = 5.f; if (i == 1) { UIBezierPath *path = [UIBezierPath bezierPathWithRoundedRect:shadowCorImgView.bounds cornerRadius:shadowCorImgView.bounds.size.height * 0.5]; shadowCorImgView.layer.shadowPath = path.CGPath; } [self.view addSubview:shadowCorImgView]; }} @endUIImage分類,UIImage+HWCorner:
#import <UIKit/UIKit.h> @interface UIImage (HWCorner) //繪制圖片圓角- (UIImage *)drawCornerInRect:(CGRect)rect cornerRadius:(CGFloat)cornerRadius; @end /*** ---------------分割線--------------- ***/ #import "UIImage+HWCorner.h" @implementation UIImage (HWCorner) //繪制圖片圓角- (UIImage *)drawCornerInRect:(CGRect)rect cornerRadius:(CGFloat)cornerRadius{ UIBezierPath *bezierPath = [UIBezierPath bezierPathWithRoundedRect:rect cornerRadius:cornerRadius]; UIGraphicsBeginImageContextWithOptions(rect.size, false, [UIScreen mainScreen].scale); CGContextAddPath(UIGraphicsGetCurrentContext(), bezierPath.CGPath); CGContextClip(UIGraphicsGetCurrentContext()); [self drawInRect:rect]; CGContextDrawPath(UIGraphicsGetCurrentContext(), kCGPathFillStroke); UIImage *image = UIGraphicsGetImageFromCurrentImageContext(); UIGraphicsEndImageContext(); return image;} @end最后說(shuō)一下,只有在大量的離屏渲染情況時(shí)才會(huì)出現(xiàn)卡頓、掉幀等現(xiàn)象,沒(méi)必要過(guò)分追求容不下一絲黃色。性能上Instruments工具還可以檢測(cè)很多。
以上就是本文的全部?jī)?nèi)容,希望對(duì)大家的學(xué)習(xí)有所幫助,也希望大家多多支持武林網(wǎng)。
新聞熱點(diǎn)


疑難解答
圖片精選