In this tutorial, we’ll explain how to create a semi-realistic flash stick with gradients and simple shapes. We will make our own custom brush to create tattoo style swooshes. Also, we’ll review how to use Global Colors in Illustrator, which allows us to flexibly change the colors of an object on the fly.
本教程,我們會教你使用漸變和簡單的形狀是如何繪制一個半寫實的閃存盤的。制作U盤上的印花圖案我們會用到自己創建的自定義筆刷。我們還會教你如何使用Illustrator中的全局色,以使我們非常快地更改一個對象的顏色。
Final Image Preview
To begin with let’s have a look at the image we’ll be creating.
成品圖預覽
首先讓我們先來看一下我們將要繪制的成品圖。

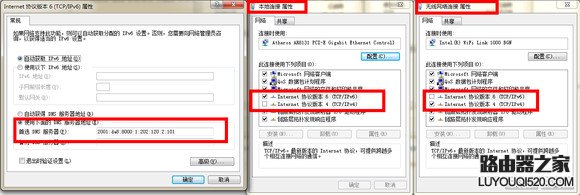
Step 1
Before we begin, we will have a look at the Swatch Palette. We need to set up our Global Colors right from the start. I picked four colors as a base. I chose a white, black and two grays. Once I added them in my Swatch Palette, I deleted all other color swatches.
Now let’s set up the Global Colors. Double-click on the Color Swatch. In the Swatch Options Menu, select the option Global. Leave the Color Type at Process Color, then click OK. The Color Swatch now has a small white triangle in the bottom right corner. This indicates that the color is now a Global Color. If we apply a Global Color to any object or path, we can later change the color on the fly and it will be applied where the Global Color was added.
1. 在我們開始教學之前,我們先來看一下色板。首先,我們先要設置全局色。我選了4種顏色作為基色,我選了白色,黑色和2個灰色。當我們把這4種顏色拖進色板調板之后,我就可以刪除其它不需要的色板了。
現在,我們開始設置全局色。在色板上雙擊,然后在色板選項窗口中,選擇“全局色”選項。顏色的類型保留為印刷色,然后點確定。現在色板的右下角有一個小的白色的三角形,這表示這個顏色現在是全局色了。如果我們把全局色應用到某個對象或者路徑時,我們在之后還可以很快地更改原來的顏色,并且應用的還是新增的全局色。

Step 2
Create a rectangle with the Rectangle Tool (M). Use the size indicated in the image below.
2. 使用矩形工具(M)繪制一個矩形,使用的大小如下圖所示。

Step 3
Let’s start creating. Select the object and go to Effect > Stylize > Round Corners and apply a tiny amount to it of .018pt. This will give us small rounded corners.
3. 我們繼續繪制。選擇矩形對象,然后執行效果菜單>風格化>圓角,圓角半徑:0.018pt。

Step 4
Create another rectangle on top of the other one, and use the size as indicated below.
4. 在矩形的上面繪制另一個矩形,使用的大小如下所示。
譯者提示:可以Ctrl+C,Ctrl+F復制第3步的矩形,然后在變換調板中點“約束寬度和高度比例”的圖標,在高度字段框內輸入數值。這樣第5步也可省略。

Step 5
Select both rectangles and align them centered, both horizontally and vertically.
5. 選擇這2個對象,居中對齊。

Step 6
Apply a linear gradient to the second shape. We have to make sure that we use the Global Colors that we have set up. To do so, drag the desired color swatch onto the gradient slider. If one is missed, the color change won’t be applied.
6. 第2個矩形應用線性漸變。我們必須要確定我們使用的是我們之前設置的全局色。選中矩形,切到漸變調板,把想要的色板拖移到漸變的滑動塊上。如果沒有選中對象的話,漸變將不起作用。

Step 7
Create another rectangle on top and use the size indicated below.
7. 在上面繪制另一個矩形,使用大小如下所示。

新聞熱點


疑難解答
圖片精選