本文實(shí)例分析了Android重寫View并自定義屬性的方法。分享給大家供大家參考,具體如下:
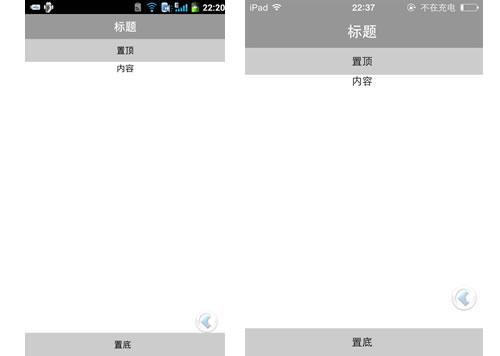
這里通過(guò)自定義屬性 實(shí)現(xiàn)如下圖所示效果:

第一步:在res/values的目錄下新建一個(gè)文件attrs.xml
聲明一些自定義屬性
<?xml version="1.0" encoding="utf-8"?><resources> <declare-styleable name="CustomViewStyle"> <attr name="customText" format="string" /> <attr name="customTextColor" format="color" /> <attr name="customTextSize" format="dimension" /> </declare-styleable></resources>
第二步:在layout目錄下新建布局文件activity_main.xml
特別注意要在外層控件加上這個(gè)聲明:
格式:xmlns:(你自定義名稱)="http://schemas.android.com/apk/(你應(yīng)用的包名)"
xmlns:xr="http://schemas.android.com/apk/res/com.rong.test"
或者
xmlns:xr="http://schemas.android.com/apk/res-auto"
推薦使用第二種
在布局文件中加入這些自定義的屬性:
<?xml version="1.0" encoding="utf-8"?><RelativeLayout xmlns:android="http://schemas.android.com/apk/res/android" xmlns:xr="http://schemas.android.com/apk/res/com.rong.test" android:layout_width="match_parent" android:layout_height="match_parent" android:background="@android:color/black" android:orientation="vertical" > <com.rong.activity.CustomView android:layout_width="300dp" android:layout_height="300dp" android:layout_centerInParent="true" android:background="#ff0000" xr:customText="自定義控件" xr:customTextColor="#000000" xr:customTextSize="40sp" /></RelativeLayout>
第三部繼承View重寫
package com.rong.activity;import com.rong.test.R;import android.content.Context;import android.content.res.TypedArray;import android.graphics.Canvas;import android.graphics.Color;import android.graphics.Paint;import android.graphics.Rect;import android.util.AttributeSet;import android.view.View;/** * 自定義控件 * * @author 徐榮 * */public class CustomView extends View { /** * 自定義畫筆 */ private Paint mPaint; /** * 文字范圍 */ private Rect mBounds; /** * 自定義文字 */ private String customText; /** * 自定義大小 */ private int customTextSize; /** * 自定義顏色 */ private int customTextColor; public CustomView(Context context, AttributeSet attrs) { super(context, attrs); TypedArray typedArray = context.obtainStyledAttributes(attrs, R.styleable.CustomViewStyle); // 獲取自定義文字 customText = typedArray.getString(R.styleable.CustomViewStyle_customText); // 獲取自定義文字大小 customTextSize = typedArray.getDimensionPixelSize(R.styleable.CustomViewStyle_customTextSize, 28); // 或者自定義文字顏色 customTextColor = typedArray.getColor(R.styleable.CustomViewStyle_customTextColor, Color.WHITE); // 要回收這個(gè)typedArray對(duì)象 typedArray.recycle(); initView(); } public void initView() { // 初始化畫筆 mPaint = new Paint(); mPaint.setAntiAlias(true); mPaint.setStyle(Paint.Style.FILL); mPaint.setColor(customTextColor); mPaint.setTextSize(customTextSize); // 生成文字區(qū)域 mBounds = new Rect(); } @Override protected void onDraw(Canvas canvas) { super.onDraw(canvas); // 獲取文字顯示區(qū)域mBounds mPaint.getTextBounds(customText, 0, customText.length(), mBounds); //使文字寬居中顯示=控件的寬度/2 -文字的寬度/2 float helfWidth = getWidth() / 2 - mBounds.width() / 2; //使文字高居中顯示=控件的寬度/2 +文字的寬度/2 float helfHeight = getHeight() / 2+mBounds.height()/2; //繪制文字 canvas.drawText(customText, helfWidth, helfHeight, mPaint); }}運(yùn)行!
更多關(guān)于Android相關(guān)內(nèi)容感興趣的讀者可查看本站專題:《Android開發(fā)入門與進(jìn)階教程》、《Android基本組件用法總結(jié)》、《Android視圖View技巧總結(jié)》、《Android布局layout技巧總結(jié)》及《Android控件用法總結(jié)》
希望本文所述對(duì)大家Android程序設(shè)計(jì)有所幫助。
新聞熱點(diǎn)


疑難解答
圖片精選